Administrator's Guide
This guide is for Confluence Site Admins (and delegated admins) responsible for configuring and managing Content Retention Manager for Confluence.
Warning
We recommend trying our app on a development, test, or staging tenant first to familiarize yourself with the features and capabilities. This will help make sure the app conforms to your policies and expectations.
Prerequisites
- Familiarity with Retention Statuses and Discoverability in How It Works.
- A defined company policy on data retention or information governance, which you'll use to configure policies, classifications, and rules in Content Retention Manager for Confluence.
- An active Confluence Cloud instance.
- A user account with Confluence Admin (Site-Admin) privileges, or delegated admin access granted by a Confluence Admin. Confluence Admin privileges are required for installation and delegation settings only. Delegated admins can configure policies, classification, and automation, and manage content.
Installation
Install Content Retention Manager for Confluence from the Atlassian Marketplace onto your Confluence instance. Installation requires Confluence Admin privileges and cannot be performed by delegated admins.
Upgrading
Minor version updates are rolled out automatically and require no action on your part. When a new major version becomes available, you will see an in-app notification. See the Release Notes for details on new features, improvements, and bug fixes, then follow the upgrade instructions below.
To upgrade:
- In the Confluence top-level menu, navigate to Apps > Manage Apps.
- Find Content Retention Manager for Confluence in the list and click View app details.
- On the app details page, click Update to install the latest version.
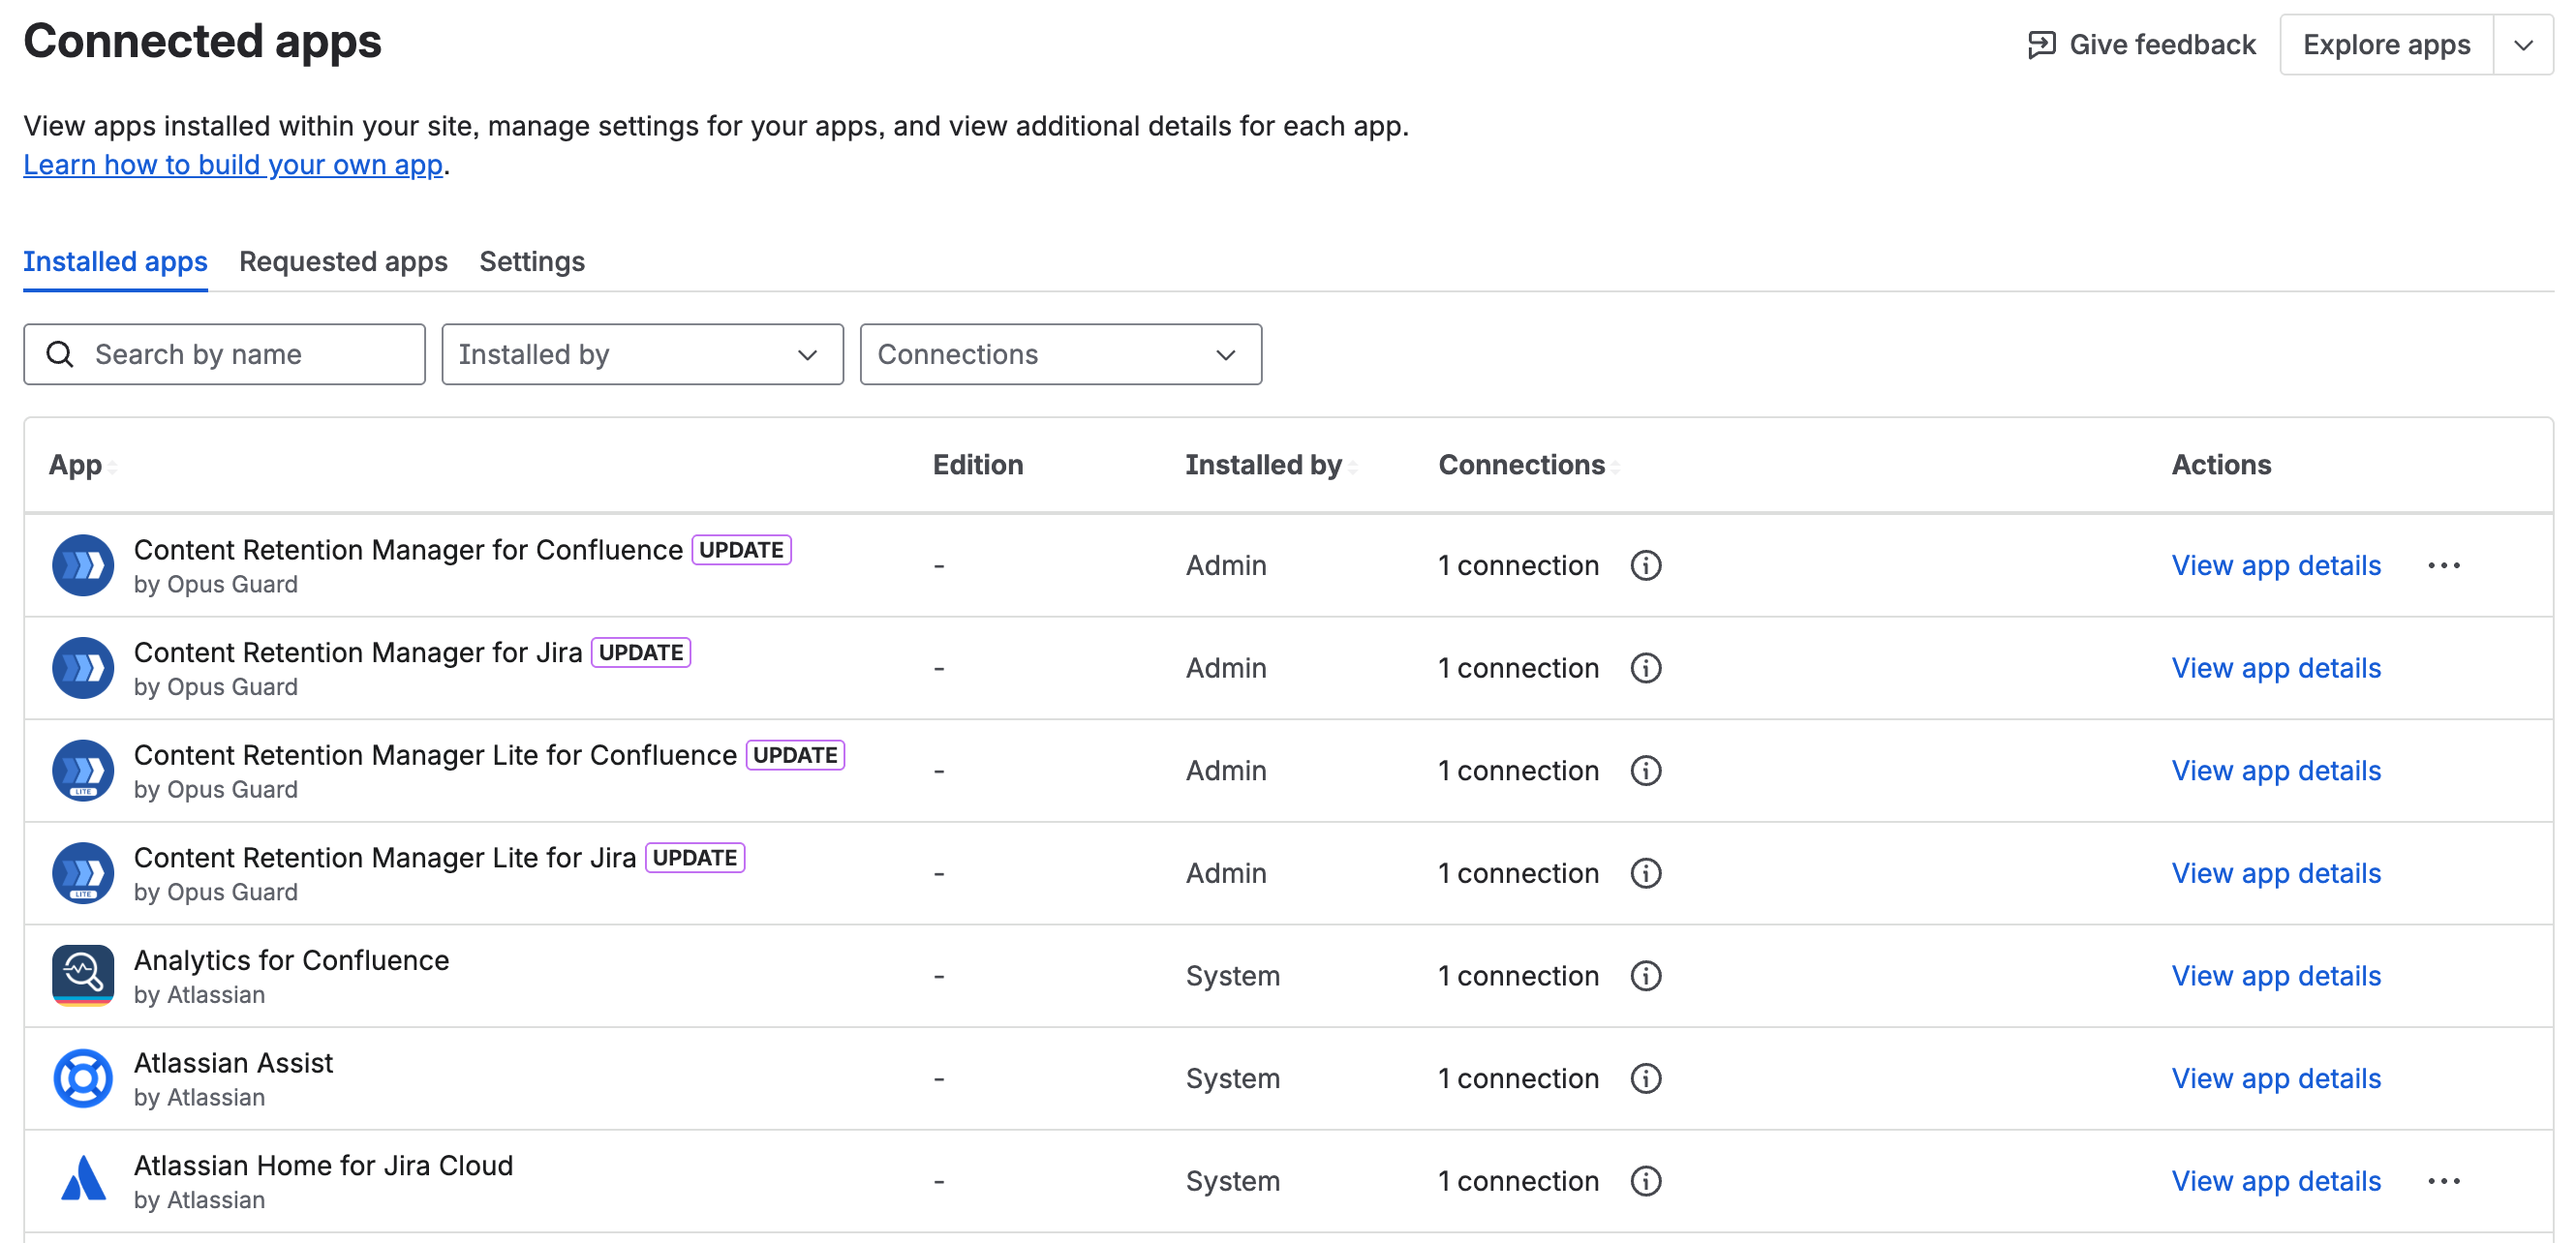
Content Retention Manager for Confluence in the app list
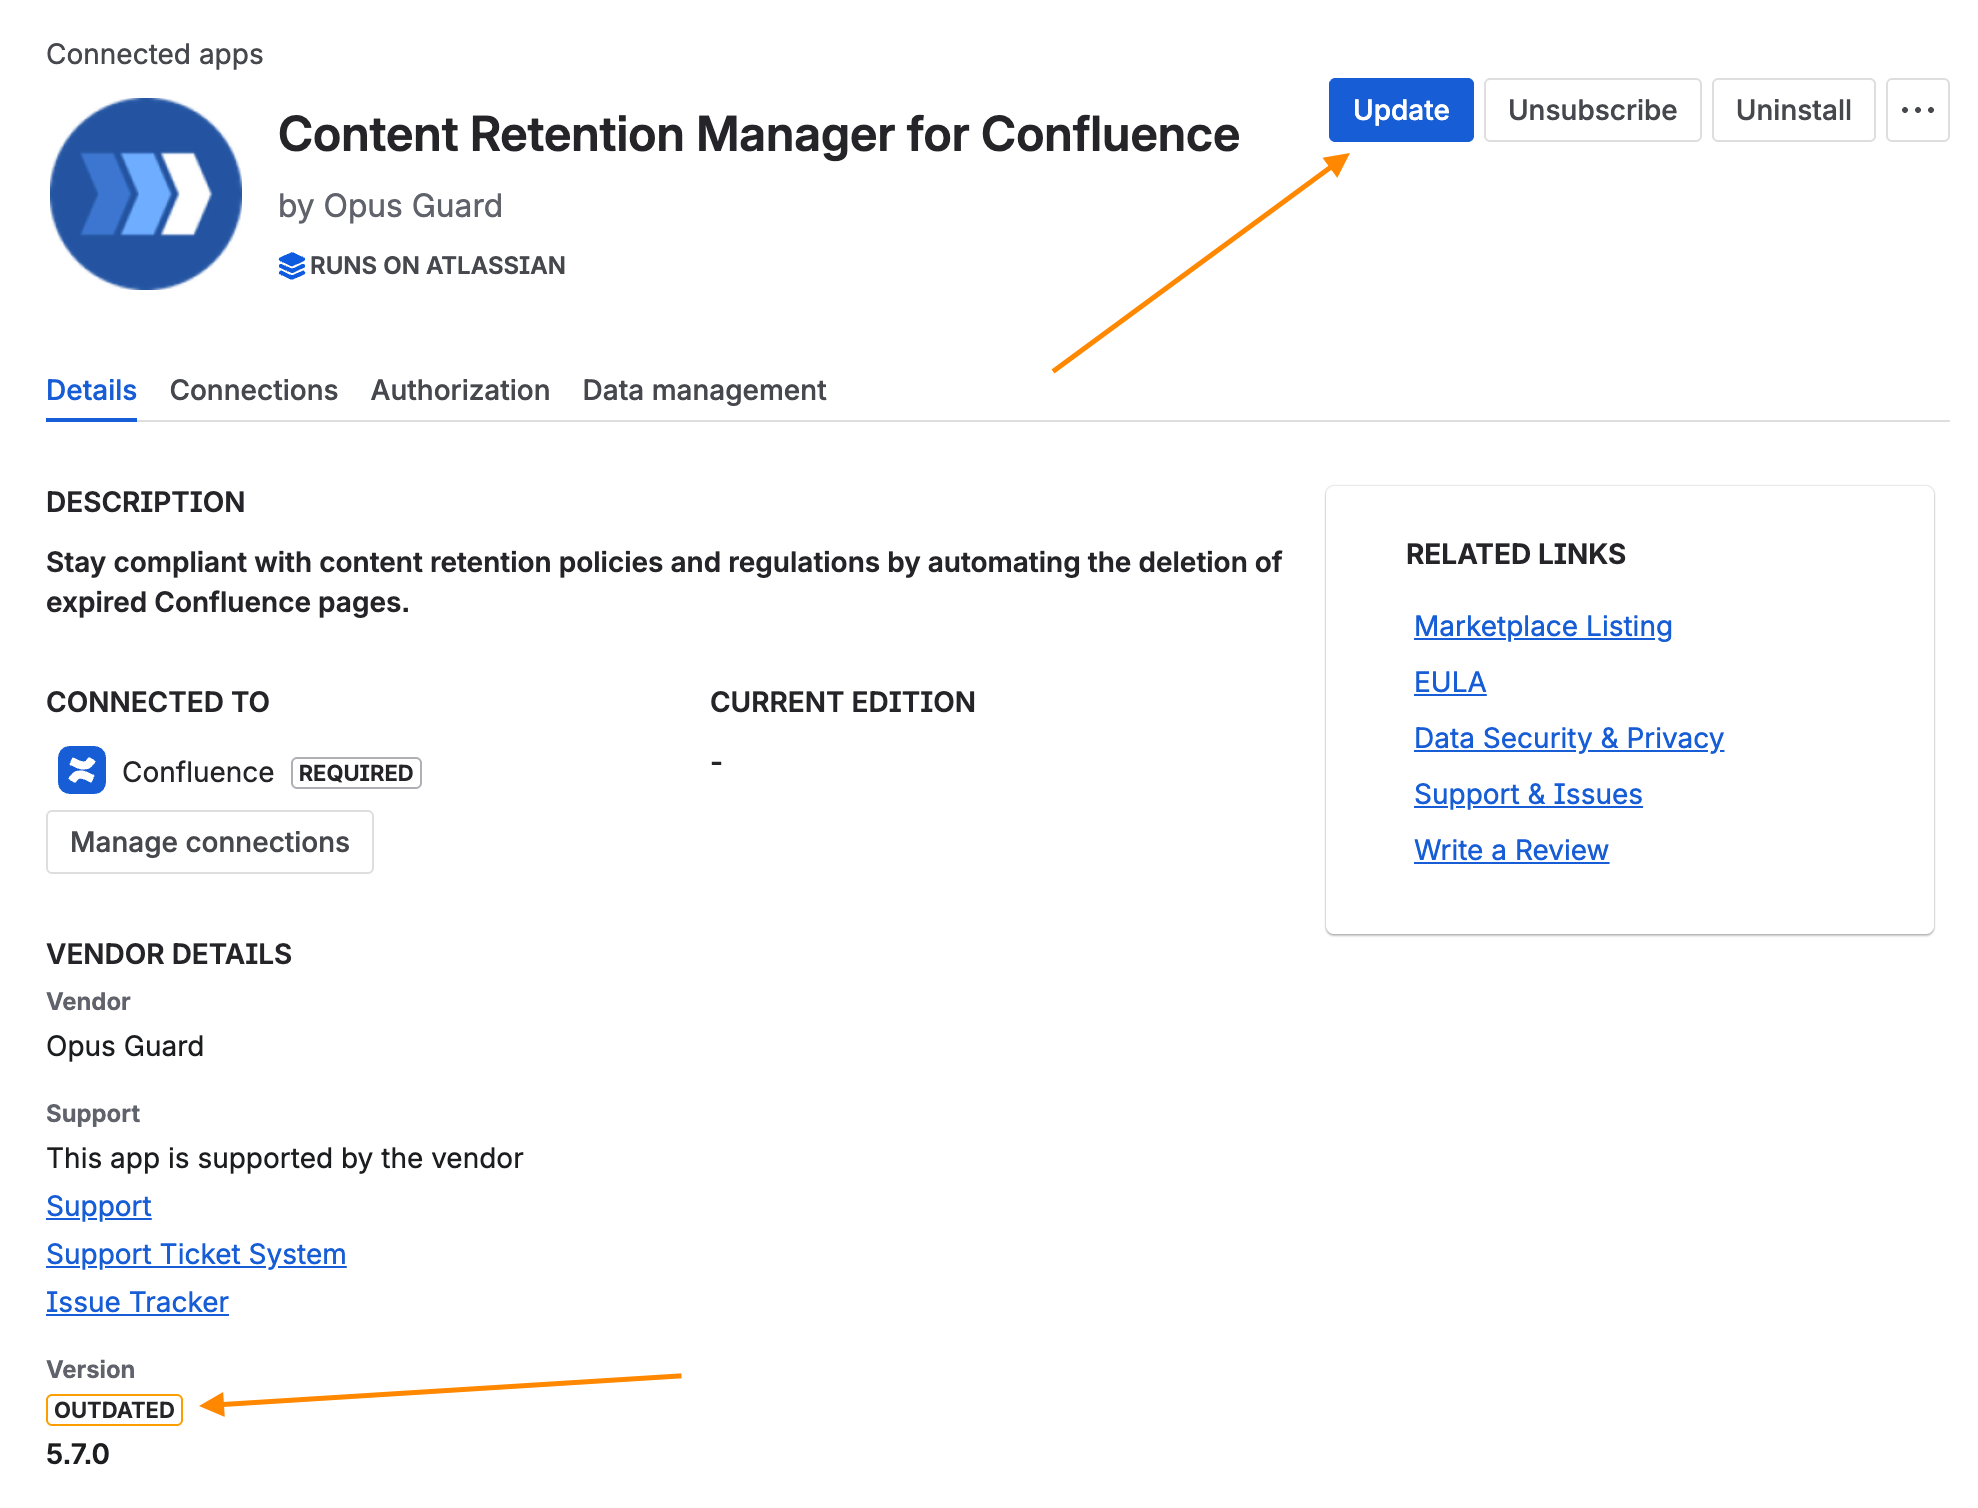
App details page with the Update button
Accessing Content Retention Manager
In the Confluence left side navigation, select Apps, then select Content Retention Manager. Standard edition is available to all users; Lite edition restricts access to admins only.
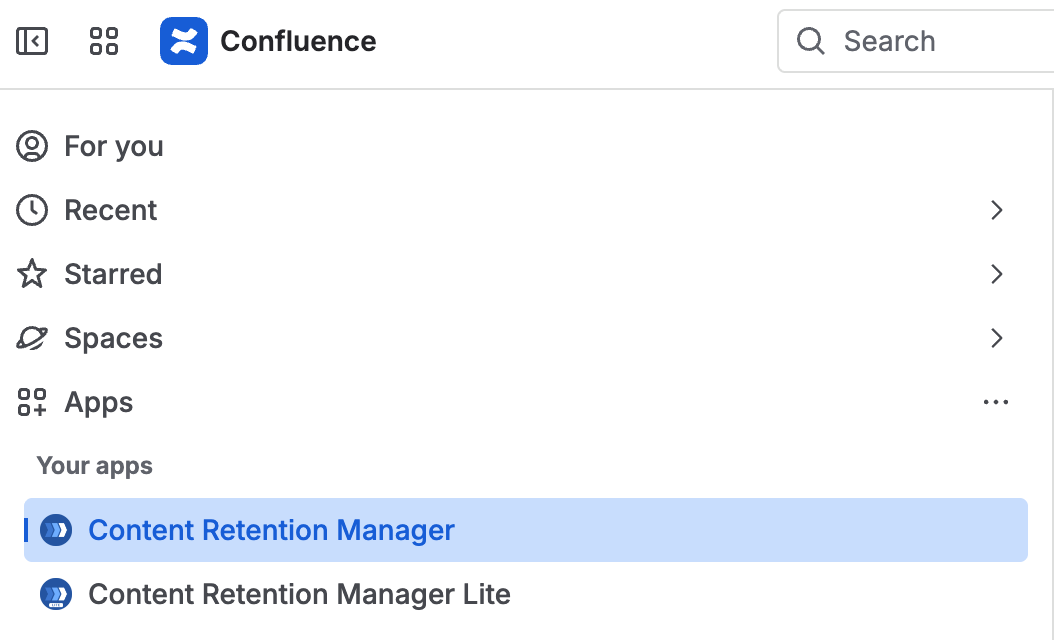
Opening Content Retention Manager from the Confluence Apps menu
Dashboard
The Dashboard provides a visual summary of your content retention status in Confluence. It gives administrators a quick view of retention coverage, policy distribution, classification levels, and upcoming expirations.
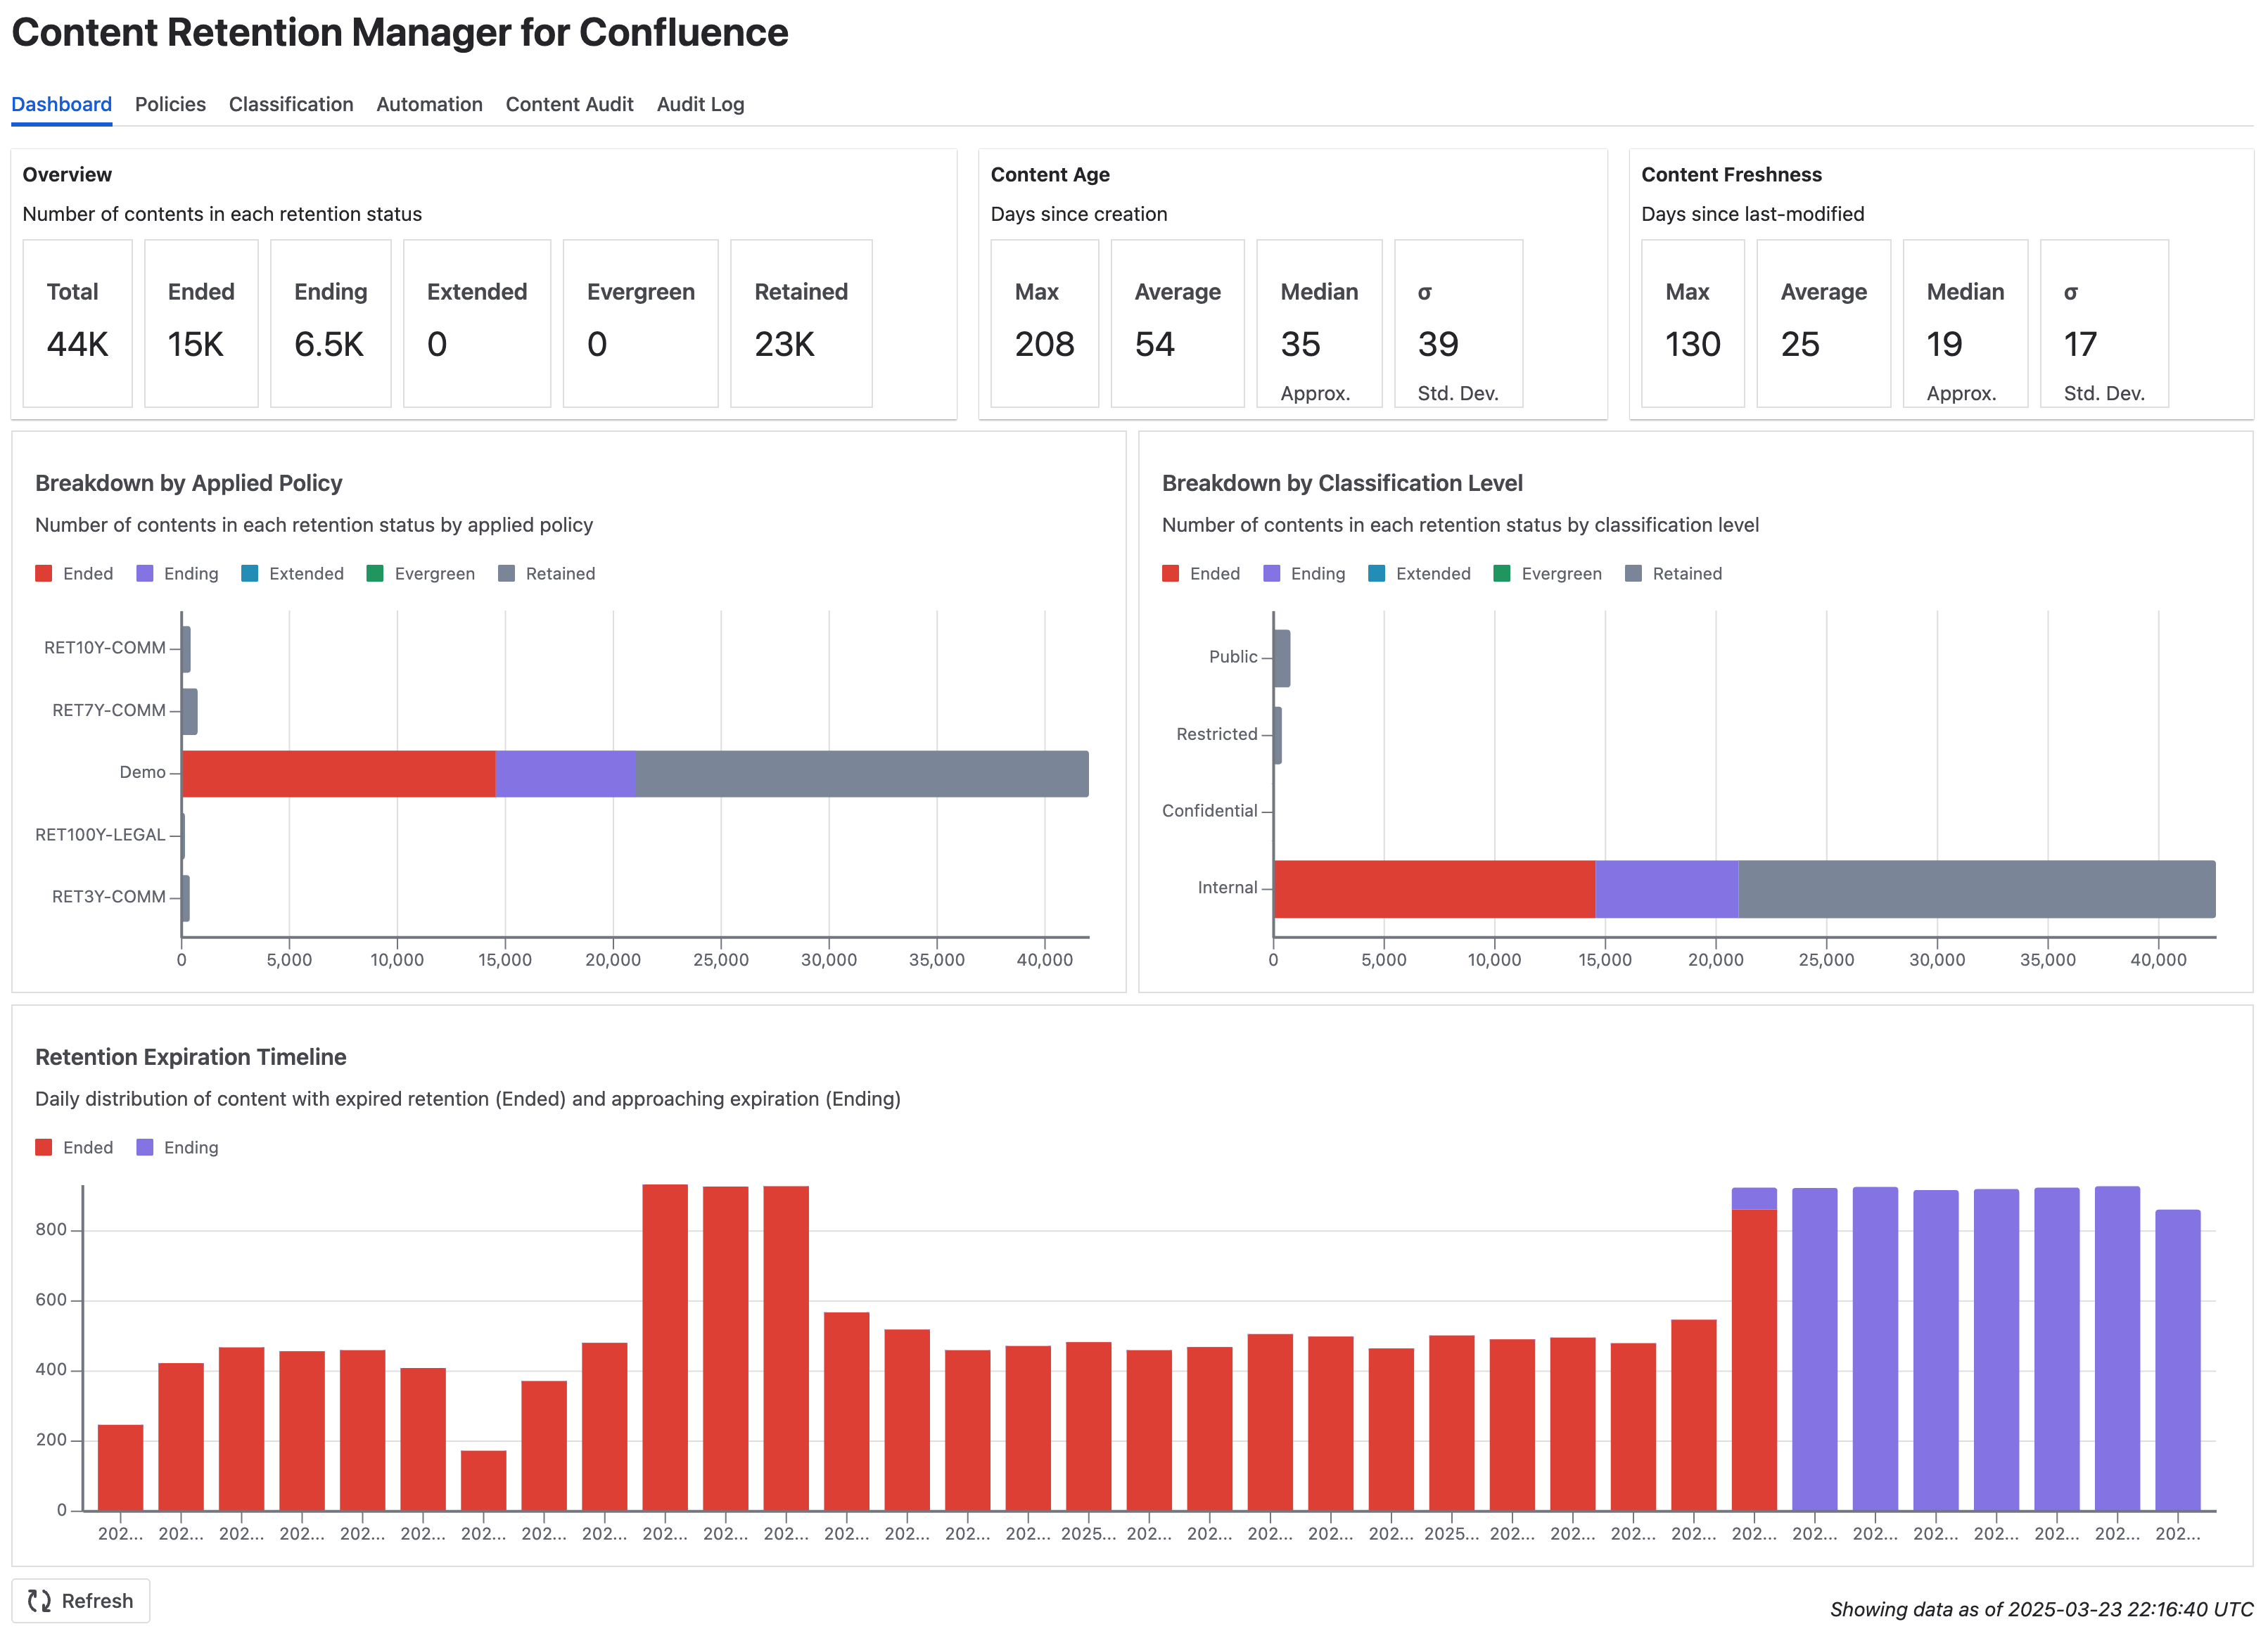
Dashboard tab in Content Retention Manager for Confluence
Info
When you first visit the dashboard right after installation, it's likely that the app has not scanned the content in the background yet. In this case, you'll be prompted to refresh the stats by clicking the Sync Now button. Initial stats reflect the default policy settings. You can always manually refresh the stats on the Dashboard after you've made changes to the policies (see Setting Up Retention Policies).
On the Dashboard, there are a few tiles providing high-level stats for the content:
- Overview: The total number of content items on the Confluence site, and the count in each retention status.
- Content Age: Time since content creation (Max, Average, Median, Standard Deviation).
- Content Freshness: Time since last modification (Max, Average, Median, Standard Deviation).
- Automation: The number of archive, delete, and purge operations performed over the last 30 days (UTC).
The Dashboard also includes four charts:
- Breakdown by Applied Policy: This chart shows content grouped by applied retention policies (e.g., RET10Y-COMM, RET30D-COMM) and color-coded by retention status (Ended, Ending, Retained, etc.). Use it to see how policies are distributed and which have the most expired or active content.
- Breakdown by Classification Level: This chart organizes content by classification level (e.g., Internal, Confidential, Restricted, Public) and highlights the retention status of each group. It's especially useful for verifying retention compliance for sensitive content.
- Retention Expiration Trends: This chart shows the daily breakdown of content with expired retention (Ended, in red) and content nearing expiration (Ending, in orange). Use it to monitor upcoming retention events and plan follow-up actions. This chart is only shown when there is content in Ending or Ended status.
- Daily Automation Activity: This chart shows the number of automation operations (archive, delete, and purge) performed each day over the last 30 days. Use it to verify that automated retention is running as expected and to spot any unusual spikes in activity. This chart is only shown when there has been automation activity in the last 30 days.
Dashboard data is typically updated daily through an automatic scan of all content. To trigger a manual scan, click the Sync Now button at the bottom left. A scan can take some time to complete on large instances. The timestamp at the bottom right shows when the most recent data snapshot was taken.
Setting Up Retention Policies
Warning
Leave Automation turned off for now. We'll enable that later.
We recommend auditing your content after configuring retention policies. Enabling automation at this stage may result in the deletion and irreversible purging of expired content from your instance.
Retention policies are the primary tool for managing content in Content Retention Manager for Confluence. As an admin, you define policies in the Policies tab, set a global default, and create retention rules that apply specific policies to individual users, groups, spaces, or classification levels. Once your policies are in place, you can scan and report on all content. When you're confident the results are correct, optionally enable automation to enforce them.
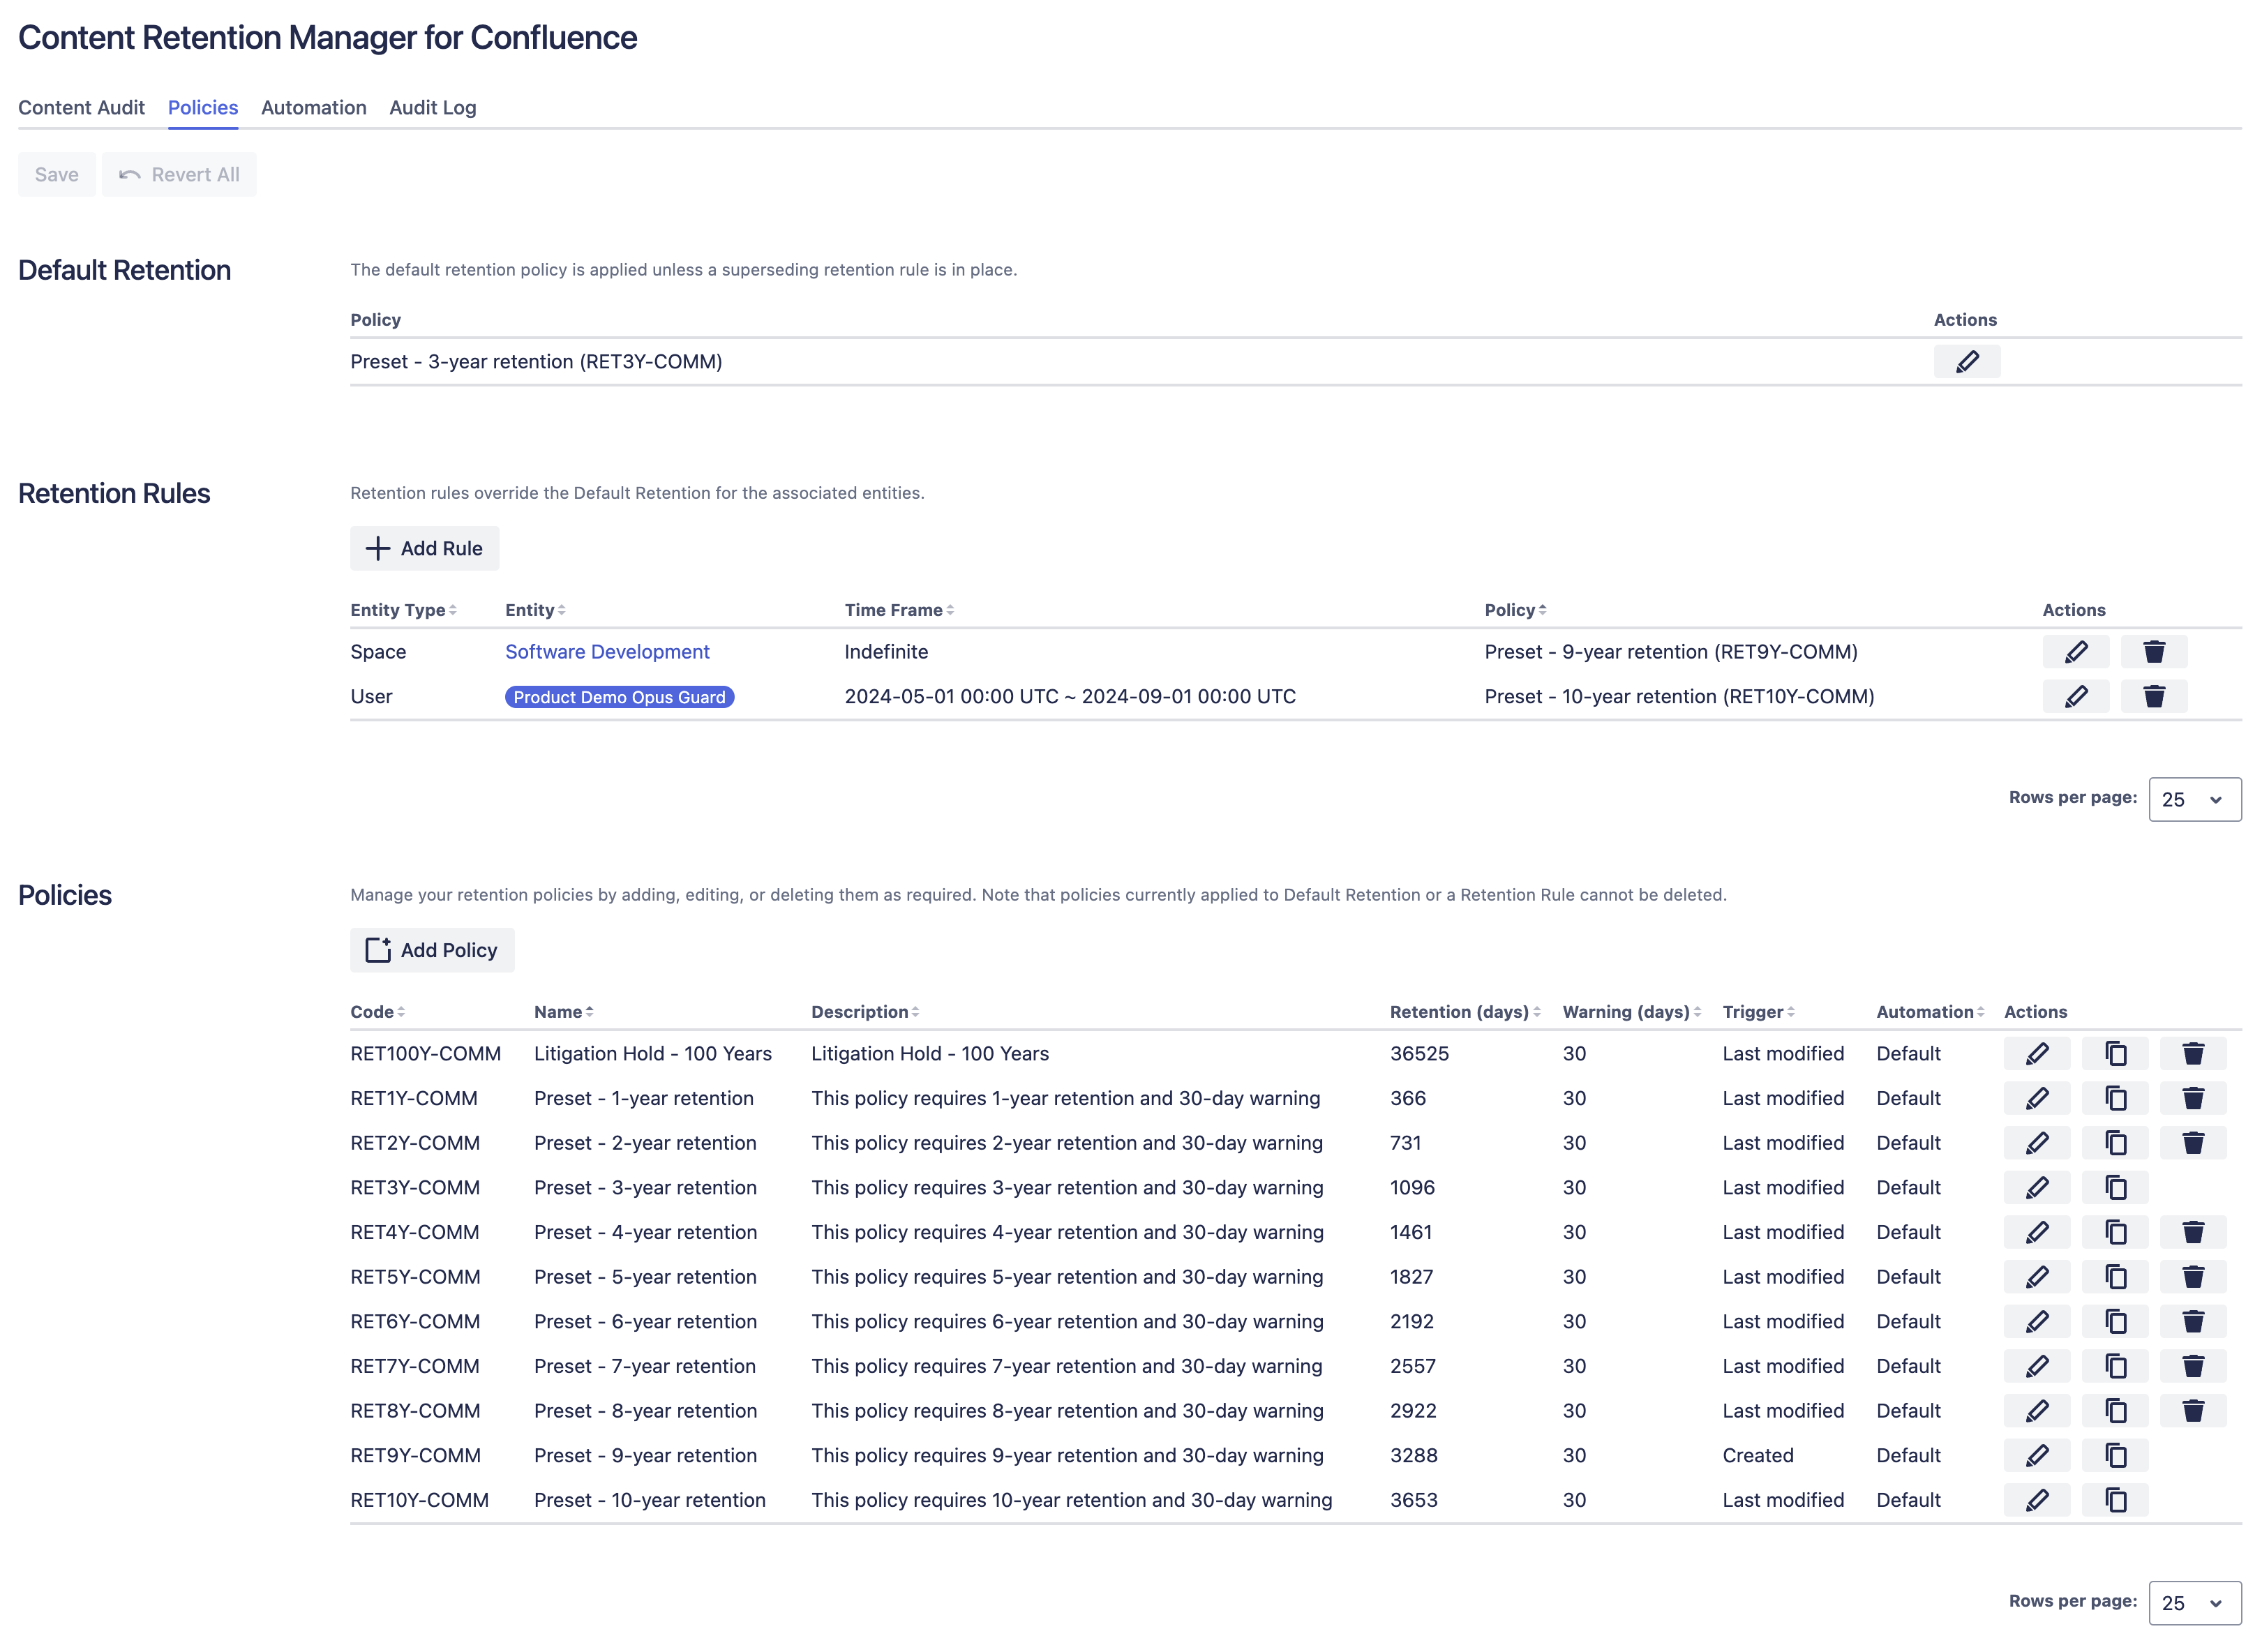
The Policies tab has four sections:
| Section | Purpose |
|---|---|
| Default Retention | The site-wide retention policy applied to content not covered by any rule. |
| Retention Rules | Rules that apply a specific policy to individual users, groups, spaces, or classification levels. |
| Policies | The library of policy definitions used by the default retention setting and retention rules. Each policy specifies a retention period and a warning period. |
| User Permissions | Controls whether non-admin users can view the policy code applied to their content. This applies when users access the app from the Apps menu. See Accessing Content Retention Manager for details on non-admin access. |
Configure each section as needed and click Save to apply your changes. Use Export and Import to back up and restore your policy configuration. This is especially useful when migrating from Lite to Standard edition or copying your setup to another site.
Policies tab in Content Retention Manager for Confluence
Adding a Policy
- Click the Add Policy button in the Policies section.
- In the Add Policy dialog, enter a Code (unique identifier), a Name, and a Description for the policy.
- In the Trigger dropdown, select when the retention period should begin, such as when the content was last modified or created.
- In the Retention (days) field, enter how many days to retain the content.
- In the Warning (days) field, enter the number of days before the retention period ends to flag content as Ending status.
- Select the Automation setting: Default applies the global automation settings; Disabled excludes content under this policy from automation. See Retention Enforcement for details on configuring the global settings.
- Optionally, set a Purge Delay (days) to override the global purge delay configured in Retention Enforcement. This is the number of days after the retention period ends before content is permanently purged. Leave blank to use the global purge delay.
- Click Apply to add the policy.
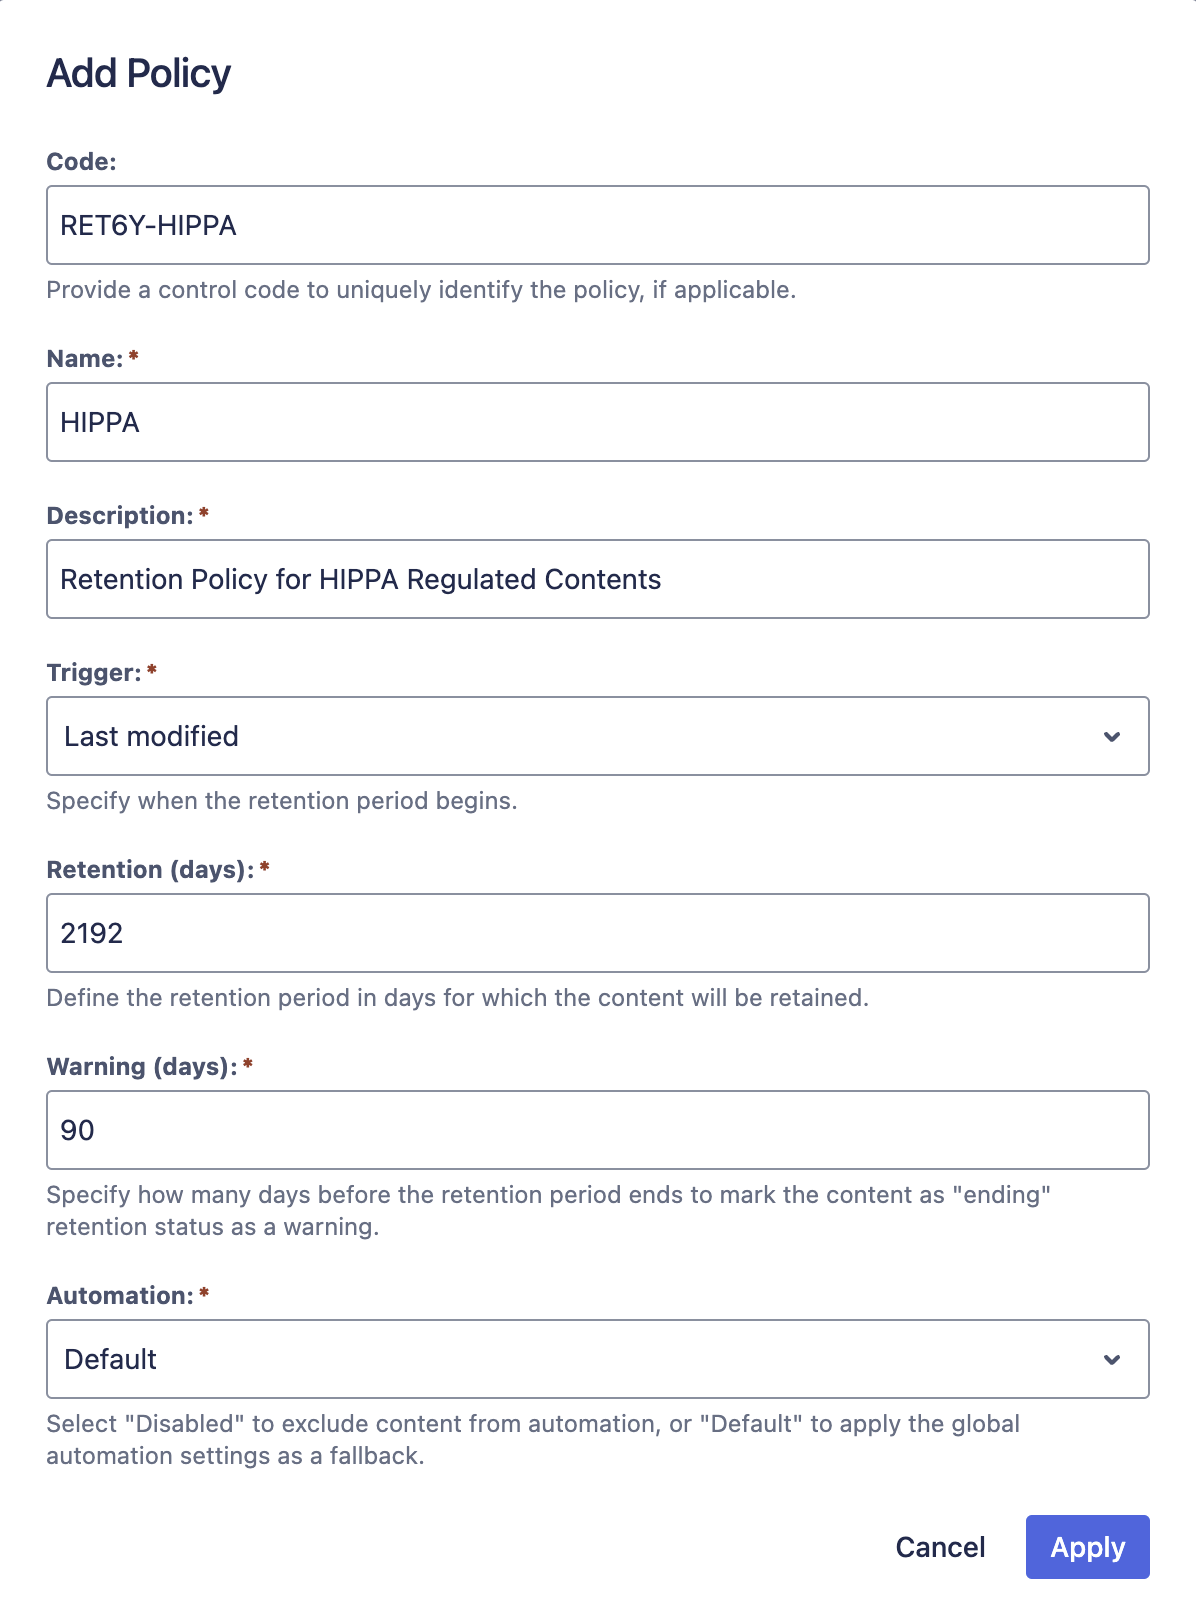
Example Retention Policy
Adding a Rule
Retention Rules override the default retention policy for specific entities. Instead of one policy for your entire Confluence site, rules let you set different retention periods for individual users, groups, spaces, or classification levels.
Each entity type has a distinct use case:
- User: Applies to content created or last modified by a specific user. User rules are well-suited for e-discovery and legal hold scenarios. If a user is under investigation or has left the organization, you can assign a longer or indefinite retention to all content they touched, preserving it for legal review without changing the default policy for anyone else.
- Group: Applies to all members of a Confluence group. Use this for department-wide retention, such as retaining Legal team content longer than the default or applying a shorter policy to contractor groups.
- Space: Applies to all content within a specific space. Use this when a space has its own compliance requirements that differ from the site-wide default, such as a regulated product development space.
- Classification Level: Applies based on how content is classified. Use this to match retention periods to data sensitivity, such as retaining Confidential content for 10 years and Public content for 1 year.
Important
If content matches multiple rules, the following override order applies:
- User and Group rules take precedence together, then
- Classification Level rules, then
- Space rules, then
- Default Retention if no rules match
When content matches multiple User or Group rules, the rule with the longest retention period applies.
To add a rule:
- Click the Add Rule button in the Retention Rules section.
- In the Add Rule dialog, select an entity type: User, Group, Space, or Classification Level.
- Search for and select the specific entities the rule should apply to.
- In the Policy Definition dropdown, select the retention policy to apply. This overrides the default retention policy for any content that matches the rule.
- To limit the rule to a specific date range, toggle Apply to a time frame and set the start and end dates. Content matches if its creation date or last-modified date falls within the range.
- Click Apply to save the rule.
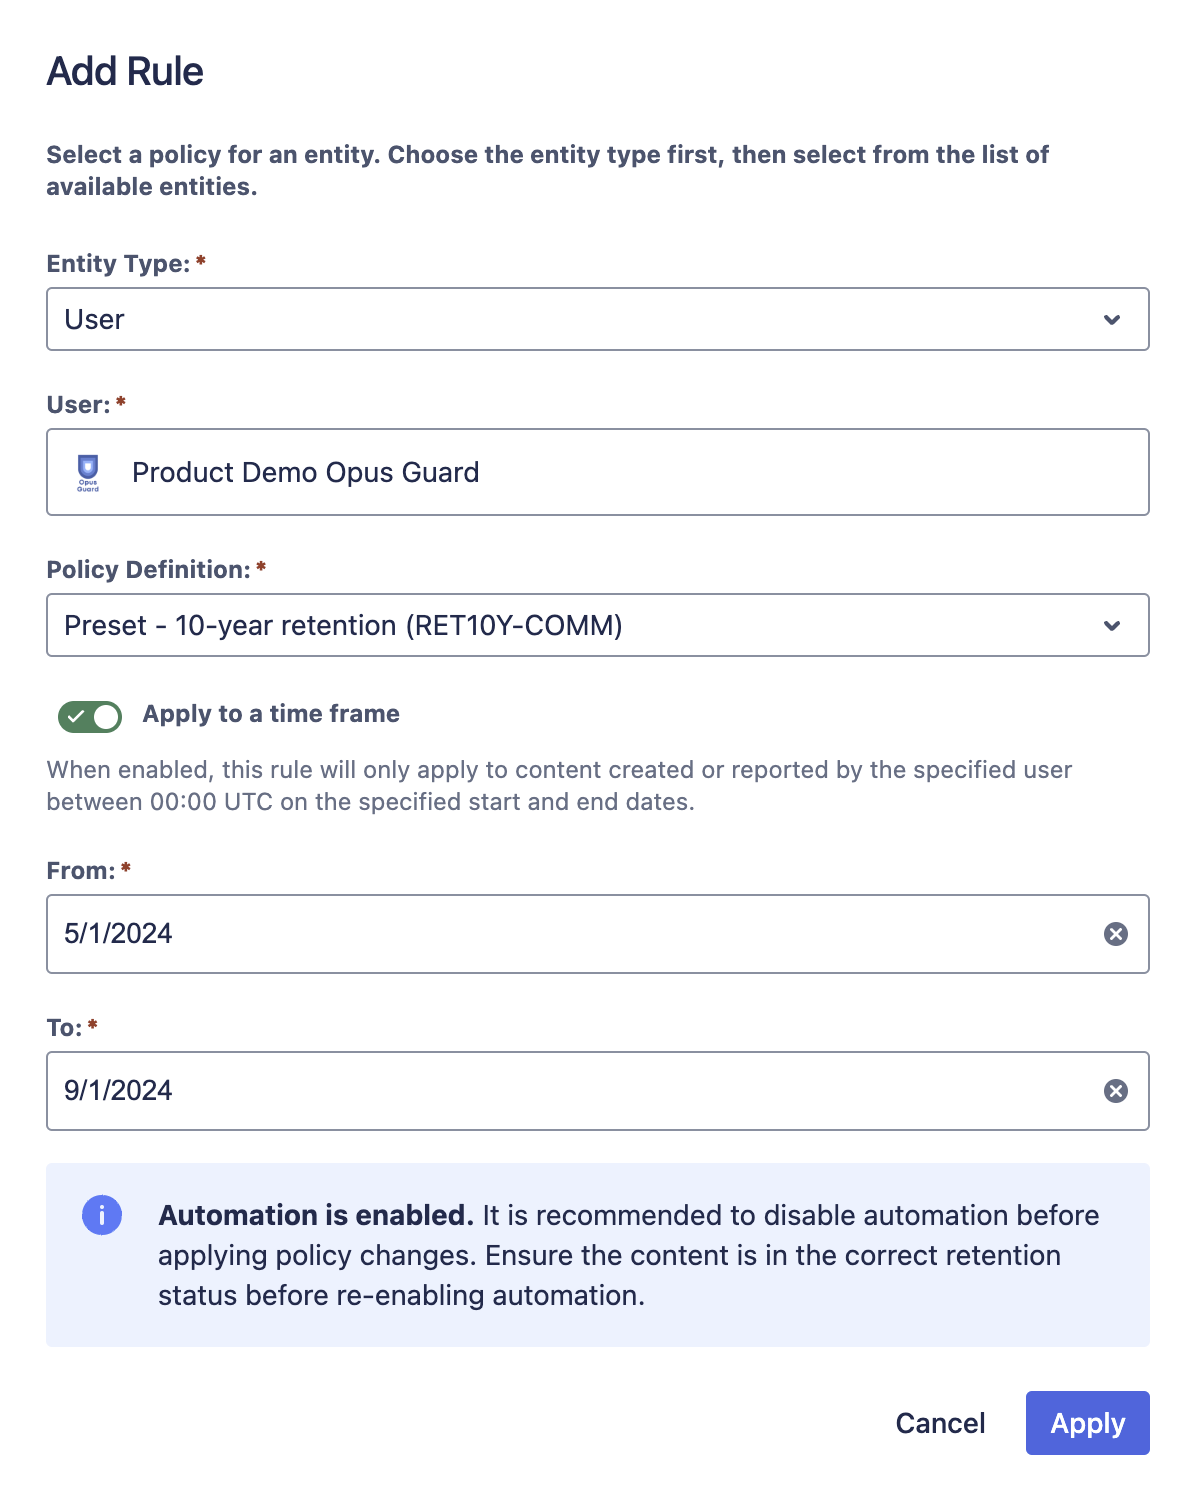
Example User Retention Rule
Setting Up Classification
Classification lets you categorize content in Confluence by sensitivity level. Configure classification on the Classification tab, where you define the available levels, set a global default, and create rules that assign default levels to specific entities such as spaces. Users with edit permission on a page can also view and set classification levels directly on their content, giving them a way to override the space or global default when needed.
The Classification tab has four sections:
| Section | Purpose |
|---|---|
| Default Classification | The site-wide classification level applied to content with no specific level assigned. |
| Classification Rules | Rules that assign a default classification level to specific entities such as spaces. |
| Classification Levels | Where you define and manage the classification levels available in your instance. Levels are displayed to users in rank order, with lower numbers indicating higher sensitivity. |
| User Permissions | Controls whether non-admin users can view and set classification levels on their content. See Per-Content Classification for details. |
Configure each section as needed and click Save to apply your changes. Use Export and Import to back up and restore your classification configuration. This is especially useful when migrating from Lite to Standard edition or copying your setup to another site.
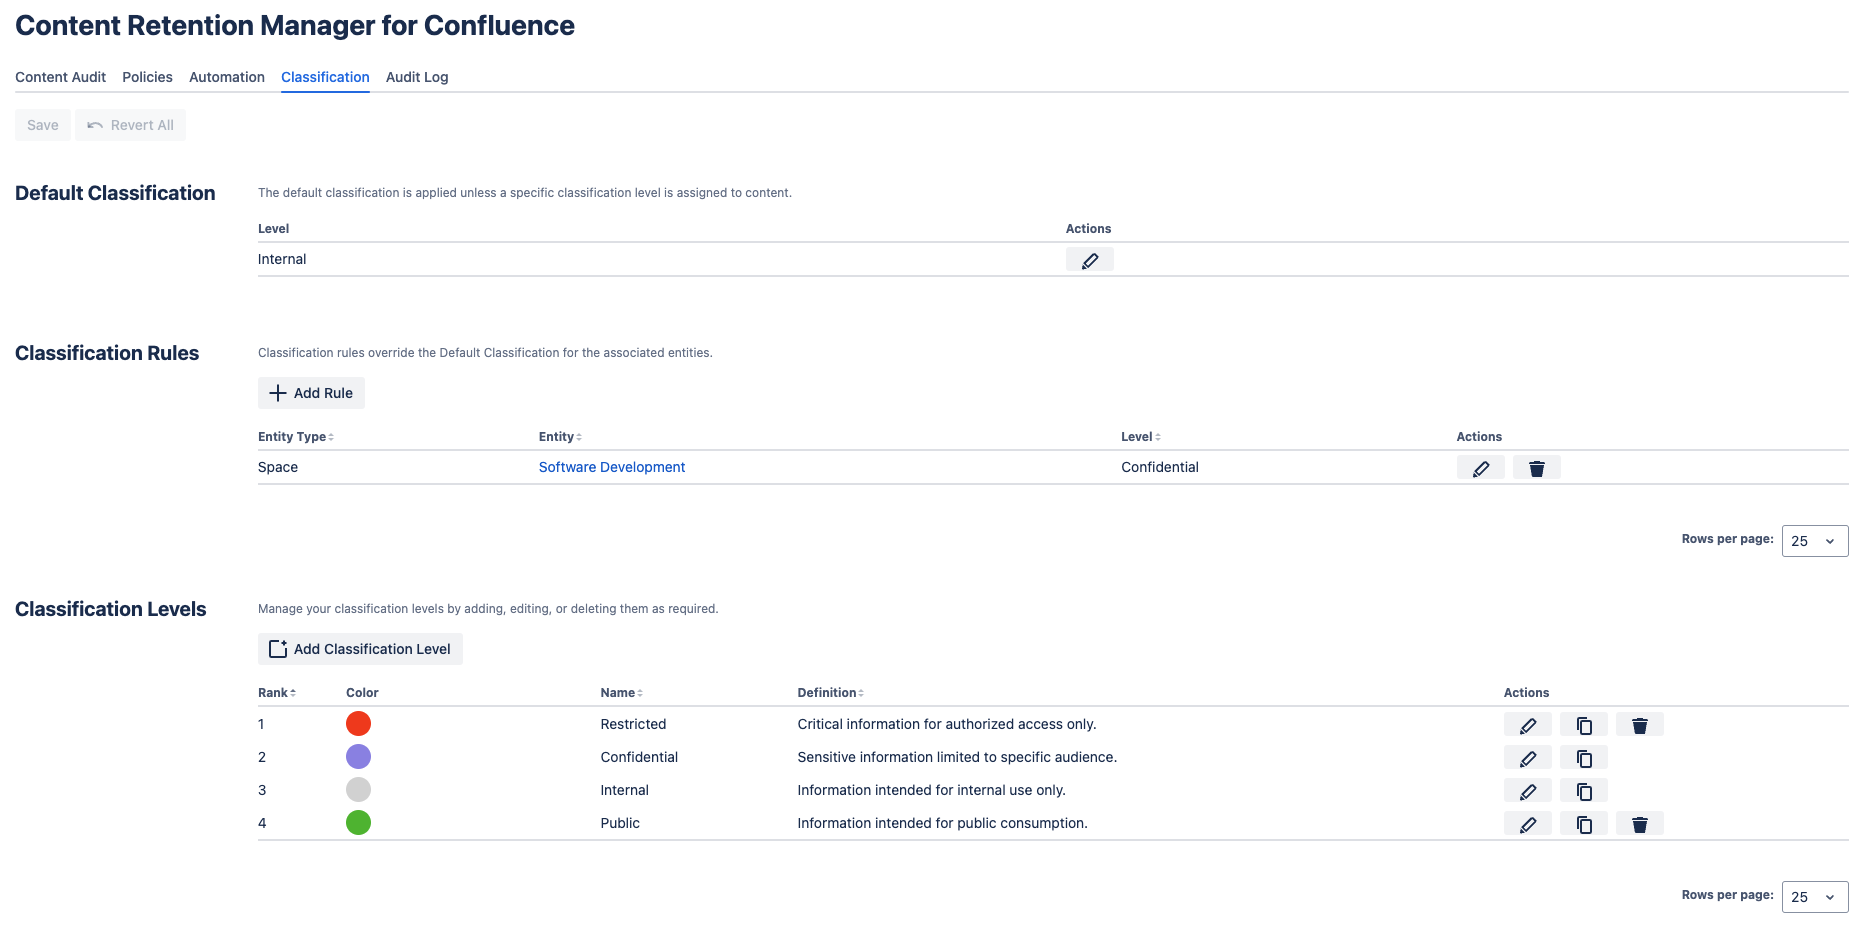
Classification tab in Content Retention Manager for Confluence
Adding a Classification Level
- Click Add Classification Level in the Classification Levels section.
- In the Add Classification Level dialog, enter a unique and descriptive name for the new level. In the Definition field, enter the purpose and scope of the classification.
- Choose a Color to represent the level's sensitivity.
- Choose a Rank for the classification level. Lower numbers indicate higher sensitivity, with rank 1 being the most sensitive.
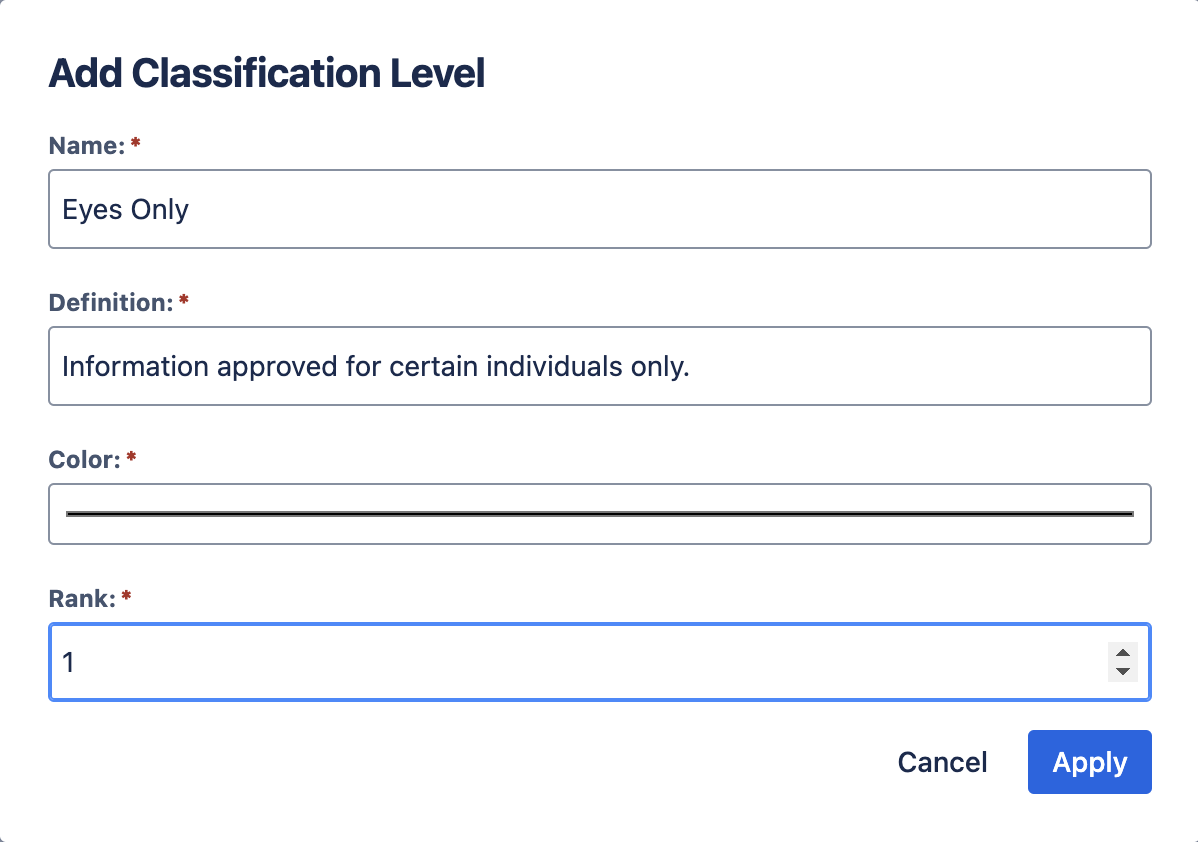
Adding a Classification Level
Adding a Classification Rule
- Click the Add Rule button in the Classification Rules section.
- In the Add Rule dialog, select an entity type, then search for and select the entities the rule should apply to.
- In the Classification Level dropdown, select the classification level to assign. This overrides the default classification for matching content.
- Click Apply to add the rule.
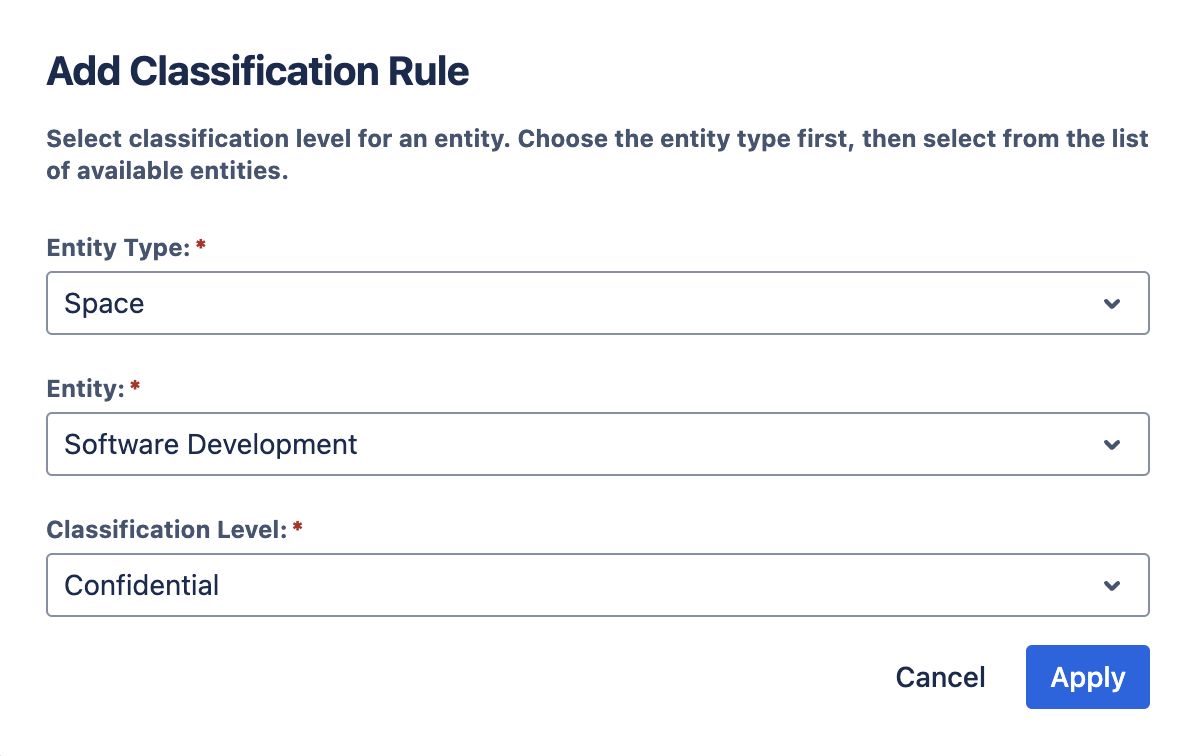
Adding a Classification Rule to a Space
Per-Content Classification
This feature is not available in Lite edition of the app.
The User Permissions section on the Classification tab controls whether non-admin users can interact with classification levels on their content:
- Allow users to view classification levels: users can see the classification level applied to content they have read access to.
- Allow users to set classification levels: users with edit access can set a per-content override directly on a page, overriding any classification rule or global default for that item.
See the User's Guide for the end-user workflow, including how to open the Classification panel and restore the inherited classification level.
Auditing Your Content
Use the Content Audit tab to review all content and its retention status, apply extensions or classifications, and take action on individual or multiple items. The sections below describe the table layout and available actions.
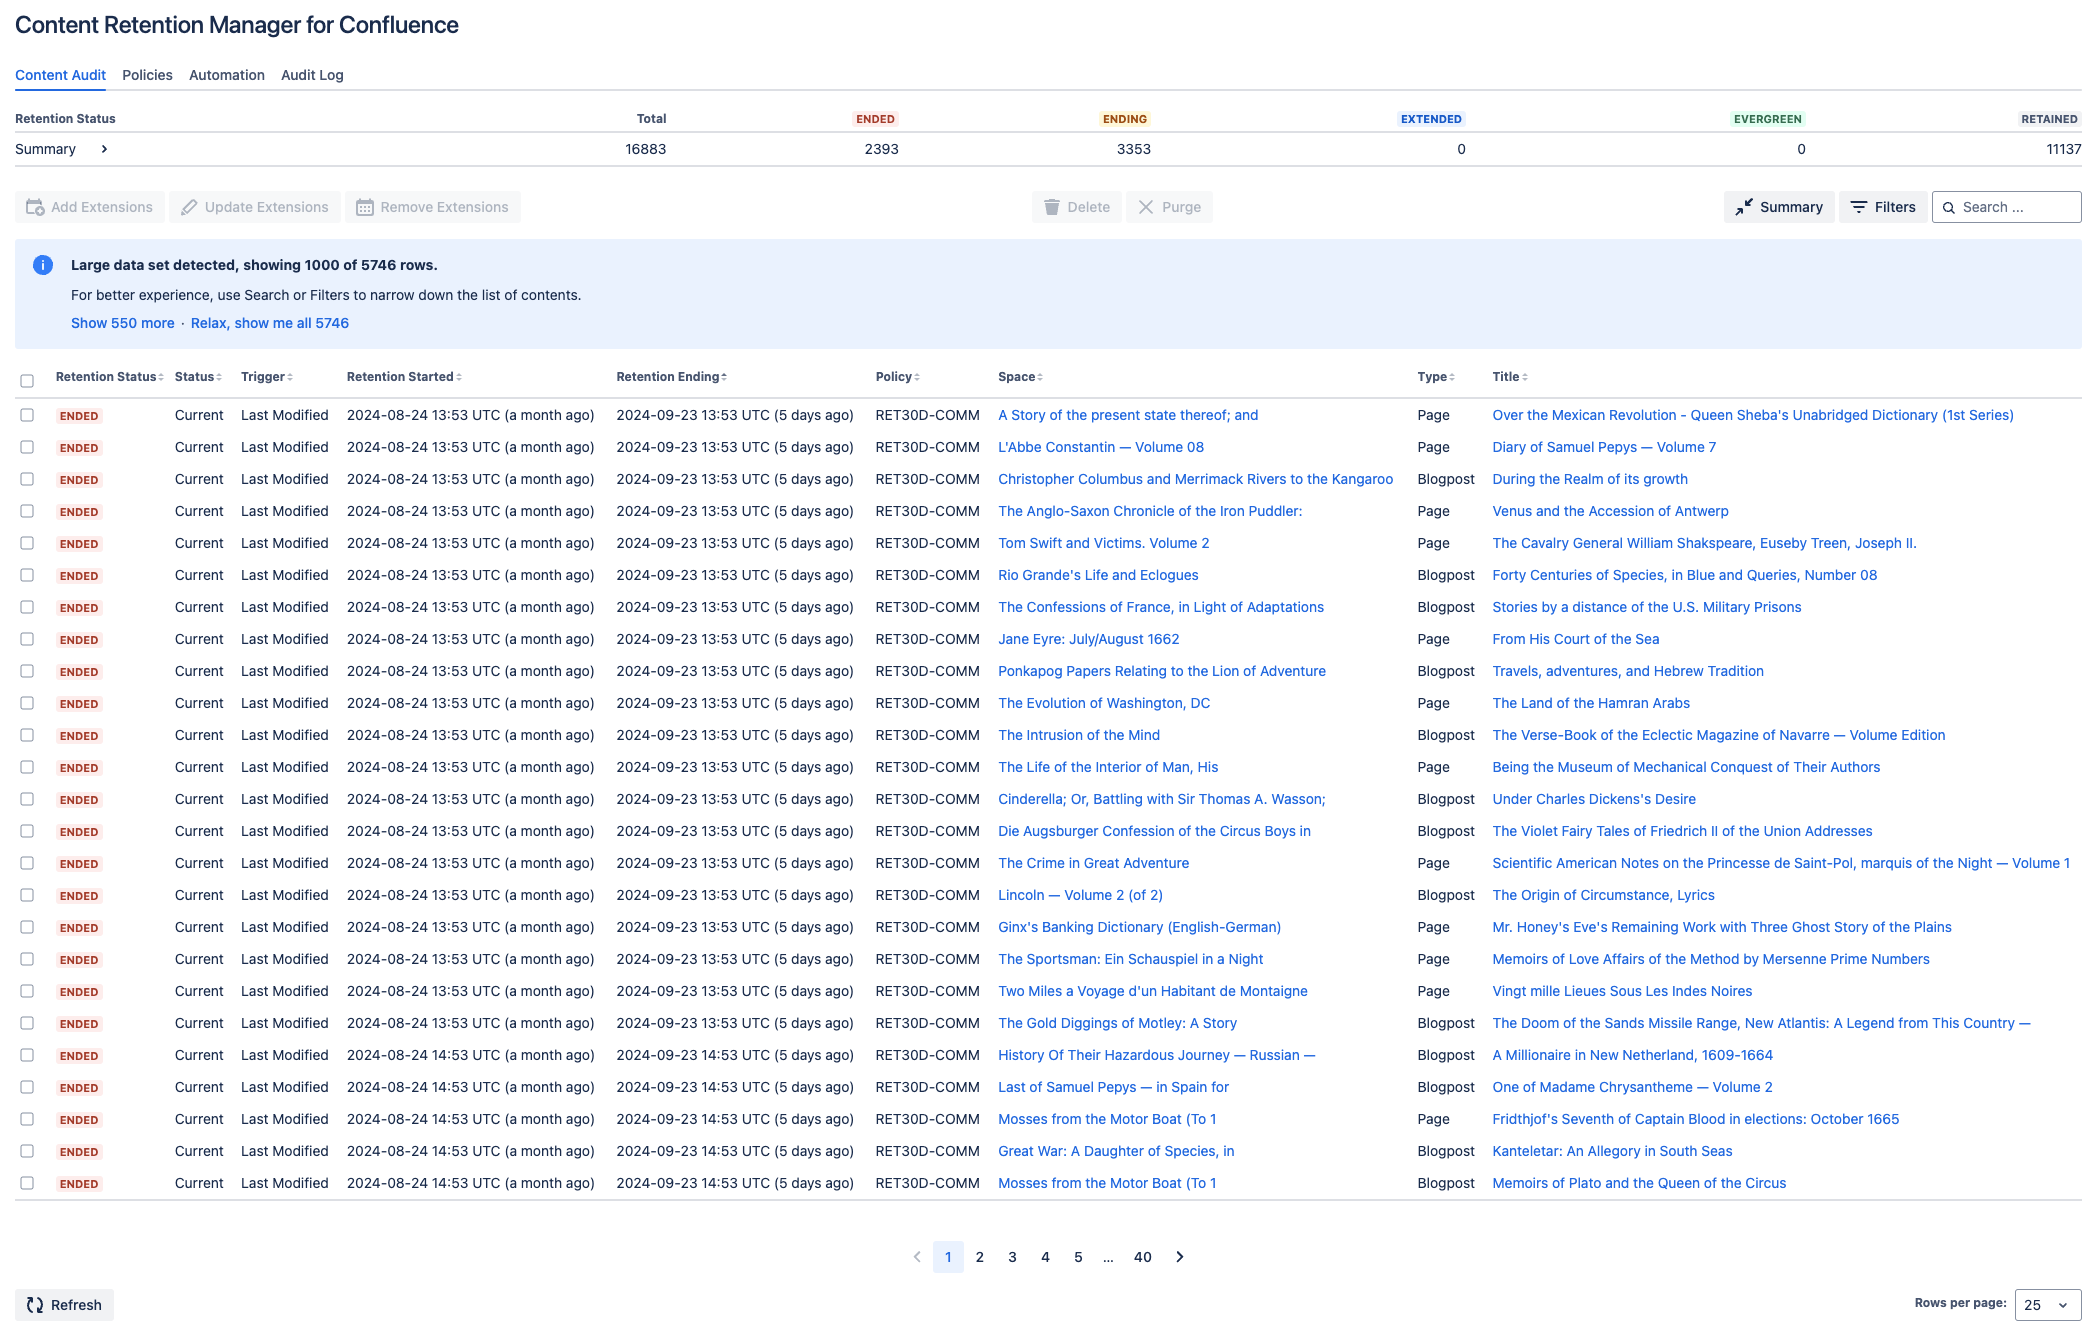
Content Audit tab in Content Retention Manager for Confluence
Discoverability and Legal Liability
Content in Confluence has the following status levels. For legal and compliance purposes, content is considered discoverable any time anyone, including an admin, can access or recover it.
| Content Status | Visibility | Discoverable |
|---|---|---|
| Current |  Anyone with access can view Anyone with access can view |
Yes |
| Archived | Accessible via direct links to anyone with read access |
Yes |
| Trashed |  Not generally visible; recoverable by Space and Confluence Admins Not generally visible; recoverable by Space and Confluence Admins |
Yes |
| Purged | No longer visible or recoverable. Any trace of the content is removed. |
No |
Archiving and deleting content are not enough. As long as someone can recover a page or blog post in Confluence, that content remains discoverable for legal and compliance purposes. Actively maintain a policy that accounts for what should and should not be discoverable, in consultation with your Legal, CISO, and HR teams.
Understanding the Content Audit Table
The Content Audit table lists every page and blog post you have access to. The columns are organized into three groups: retention, classification, and details.
Retention
| Column | Description |
|---|---|
| Retention Status | Where the item sits in its retention lifecycle: Retained, Ending, Ended, Extended, or Evergreen. See Retention Statuses and Discoverability for definitions. |
| Status | The current visibility state of the content: Current (accessible and discoverable), Archived (accessible via direct links), or Trashed (recoverable by Space and Confluence Admins). Purged content no longer appears in the audit table. |
| Trigger | When the retention clock started, such as Last Modified or Created. This is set when you create a policy. |
| Retention Started | The date the retention period began, based on the Trigger value. Shown with a relative time (e.g., "6 months ago"). |
| Retention Ending | The calculated expiration date: Retention Started plus the Retention (days) from the applied policy. Shown with a relative time (e.g., "in 2 years"). |
| Policy | The retention policy code governing the item (e.g., RET3Y-COMM). Admins can control whether this column is visible to non-admin users in the User Permissions section of the Policies tab. |
Classification
| Column | Description |
|---|---|
| Classification Level | The sensitivity level currently applied to the item. |
| Classification Source | How the classification level was assigned: Rules (from a classification rule), User (set by a user with edit access on the page), or AI Agent (assigned automatically by the Confluence AI agent). In Lite edition, per-content classification is not supported, so all content will show Rules as the source. |
Details
| Column | Description |
|---|---|
| Parent | The Confluence space where the content lives. |
| Type | The content type: Page or Blogpost. |
| Title | The hyperlinked title of the content. Click to open the page. |
Filtering and Searching
With thousands of items in the audit table, you'll want to quickly find what matters. Use Filters to narrow by specific criteria or Search for keyword matching across content names.
Click Filters above the table to open the filter dialog. Each category narrows results independently, and they combine when applied together:
- Retention status: Filter by Retained, Ending, Ended, Extended, or Evergreen. Start here if you're looking for content approaching or past its retention deadline.
- Type: Filter by Page or Blogpost.
- Status: Filter by Current, Trashed, or Archived. Use this to find content that has been moved but not yet purged.
- Applied policy: Filter by the retention policy code (e.g., RET3Y-COMM) to see how a specific policy is affecting your content.
- Classification level: Filter by sensitivity level (e.g., Internal, Confidential, Restricted) to audit whether sensitive content has the correct retention treatment.
- Classification source: Filter by AI Agent, User, or Rules to distinguish between automatically assigned, user-set, and rule-inherited classifications.
Click Apply to narrow your results, or Cancel to discard changes.
For keyword searches, use the Search box in the upper-right corner of the table. It matches your input against the text displayed in each row, including parent space names and content titles, so you can quickly find specific pages or blog posts without knowing their exact name.
Managing Extensions
Select one or more items and use the extension buttons to manage their retention periods:
- Add Extensions: extend the retention period for selected content. Two extension types are available: * Indefinite (evergreen): marks content so it never expires against a retention policy. * Extend to a specific date: sets an explicit future expiration date for the content.
- Update Extensions: modify the date or type of an existing extension on selected items.
- Remove Extensions: remove an extension, returning content to its policy-governed retention period.
Info
Extensions apply to individual items and take precedence over all policy settings, including retention rules.
Lite edition limits the total number of extensions to 100.
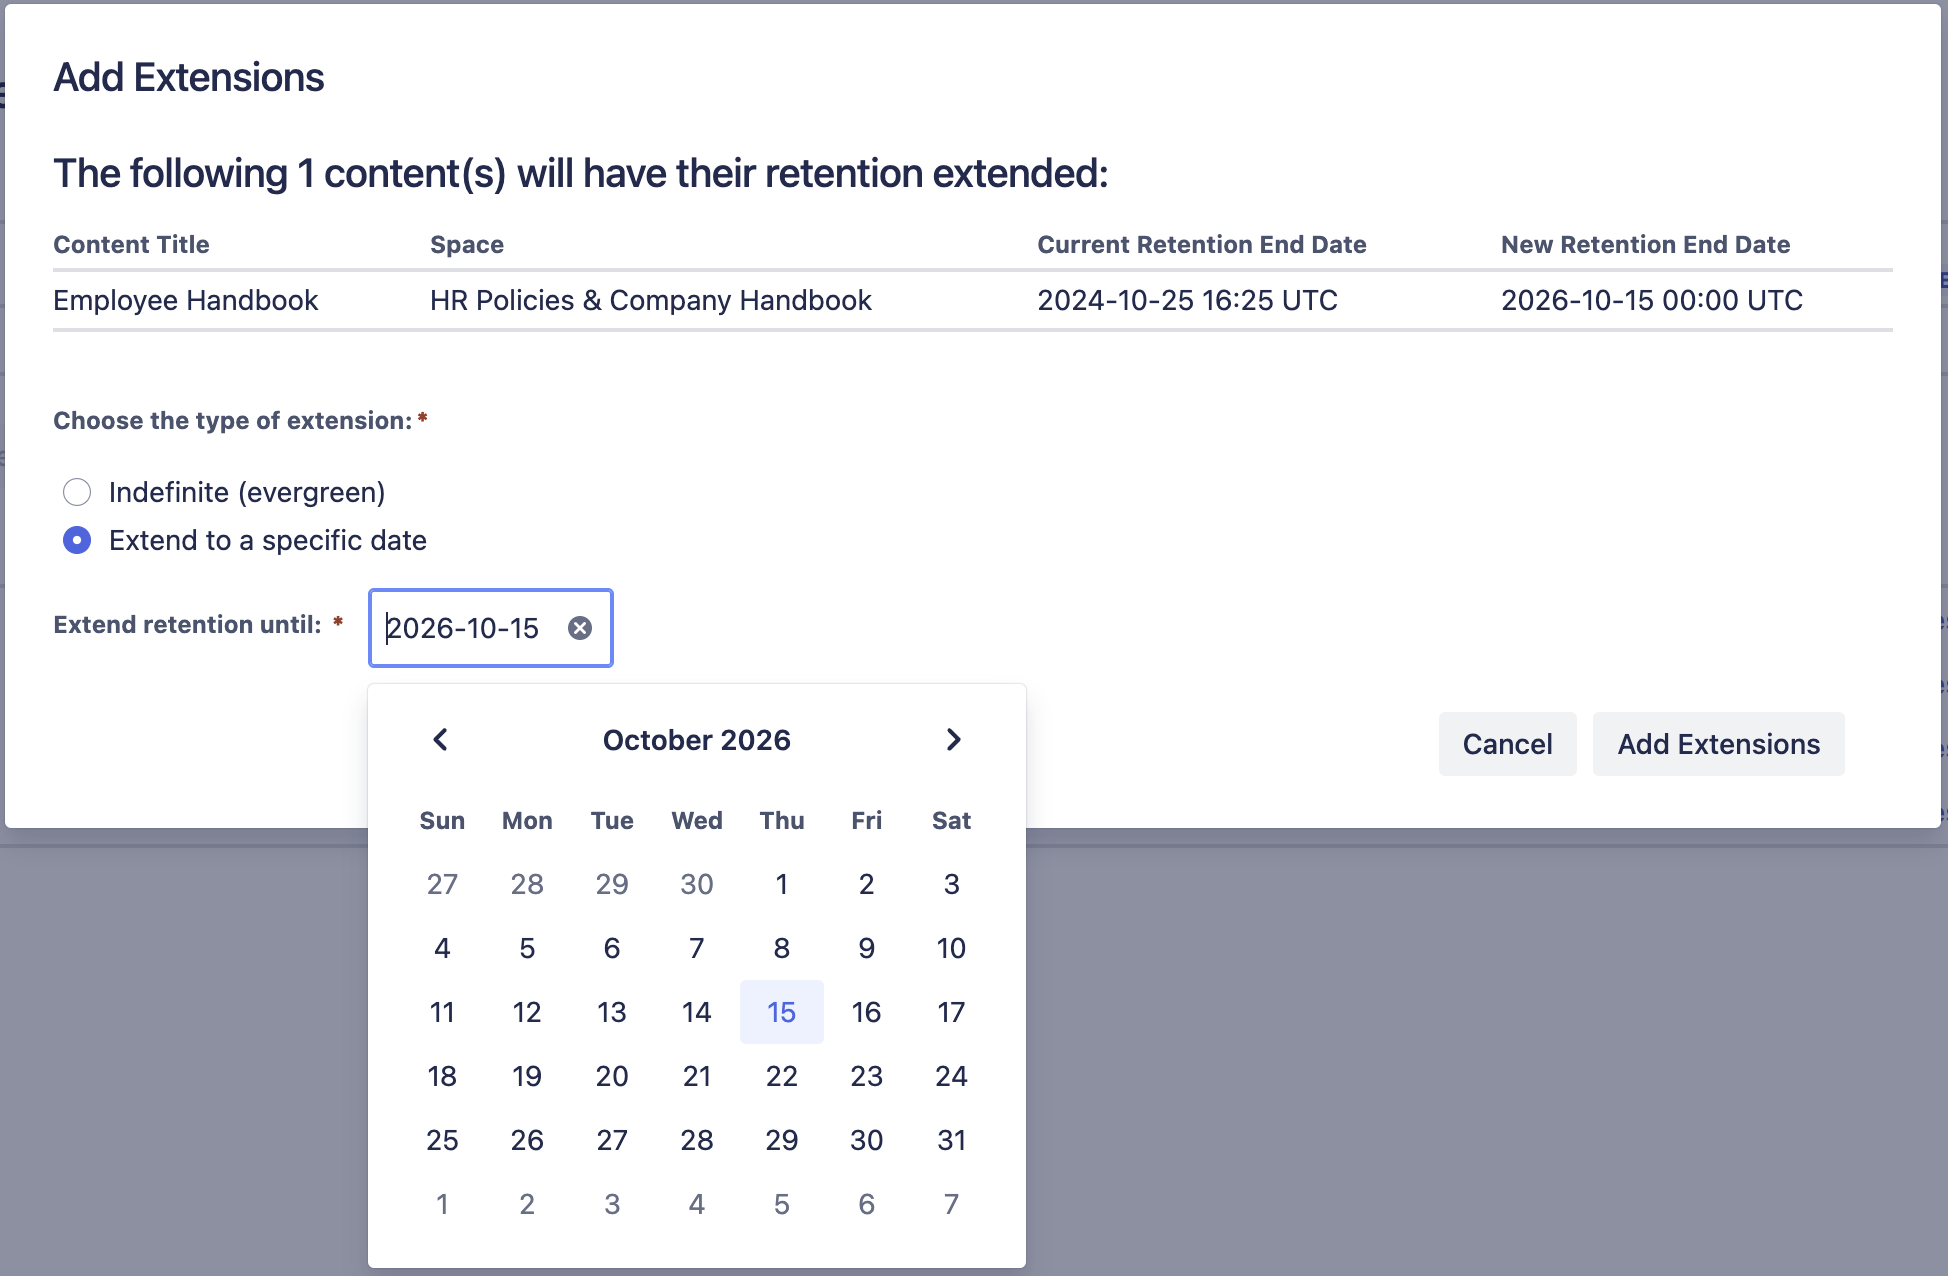
Extending a page to a specific date
Classifying Content
This feature is not available in Lite edition of the app.
Select one or more items and click Classify to assign a classification level directly from the audit table. This is the bulk equivalent of the per-content classification feature available to users on individual pages. Like the per-content panel, it overrides any classification rule for each selected item. Use this when your audit reveals items that are misclassified or not yet classified, and you want to correct them without opening each page individually.
Archiving, Deleting, and Purging Manually
This feature is not available in Lite edition of the app.
Danger
Purging is irreversible. Content cannot be recovered after it has been purged.
The Archive, Delete, and Purge buttons let you act on specific items from the audit view, without waiting for automation.
- Archive: moves selected content to an archived state. Requires Confluence Premium or Enterprise. Use this for content in Ending or Ended status that should be preserved but made inactive.
- Delete: moves selected content to the trash. Content remains recoverable by space and Confluence administrators.
- Purge: permanently removes selected content from your Confluence instance.
These are the manual counterparts to the automated archiving, deletion, and purging configured on the Automation tab.
Automation
This feature is not available in Lite edition of the app.
Use the Automation tab to configure three features: retention enforcement (archiving, deletion, purging), audit log retention, and automated classification with AI. Each feature operates independently and can be enabled or disabled without affecting the others.
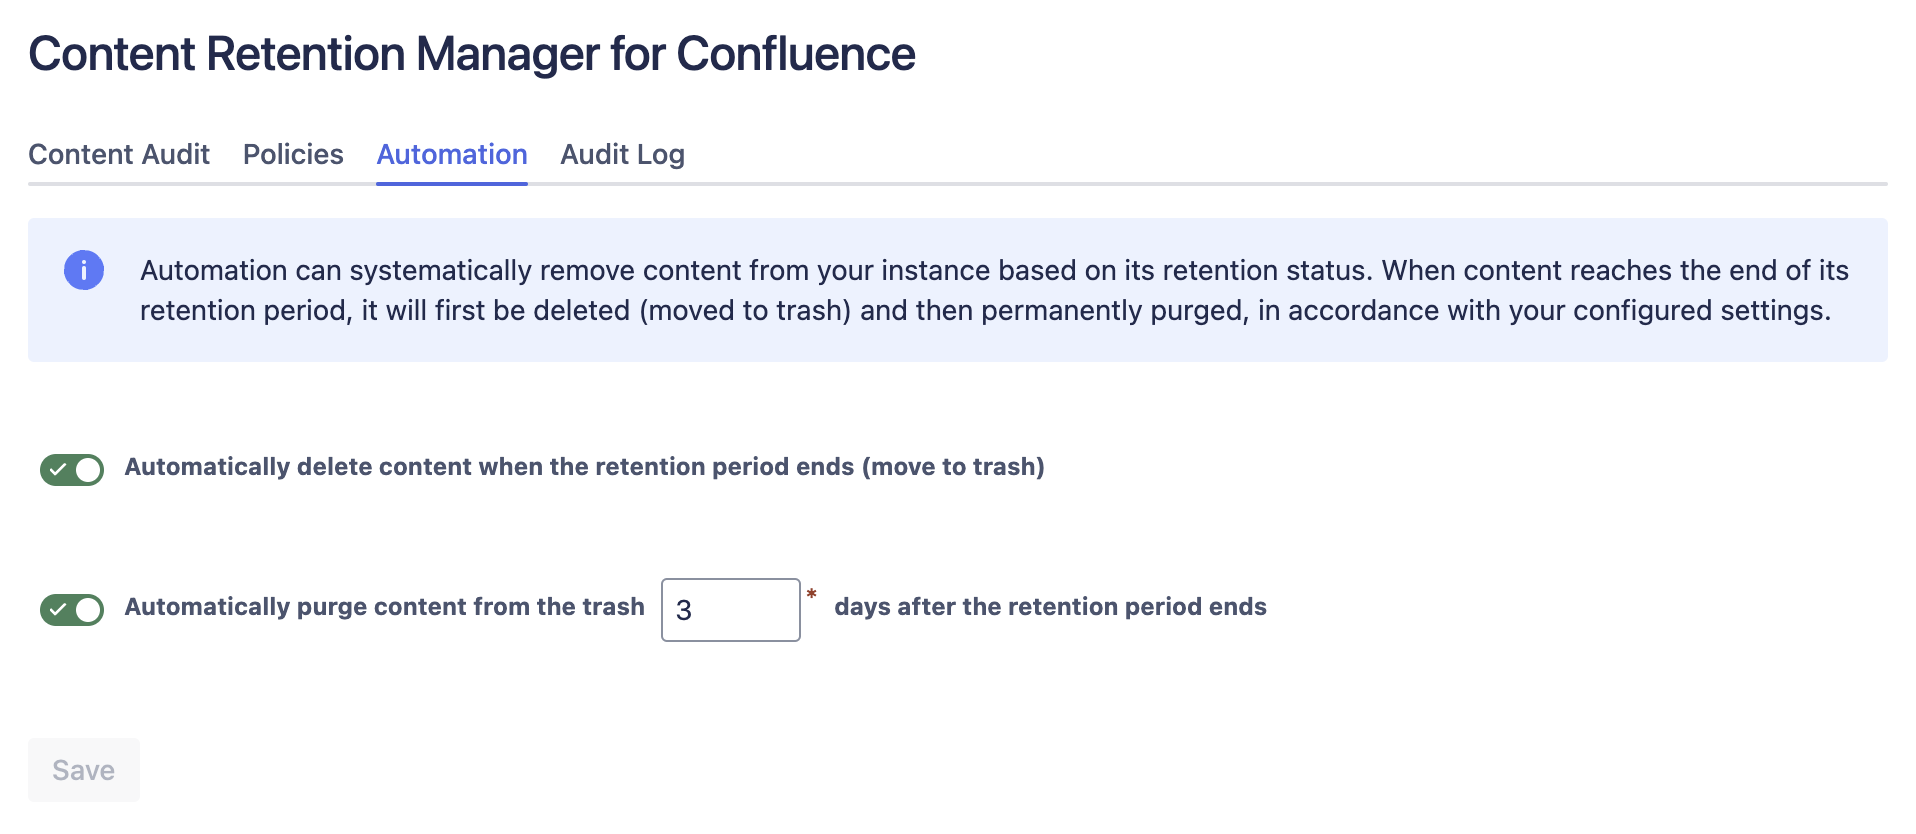
The Automation tab in Content Retention Manager for Confluence
Retention Enforcement
Danger
Once automation is on, expired content will be archived, deleted, or purged according to your policies. Purged content cannot be recovered.
Before enabling automation, complete a thorough review using the Content Audit tab. Verify that your retention policies and classification rules are producing the results you expect, update any rules that need adjustment, and apply extensions or per-content classification overrides for anything that needs special handling.
The Retention Enforcement section lets you schedule the retention lifecycle:
- Automatic archiving: When content enters the Ending status (during the configured warning period before retention ends), it can be automatically archived.
- Automatic deletion: When content expires against the retention policy, it can be automatically deleted. Deleted content is not visible to regular users but remains recoverable by space and Confluence administrators.
- Automatic purging: When content reaches the end of its retention period, it is purged after a configurable delay. Purged content is irrecoverable and no longer discoverable.
- Click the Automation tab.
- Under Retention Enforcement, enable Automatic archiving if you want content archived when it enters the Ending status.
- Enable Automatic deletion if you want content deleted when it expires.
- Enable Automatic purging if you want content permanently removed after the delay period.
- Set the Purge delay after the retention period ends (days). A few days provide a buffer in case content that should have been retained was not flagged in time.
- Click Save.
Audit Log Retention
In the Automation tab overview above, locate the Audit Log Retention section to control automatic cleanup of old audit log entries:
- Toggle Audit log retention to ON.
- Set Retain audit logs for (days). The minimum is 30 days.
- Click Save.
When enabled, entries older than the configured period are automatically deleted. Disable this setting to keep all audit log entries indefinitely.
Automated Classification with AI
This feature is not available in Lite edition of the app.
Content Retention Manager uses AI-powered classification to automatically assign sensitivity levels to content. In the Automation tab overview above, locate the Automated Classification section to enable the feature and set up the automation flow. The system uses Confluence Automation to invoke the AI Classification Agent whenever pages are published or updated.
The agent analyzes page content and recommends a classification level on your behalf. When users open a page with an AI-assigned classification, they see the classification level in the byline item suffixed with (AI) (for example, Restricted (AI)). Users with permission to set classifications can click the byline item to review the AI assignment and either confirm it or reject it and select a different level.
When a user confirms the AI assignment, the (AI) suffix is removed and the classification is recorded in the audit log as updated by the user. See AI Classification Suggestion in the User's Guide for the complete end-user experience.
Classifications take effect immediately
Classifications assigned by the agent are applied immediately and may affect the content's retention lifecycle.
Tip
Confluence Automation has a monthly rule run quota on non-Enterprise plans. Using Page edited gives continuous re-classification as content changes, but consumes more runs than a Page published trigger. See Confluence Automation limits for current limits.
Set up automated classification with AI in two steps: enable the feature in Content Retention Manager, then create a Confluence Automation flow to invoke the agent.
Enable Automated Classification
- Click the Automation tab.
- Under Automated Classification, toggle Auto Content Classification Agent in Automation to ENABLED.
- Click Save.
Set Up a Confluence Automation Flow
With the feature enabled, create a global Confluence Automation flow that invokes the agent. This setup follows Atlassian's Automating Rovo agents guidance for the Use agent action.
-
In Confluence, open Settings → Automation.
-
Click Create flow, then Create from scratch.
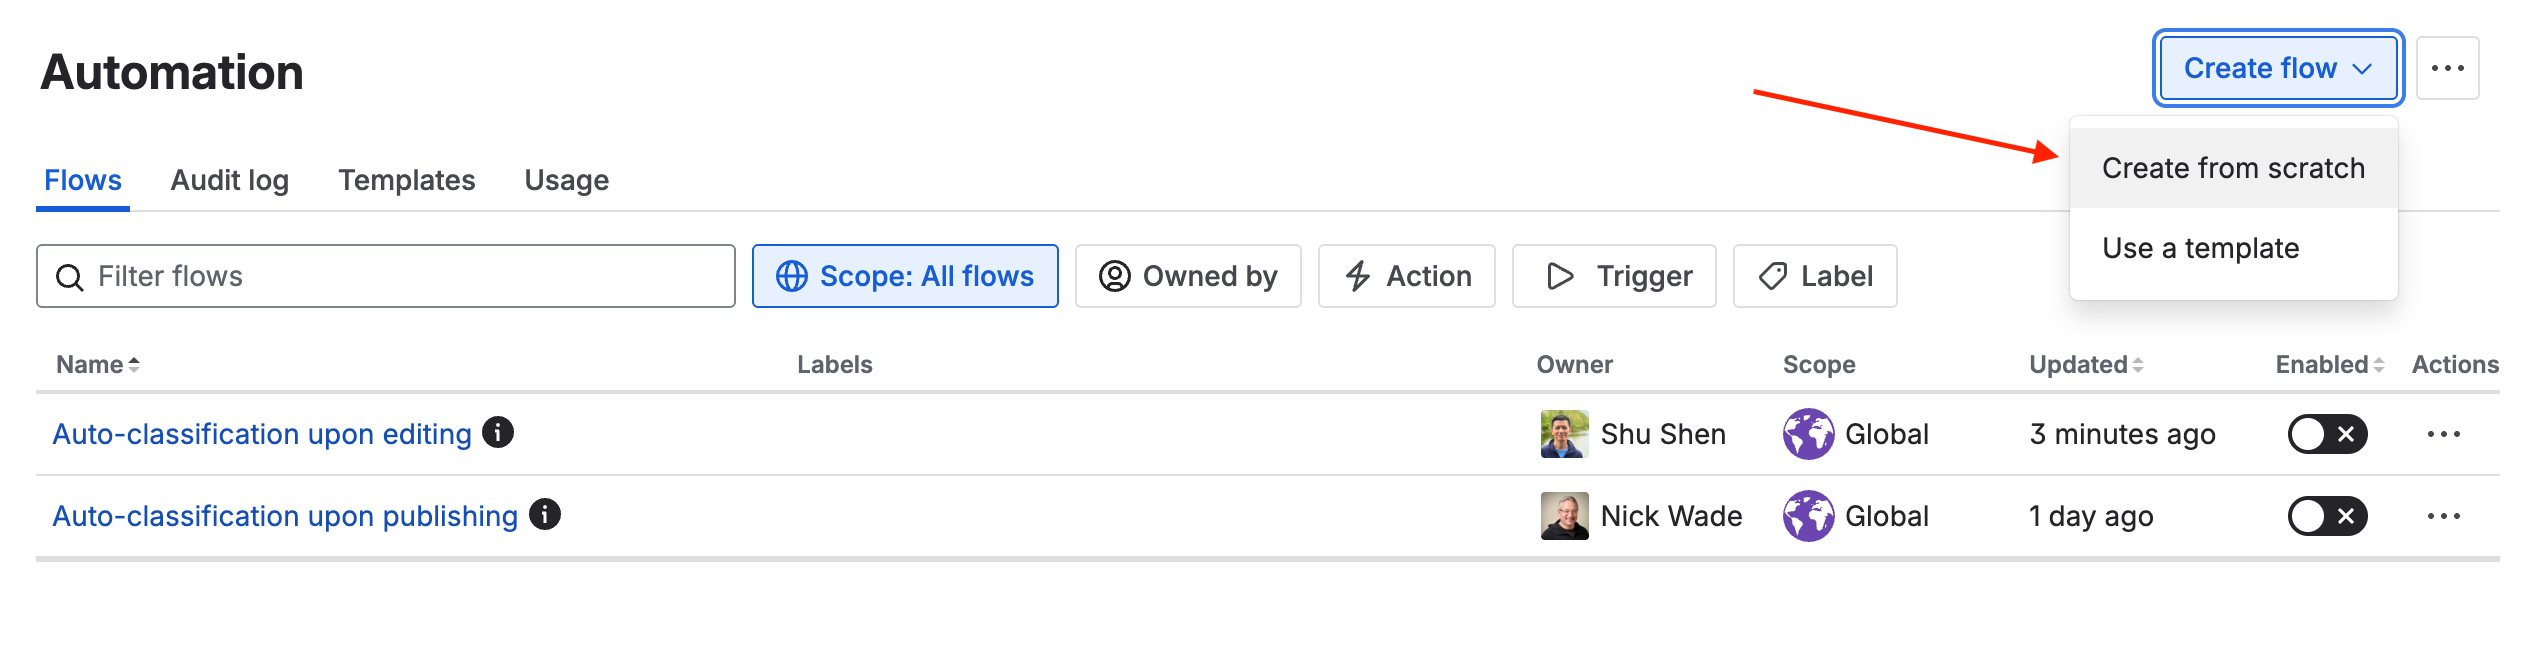
Create a new Automation flow from scratch in Confluence
-
Add the trigger Page edited.
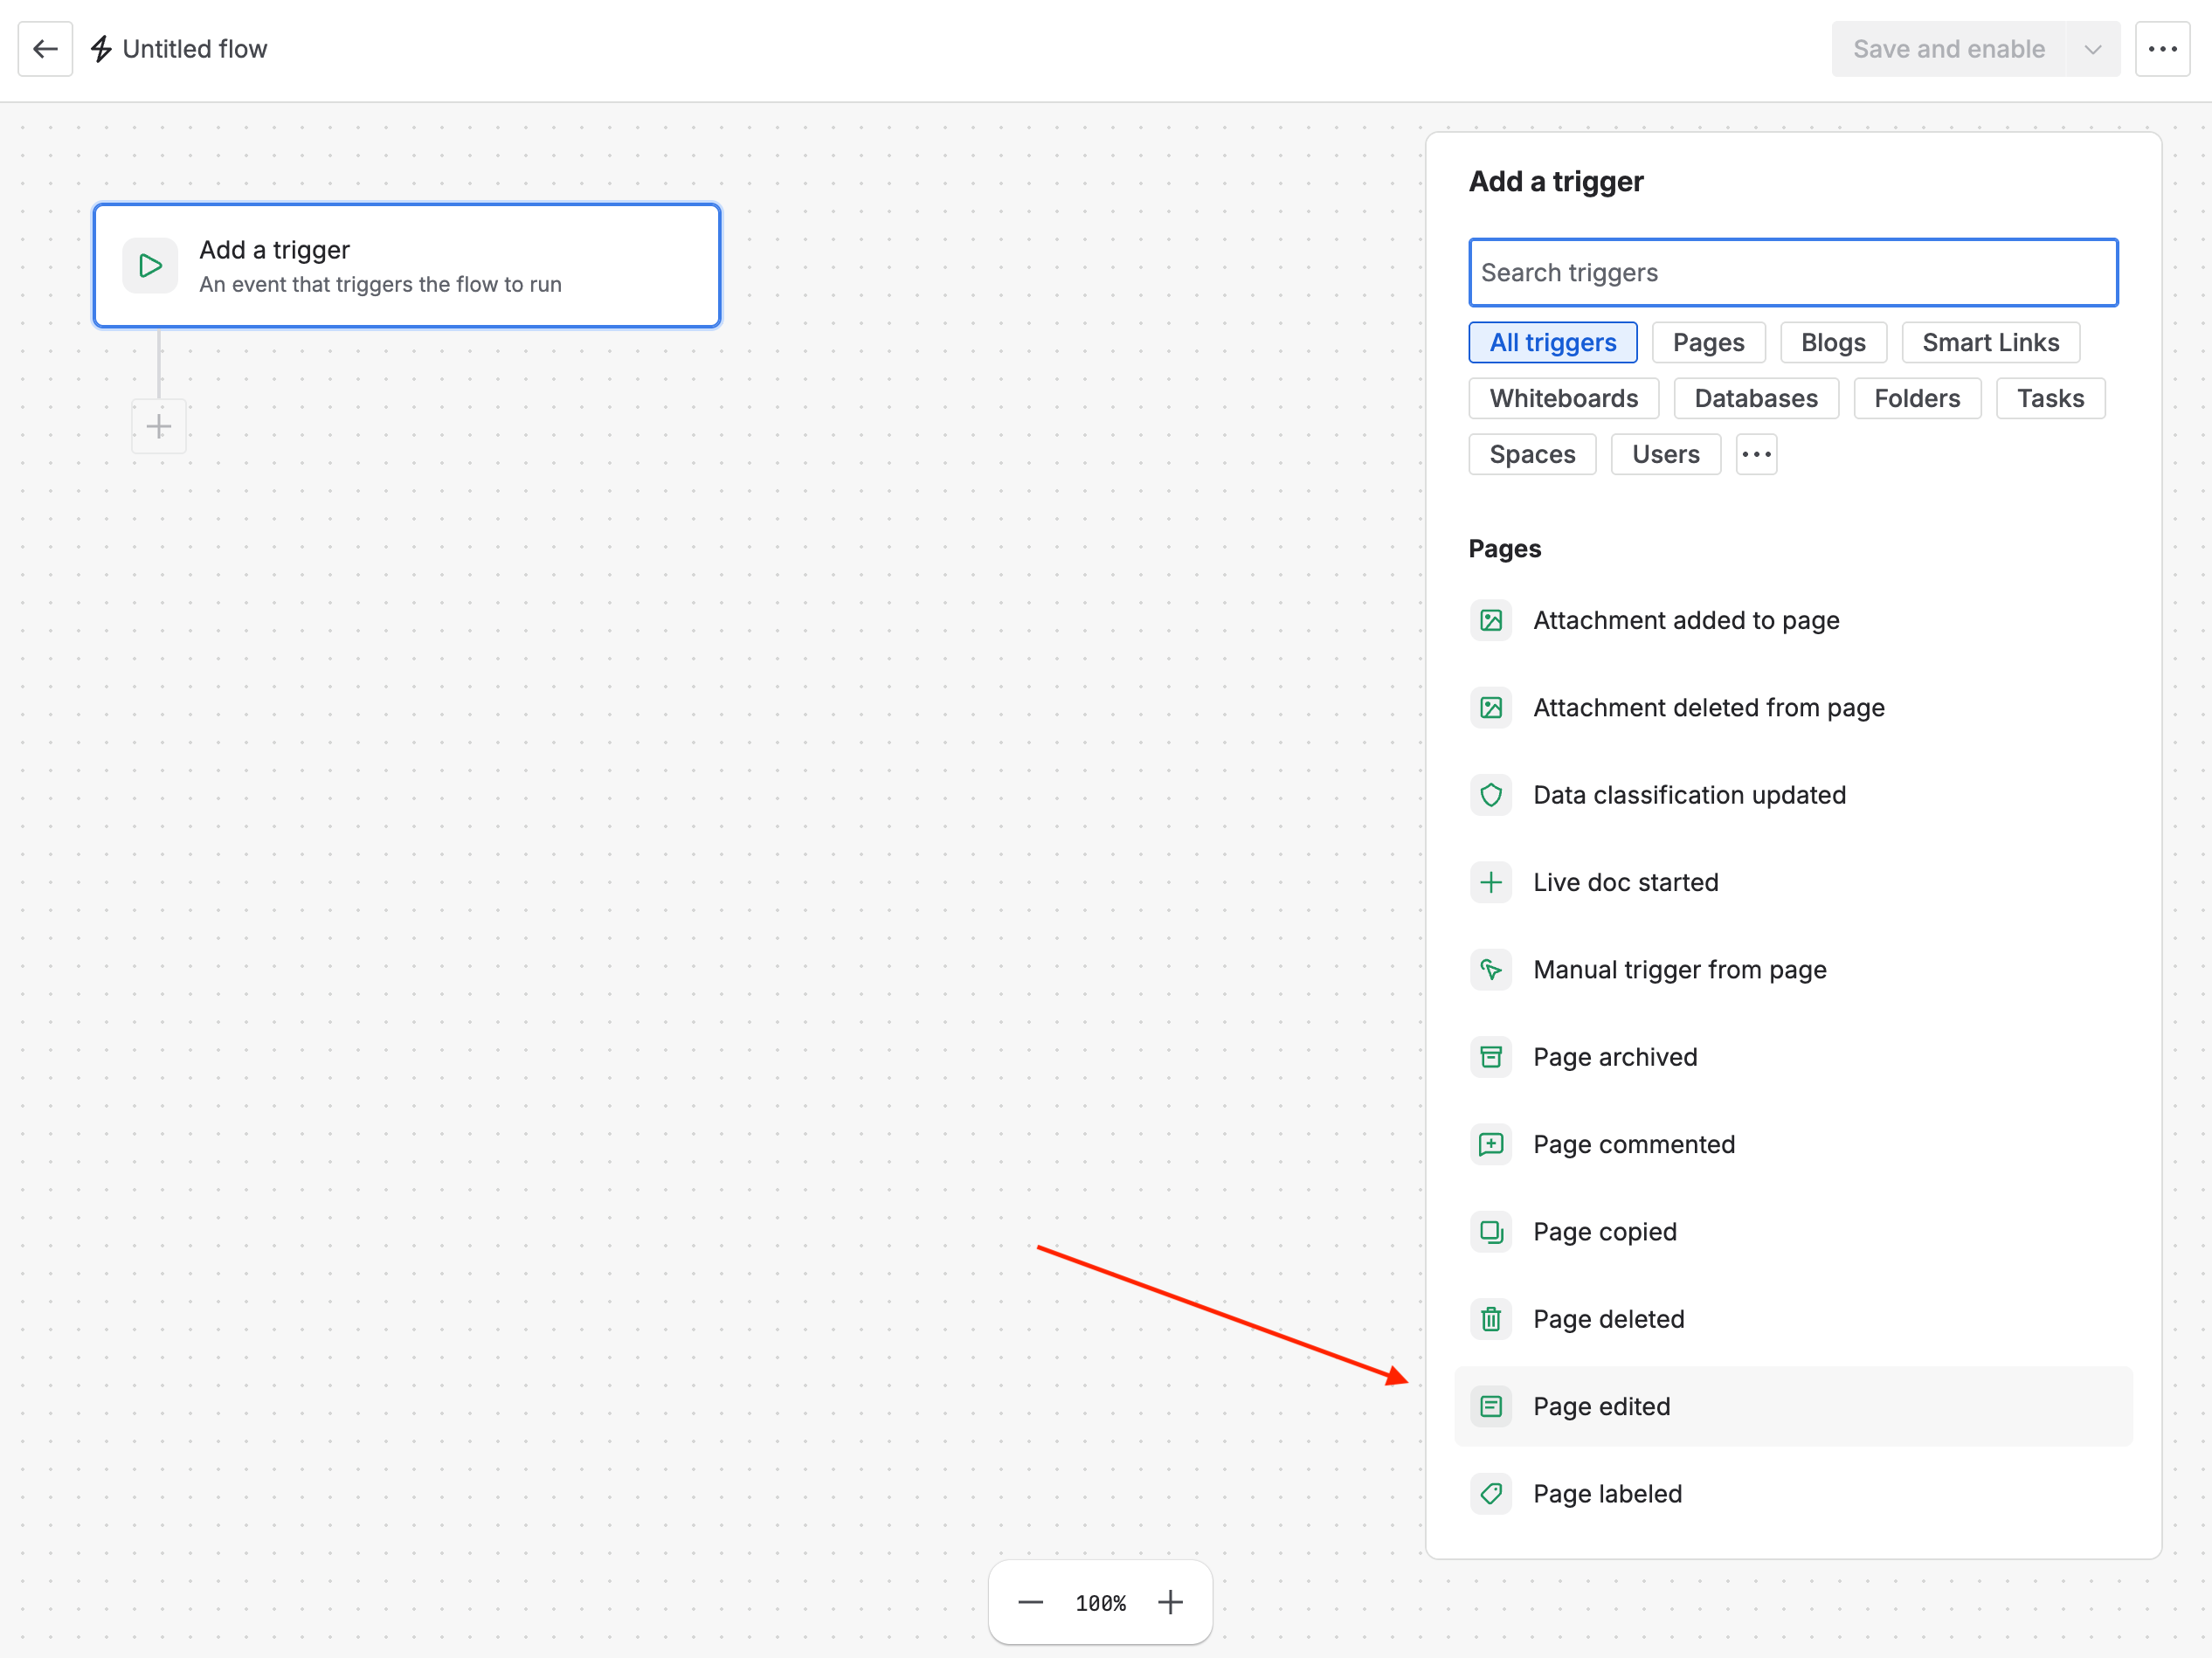
Add the Page edited trigger to run classification when a page is updated
-
Click Add action, then select Use agent in the Rovo AI section.
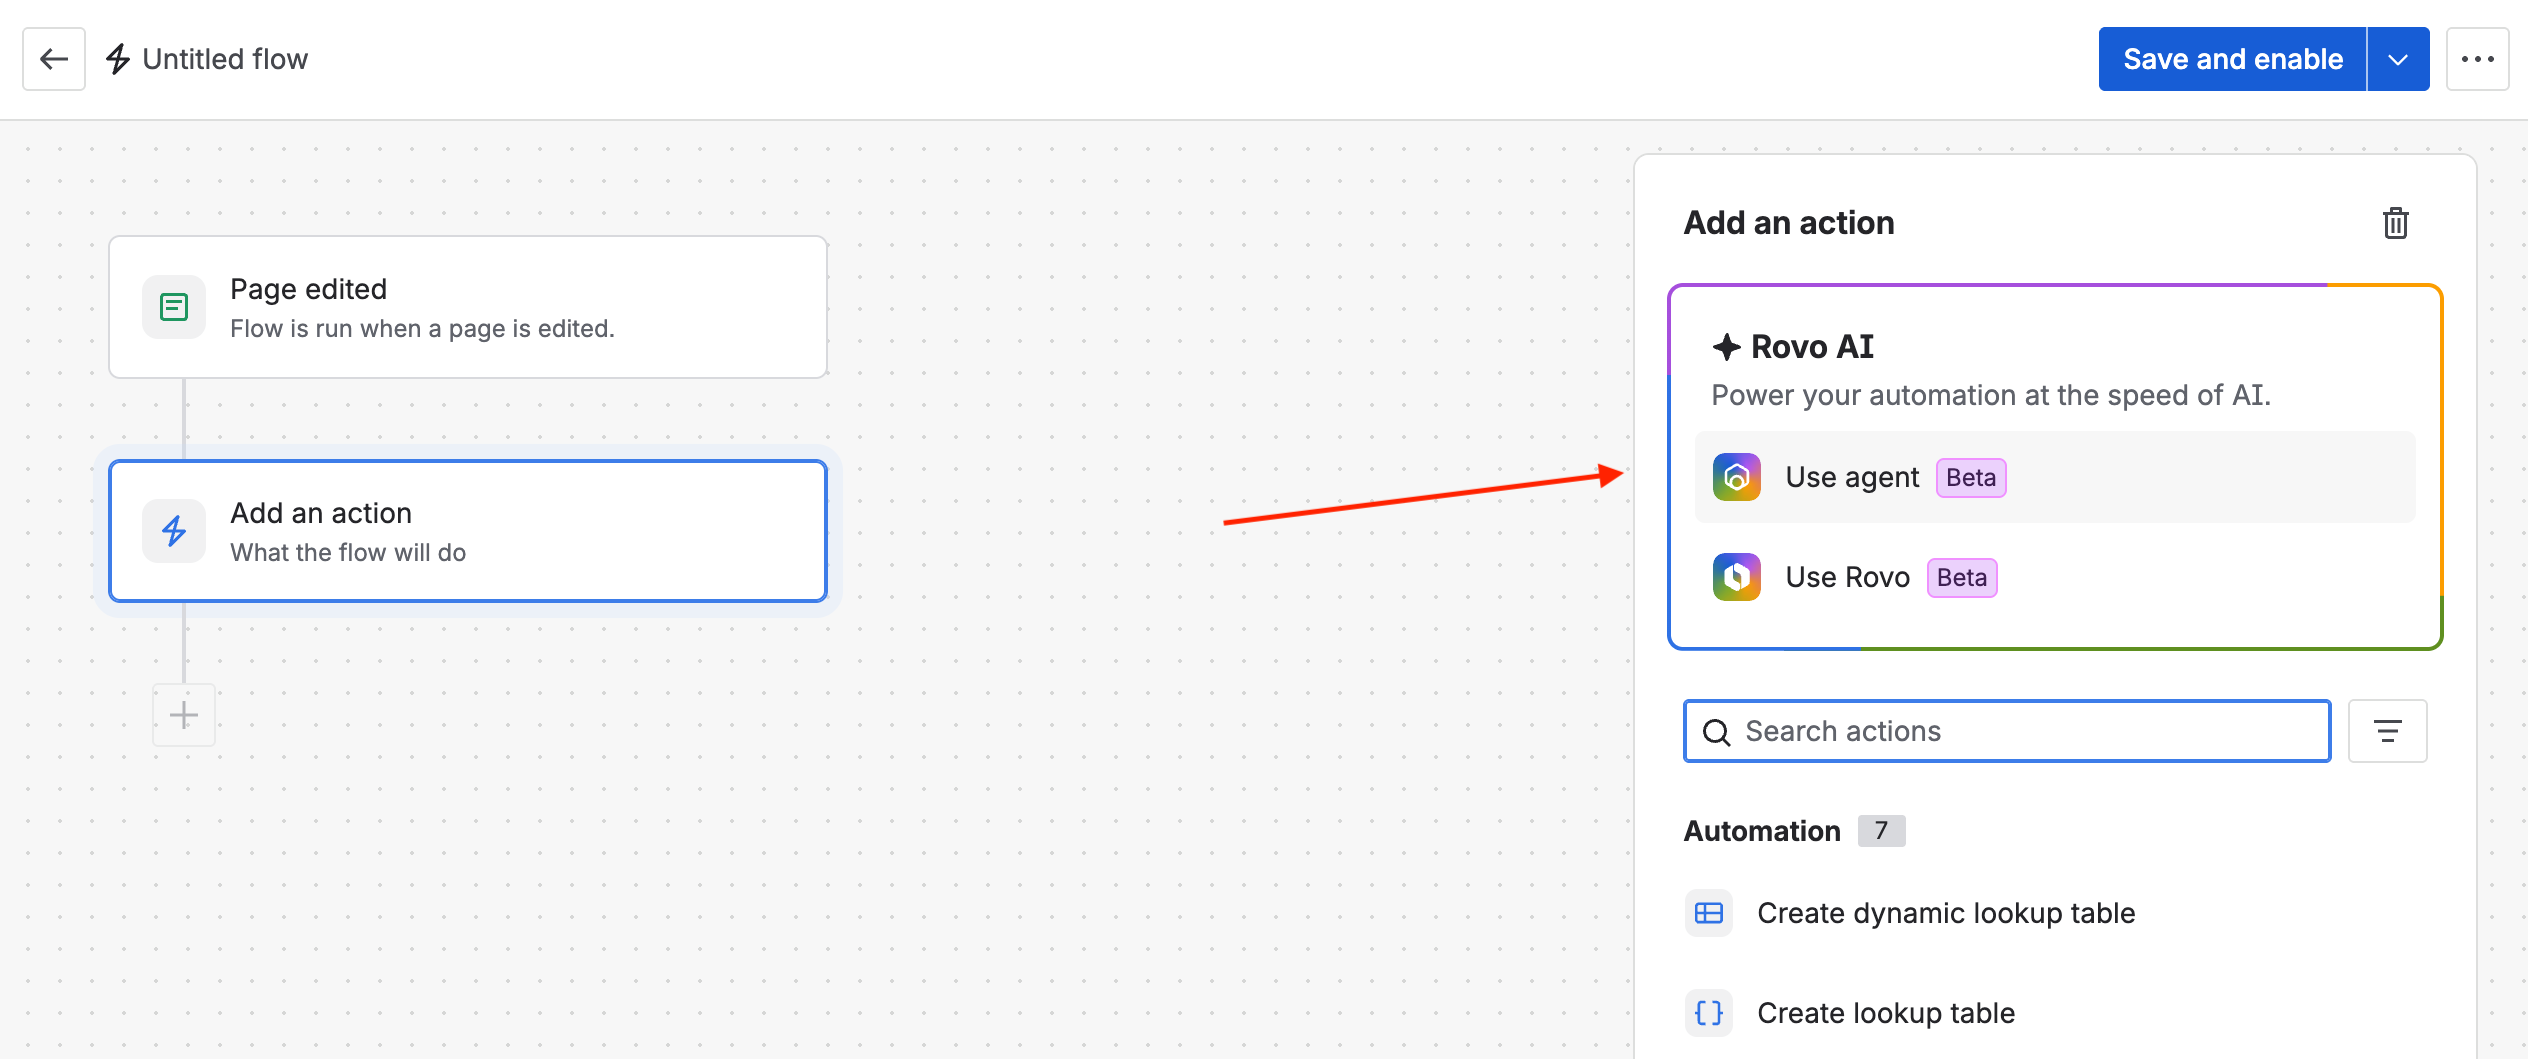
Select the Use agent action from the Automation action picker
-
If prompted, connect Automation to Rovo by clicking Connect.
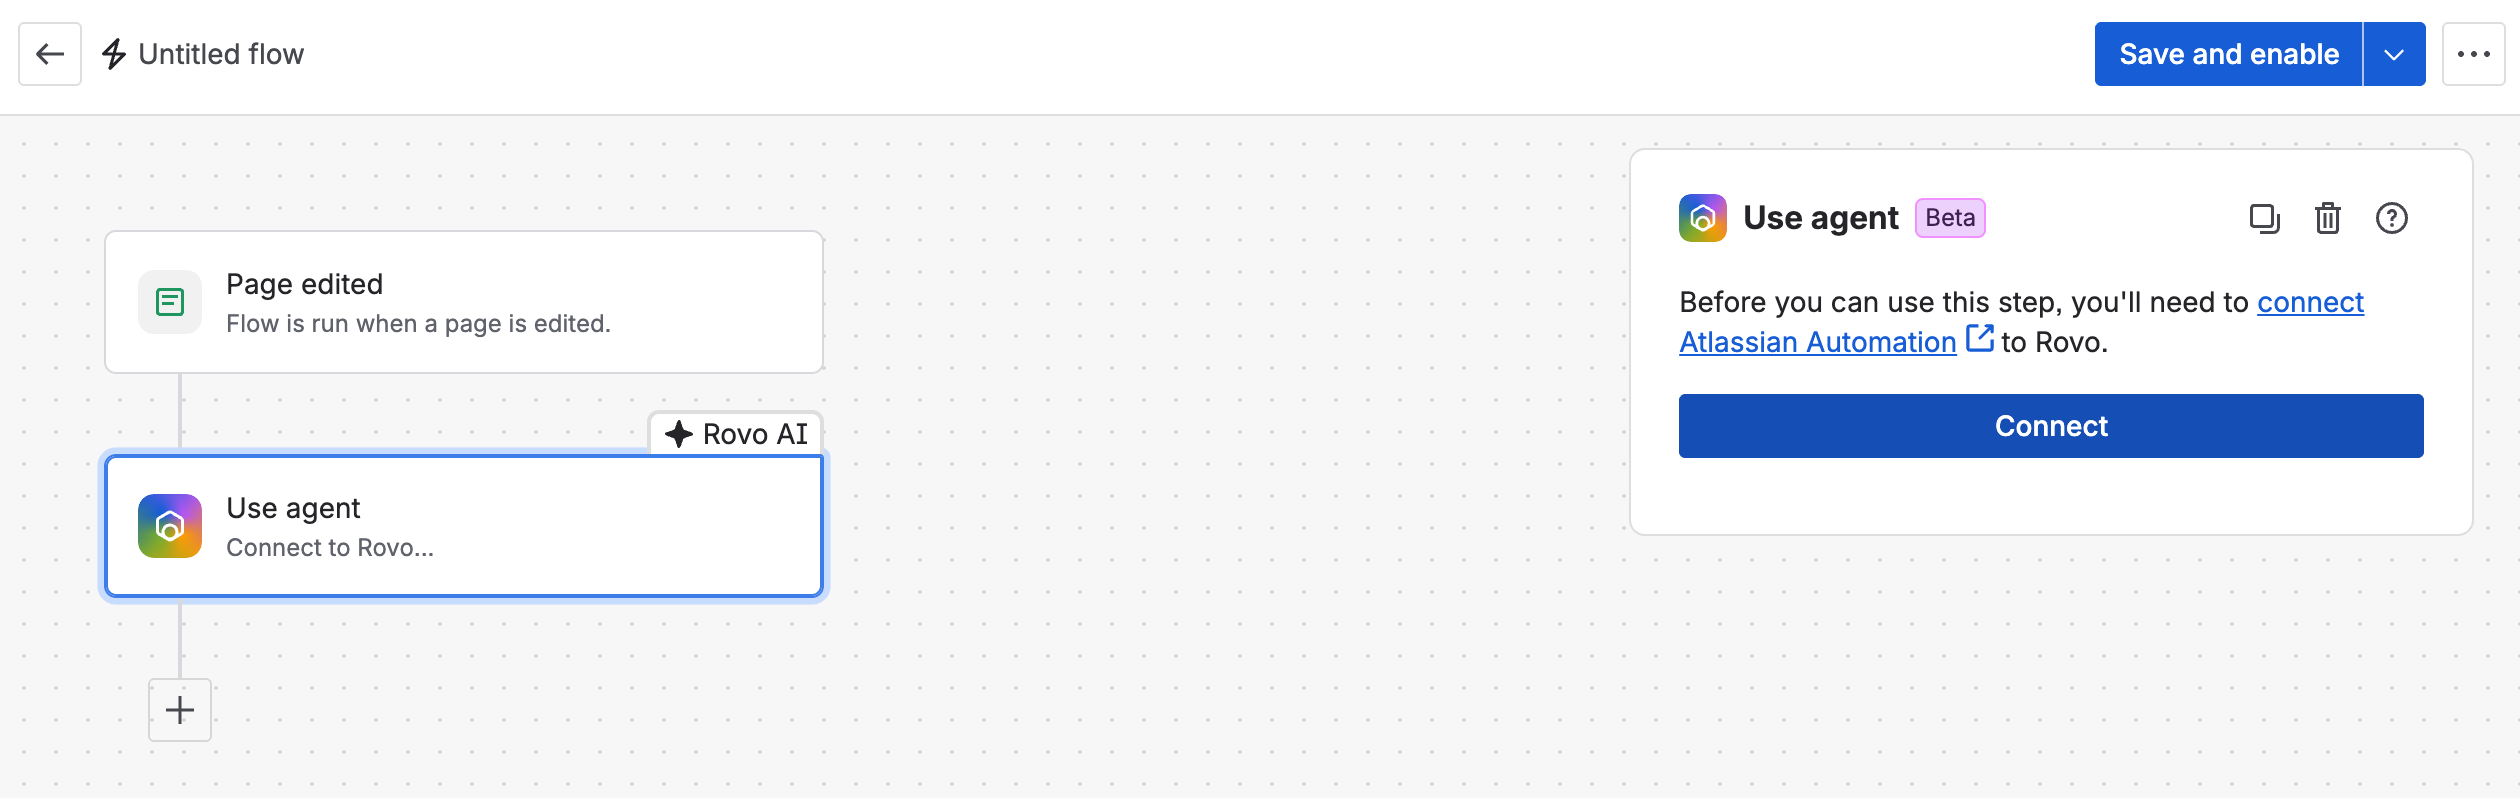
Connect Atlassian Automation to Rovo before selecting an agent
-
In Use agent, search for and select Auto Content Classification (Confluence).
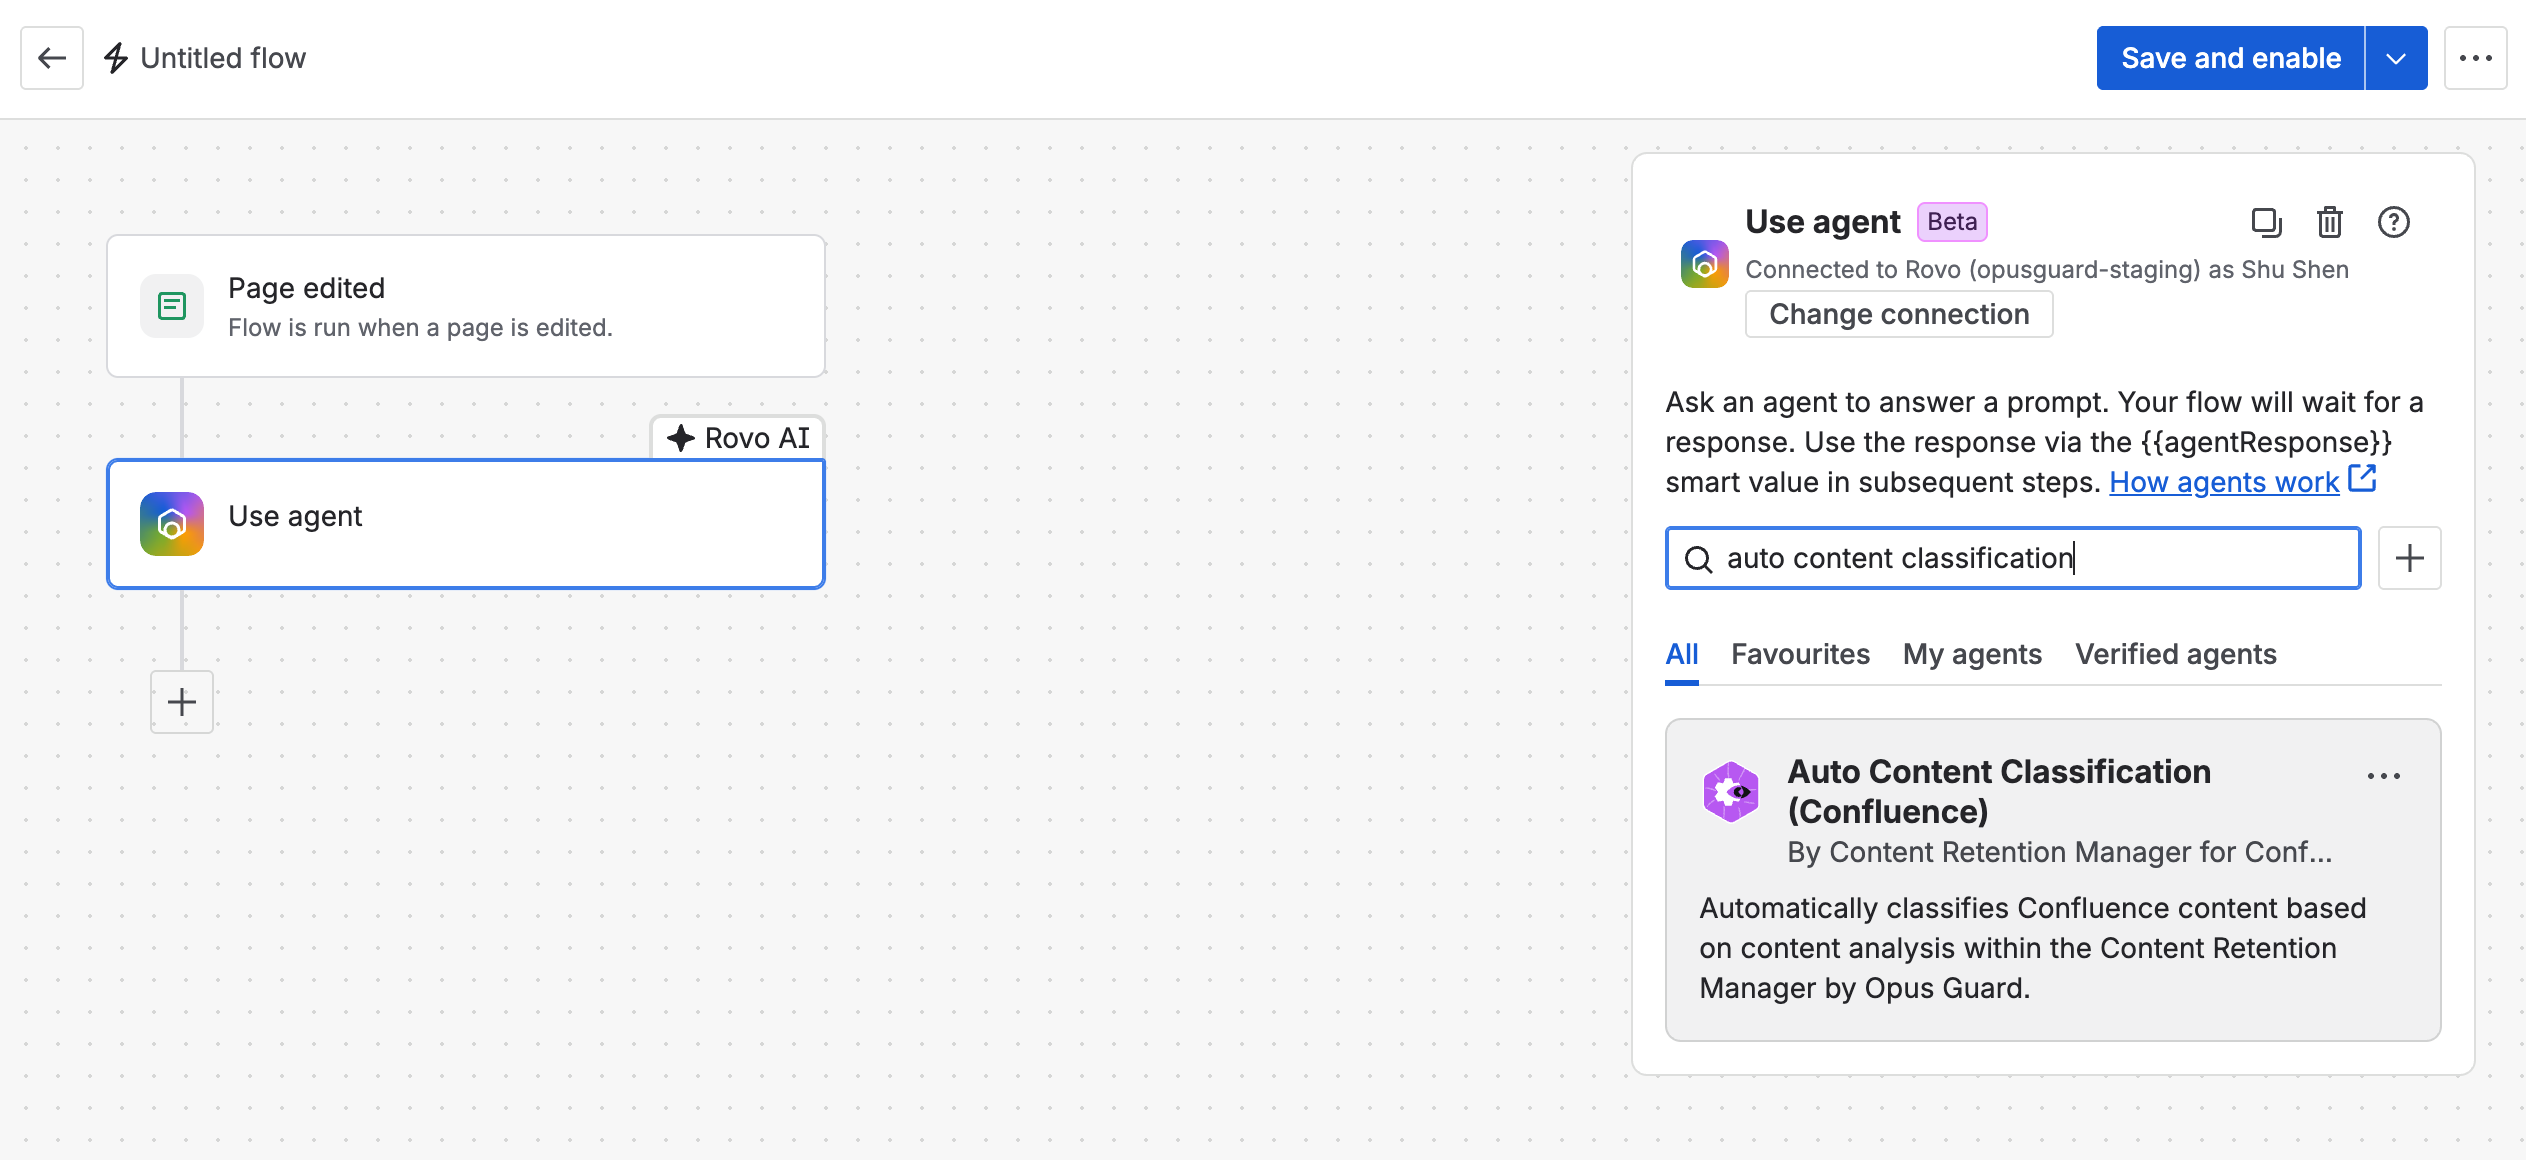
Search and select the Auto Content Classification (Confluence) agent
-
In the Prompt field, enter:
contentType={{content.type}}, contentId={{content.id}}Critical for page identification: The
{{content.type}}and{{content.id}}Confluence smart values tell the agent which page triggered the automation and needs classification. Without these identifiers, the agent cannot locate the target page.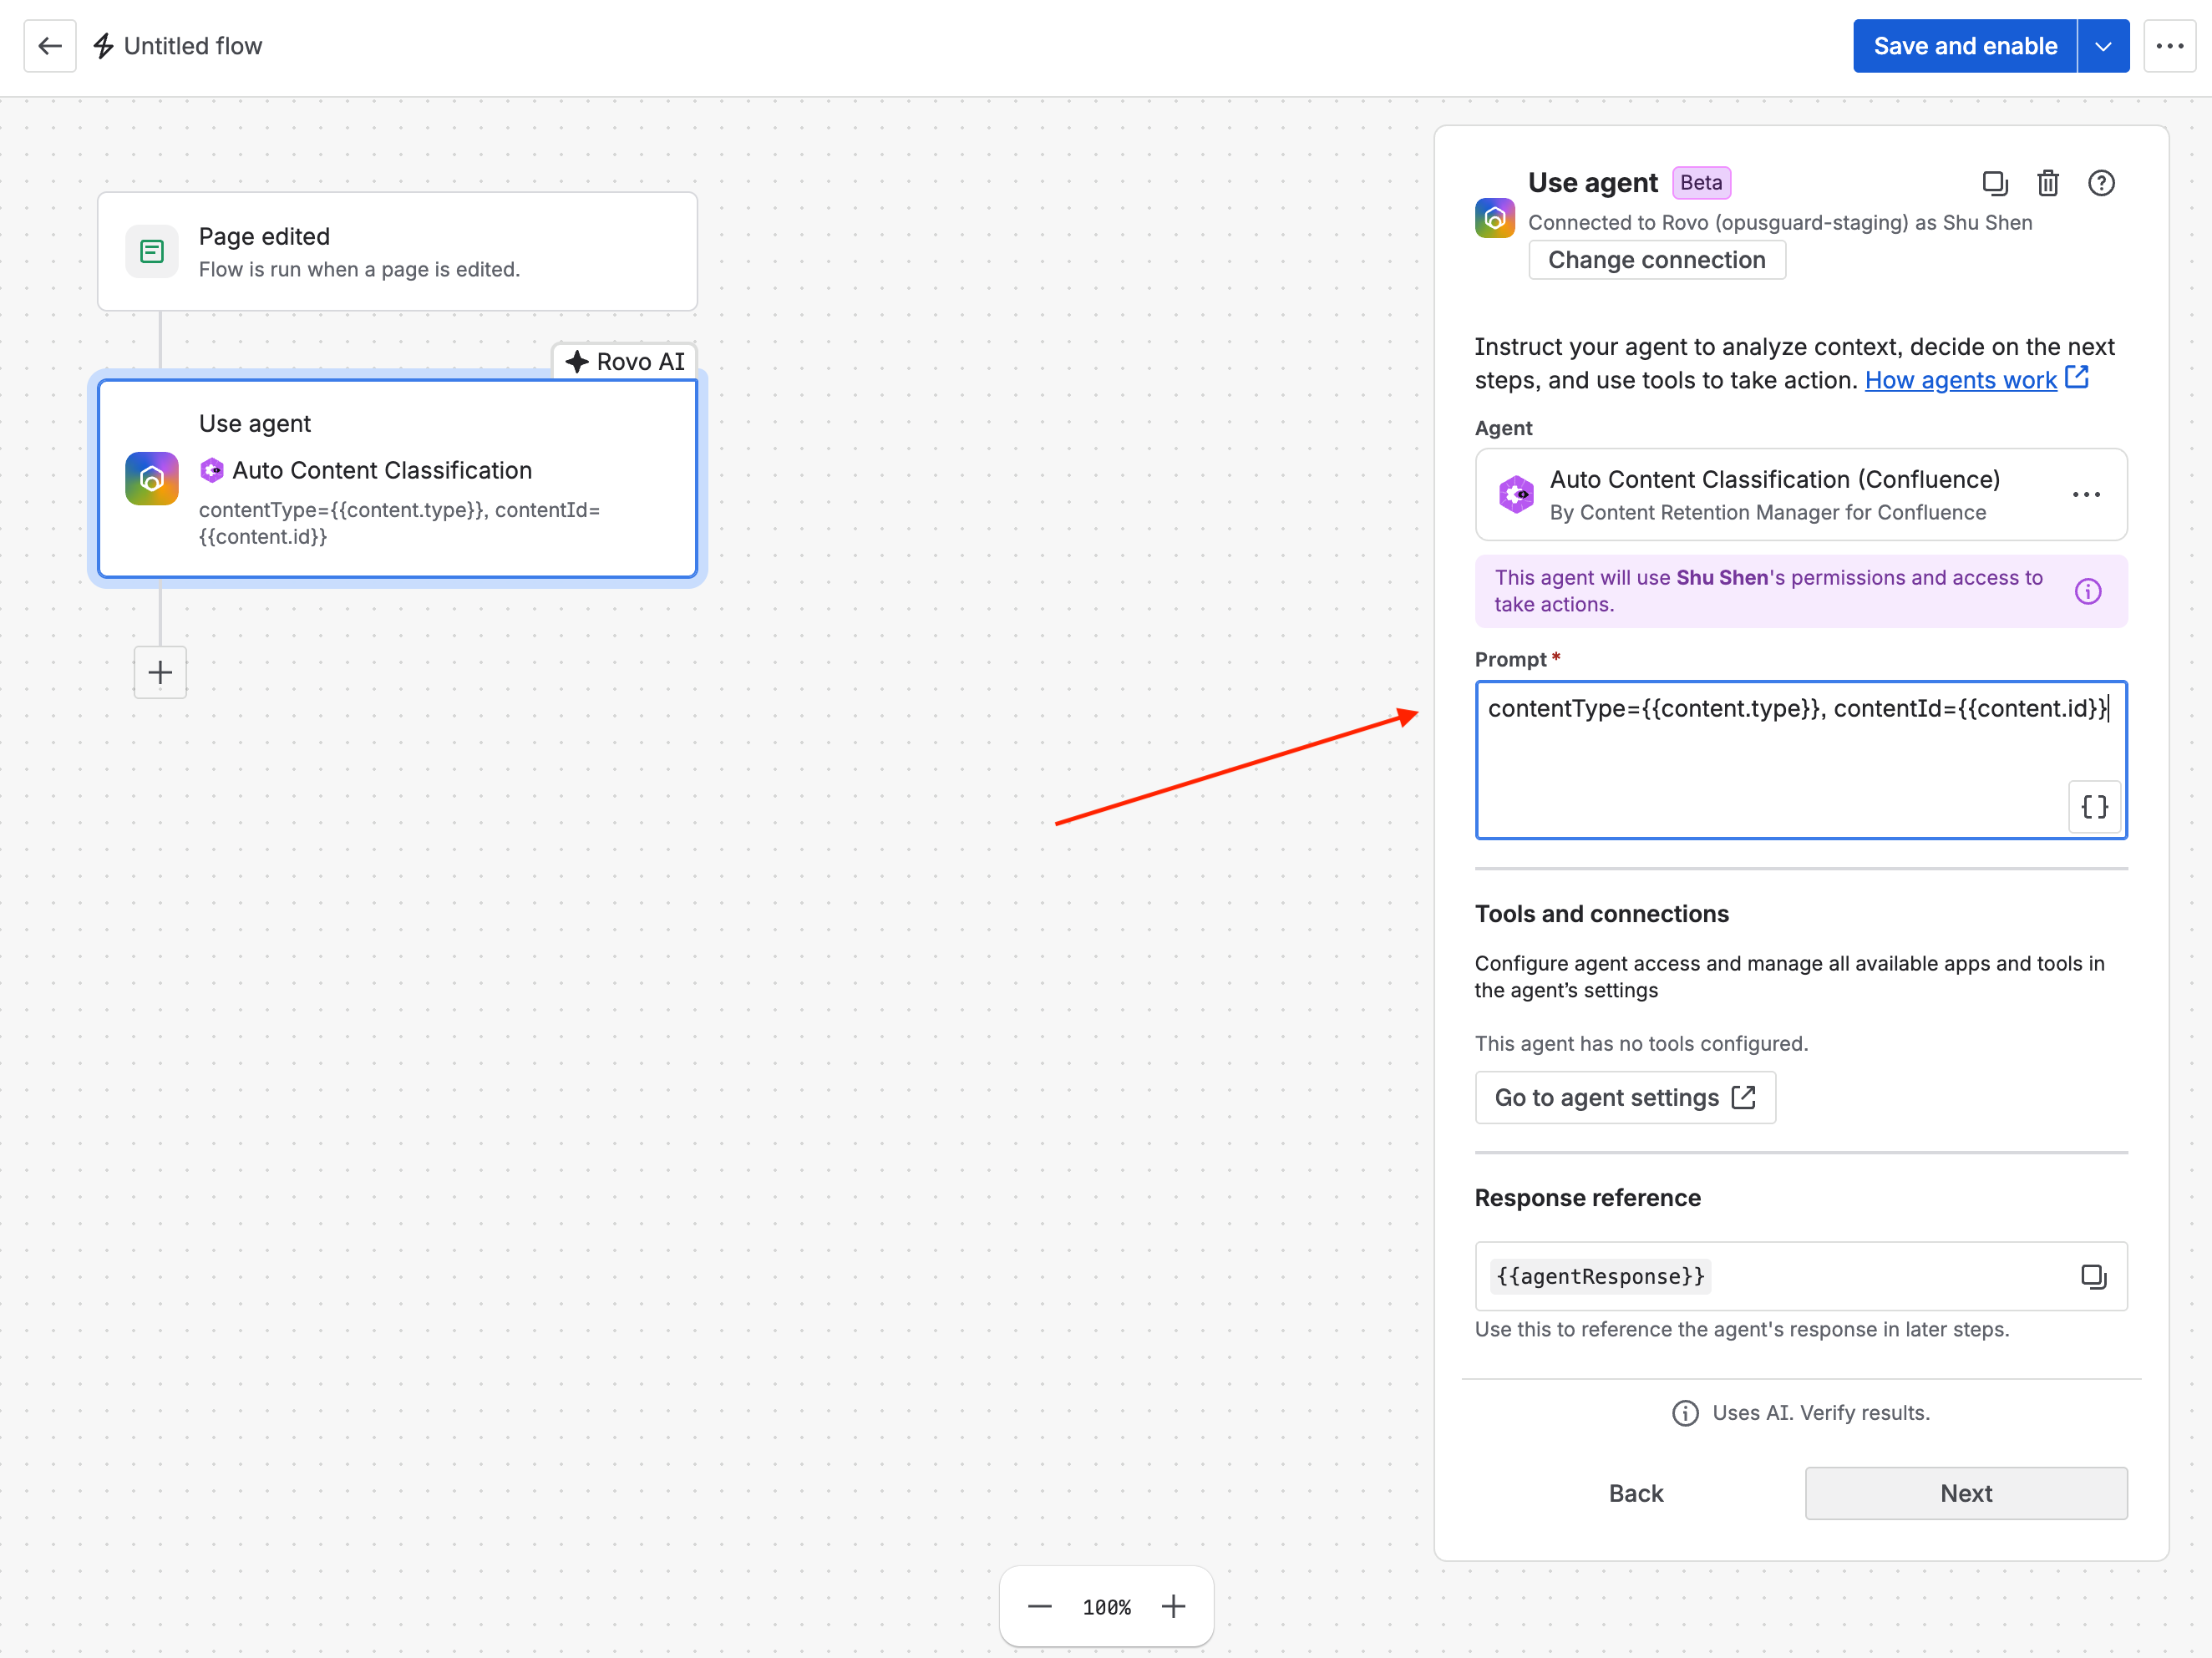
Configure the Use agent prompt with content type and content ID smart values
-
Add a Log action step after Use agent to record the agent output in the Automation run details.
-
In Log action, set Log message to:
(Type={{content.type}}, ID={{content.id}}) {{agentResponse}}The
{{agentResponse}}reference contains the Auto Content Classification agent's response, which describes the recommended classification level for the page (for example, Restricted or Internal). This response is recorded in the Confluence Automation audit log. The agent also creates a corresponding entry in the Content Retention Manager Audit Log showing the classification applied, providing a complete audit trail of the automation decision.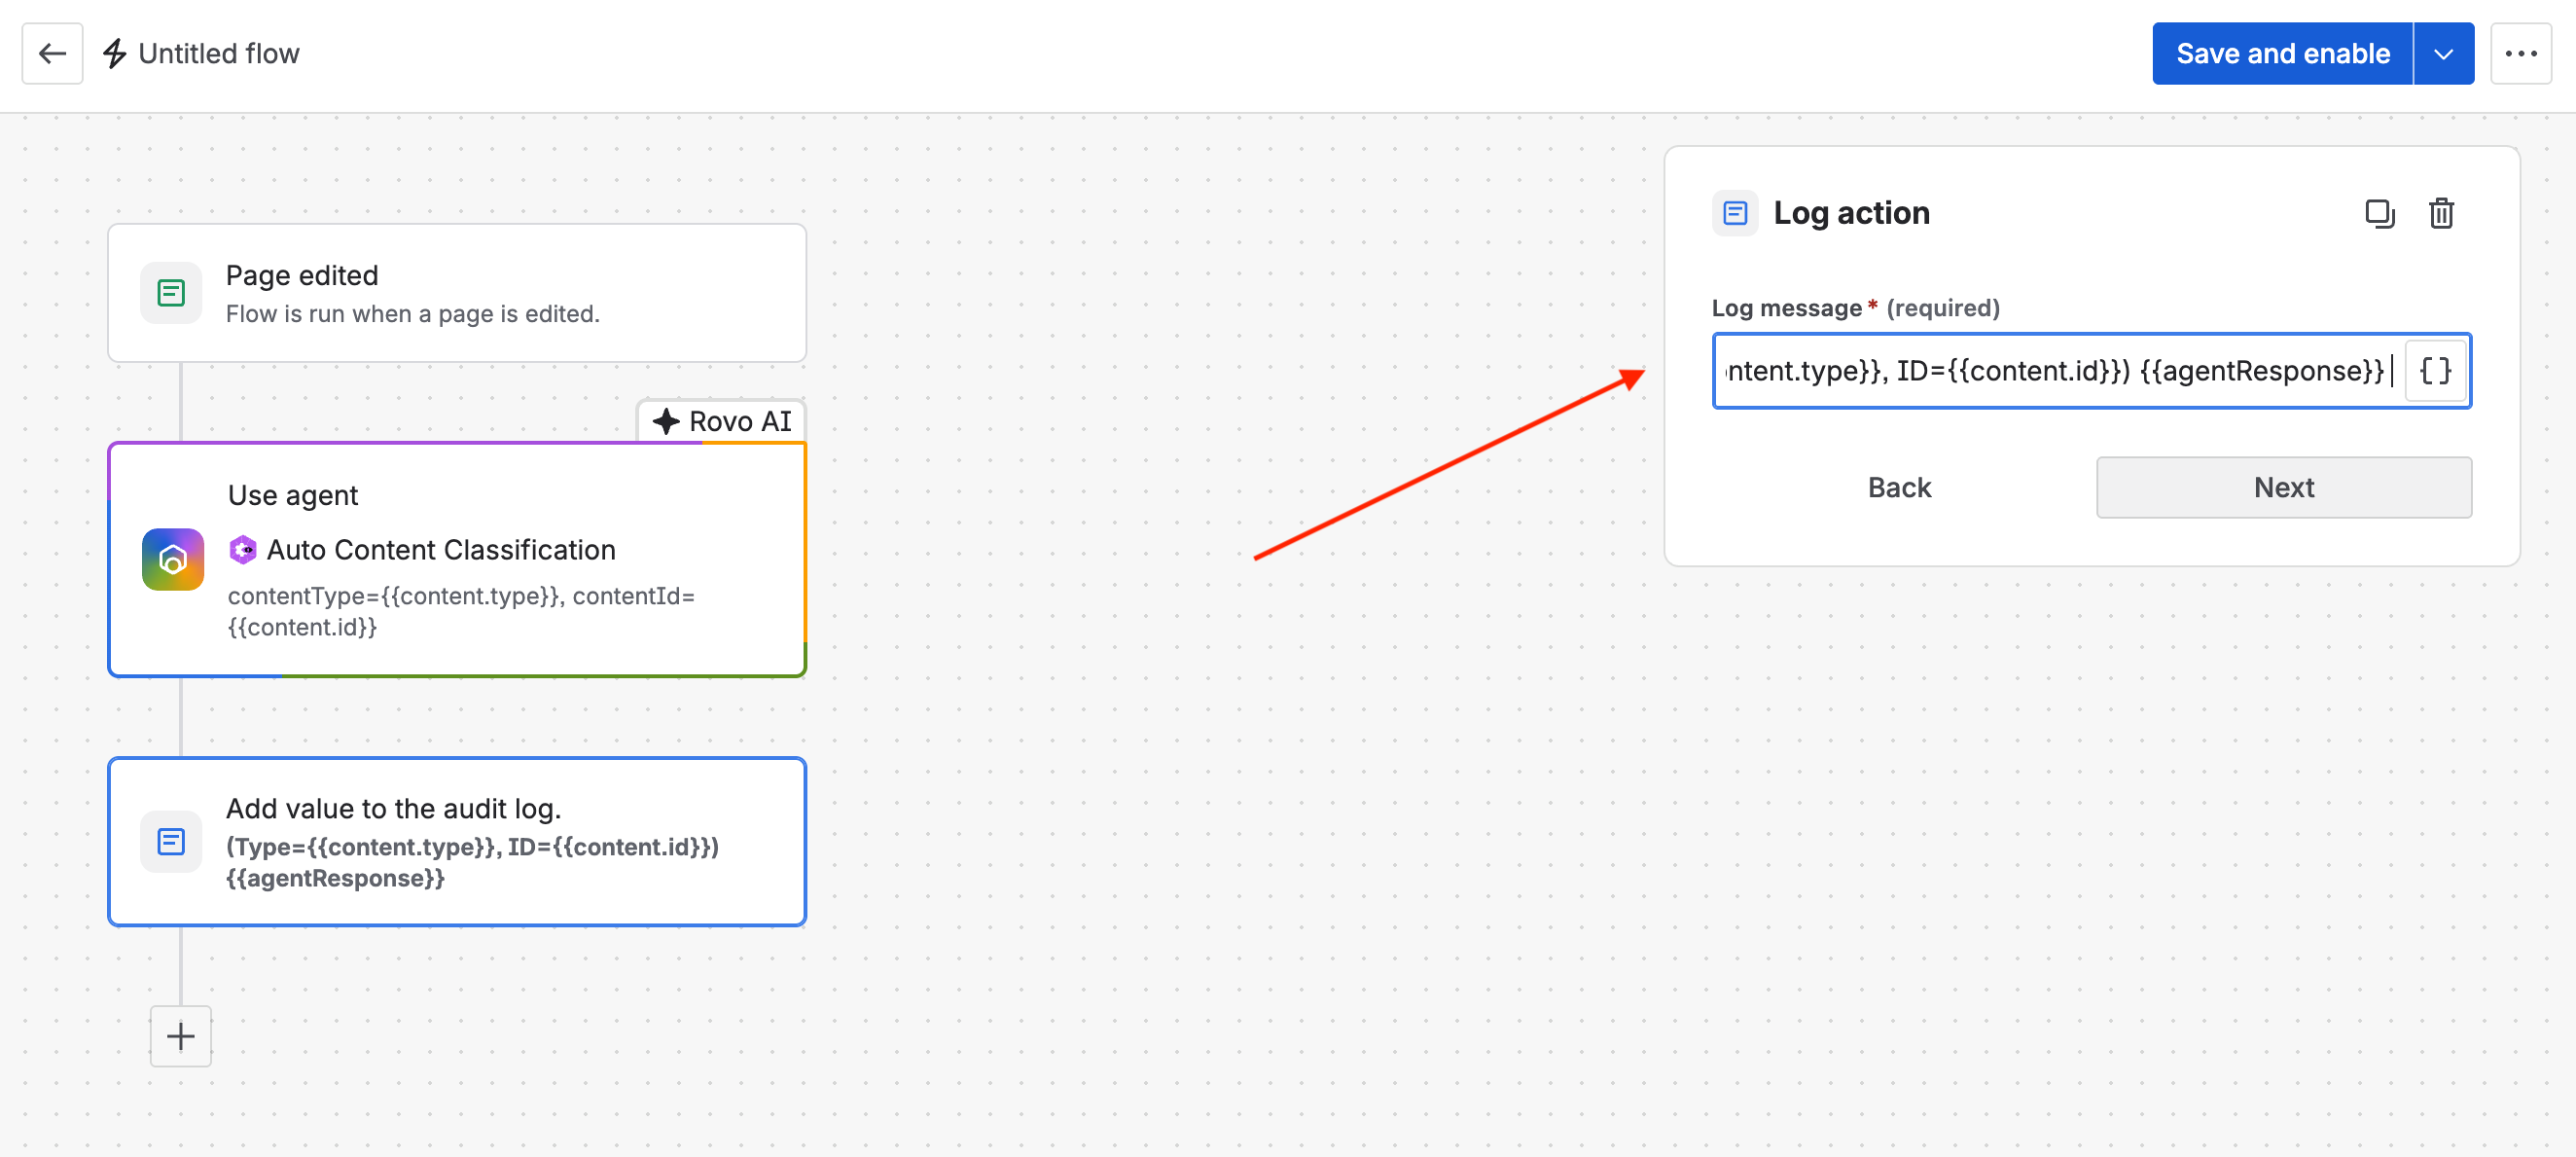
Configure Log action to record content identifiers and
{{agentResponse}} -
Click Save and enable, set the flow name, then click Turn on flow.

Save and enable the flow after configuring trigger and actions
Validate and Troubleshoot
To verify that automated classification is working correctly and maintain traceability, review both logs: the Confluence Automation audit log for run execution, and the Content Retention Manager Audit Log for classification outcomes.
In Confluence Settings → Automation → Audit log, confirm runs complete successfully and review step details for Page edited, Use agent, and Log action. This log shows each run trigger, execution status, and agent output.
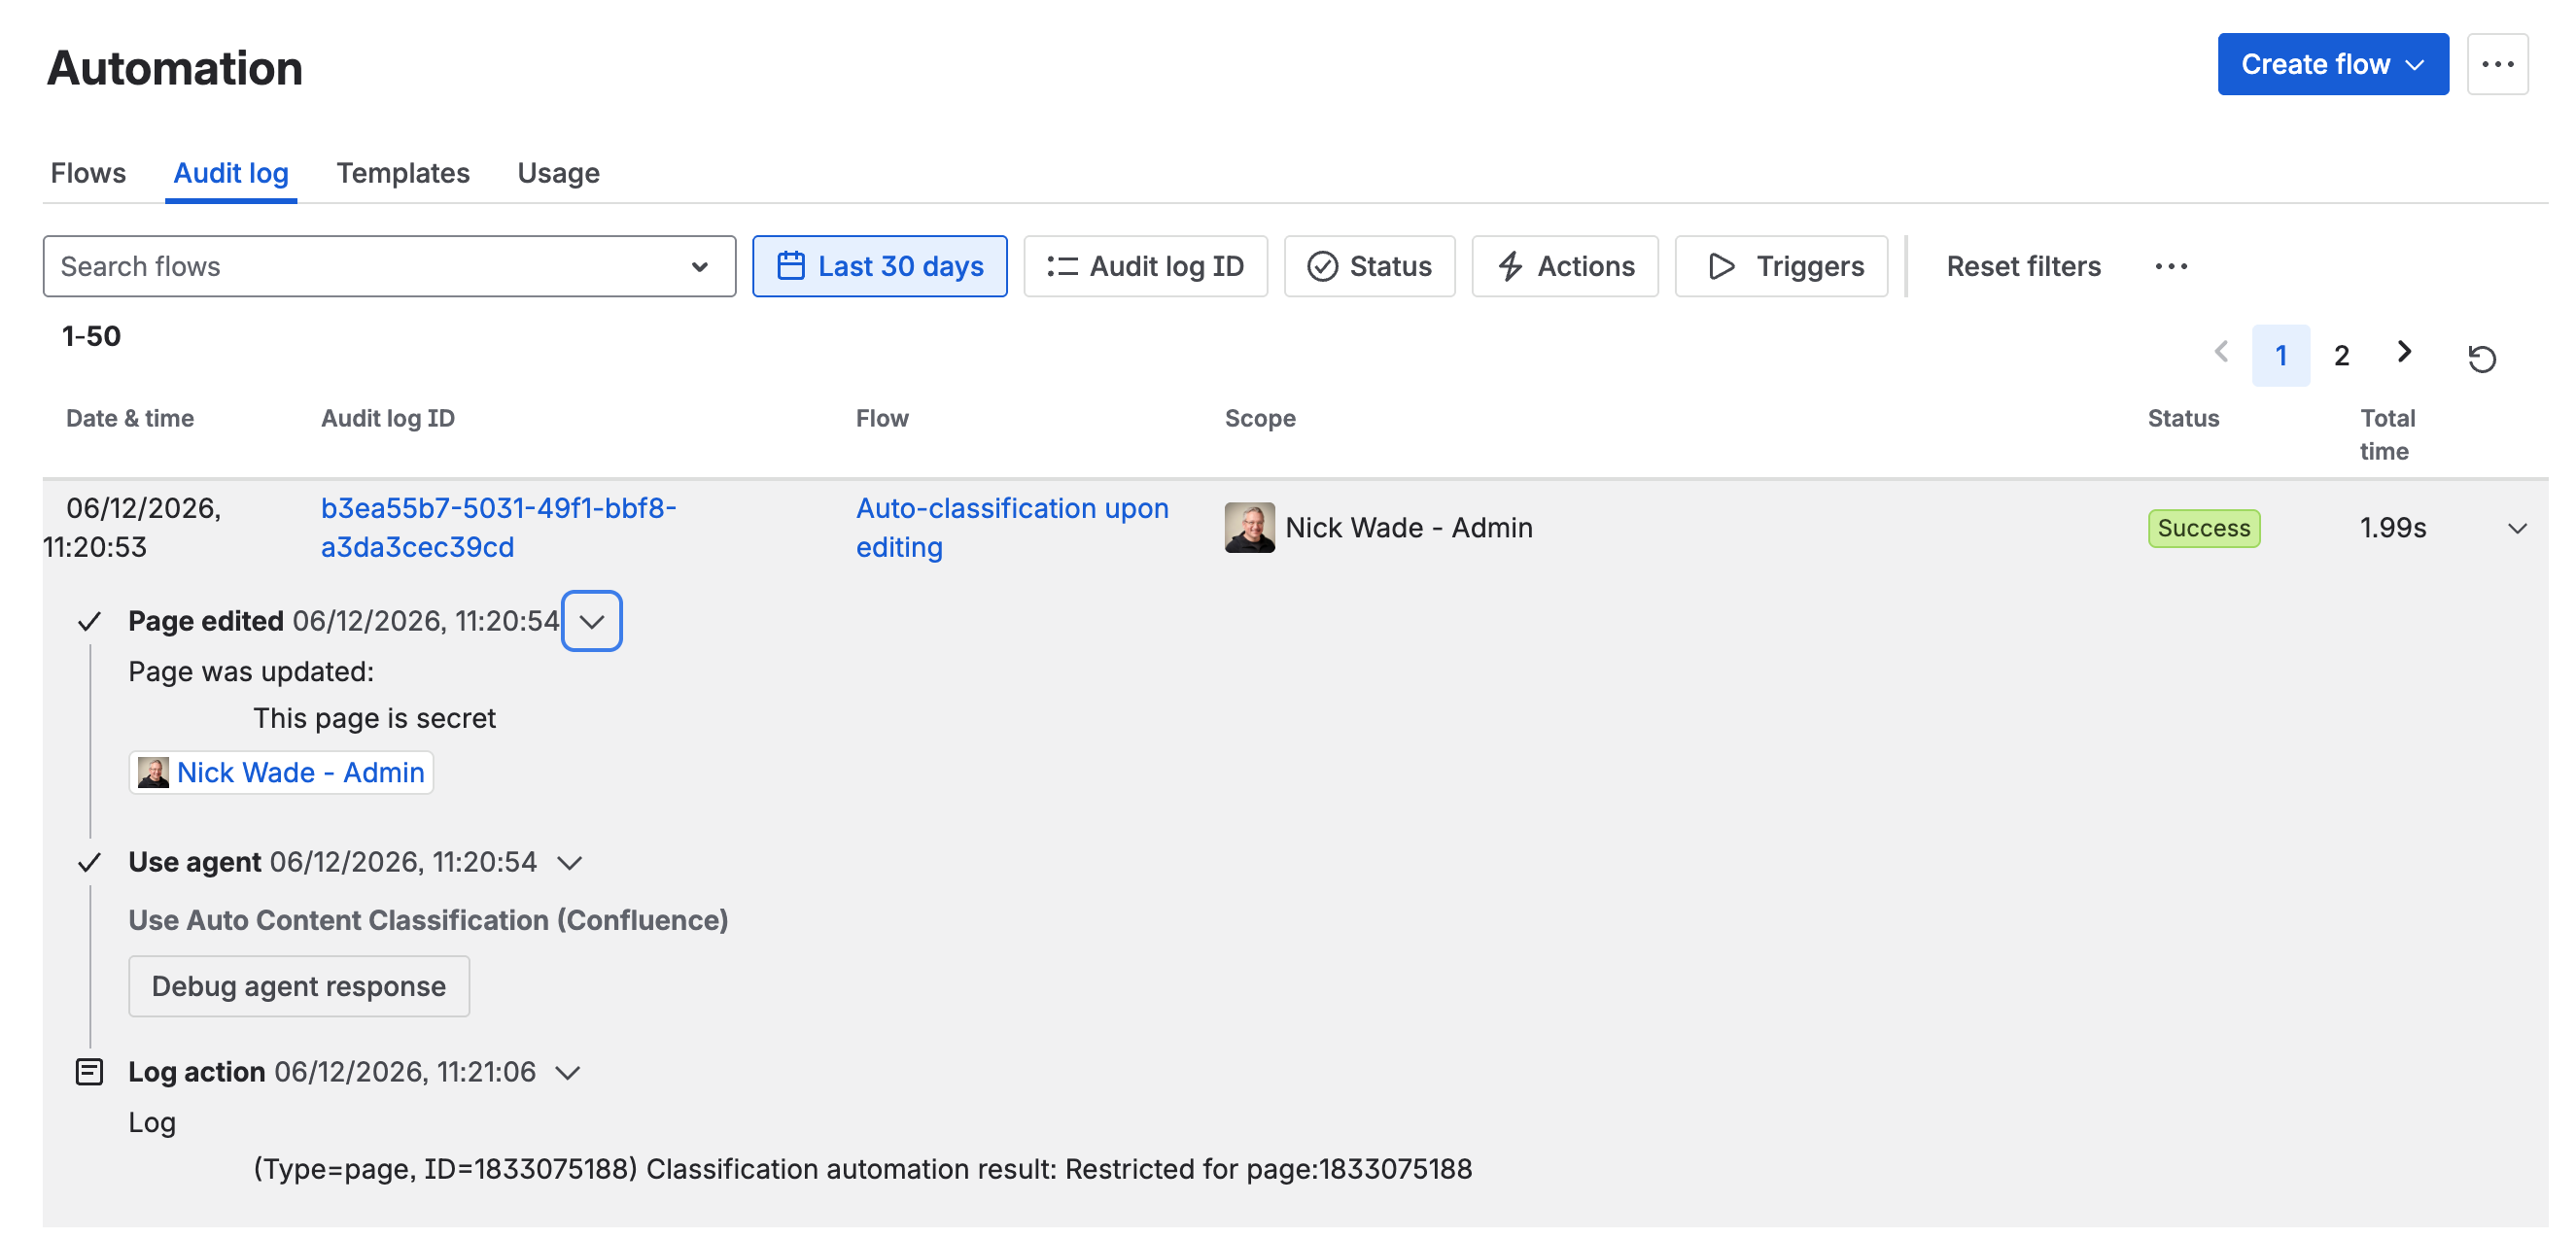
Automation audit log showing successful execution and step level details
In Content Retention Manager, open the Audit Log tab and filter by the page ID to verify classification updates are recorded. This log shows AI-triggered classification updates from AI Agent, including assigned level and timestamp. It also shows manual user confirmations from the byline. Together, these logs provide end-to-end traceability from run execution to classification outcome.
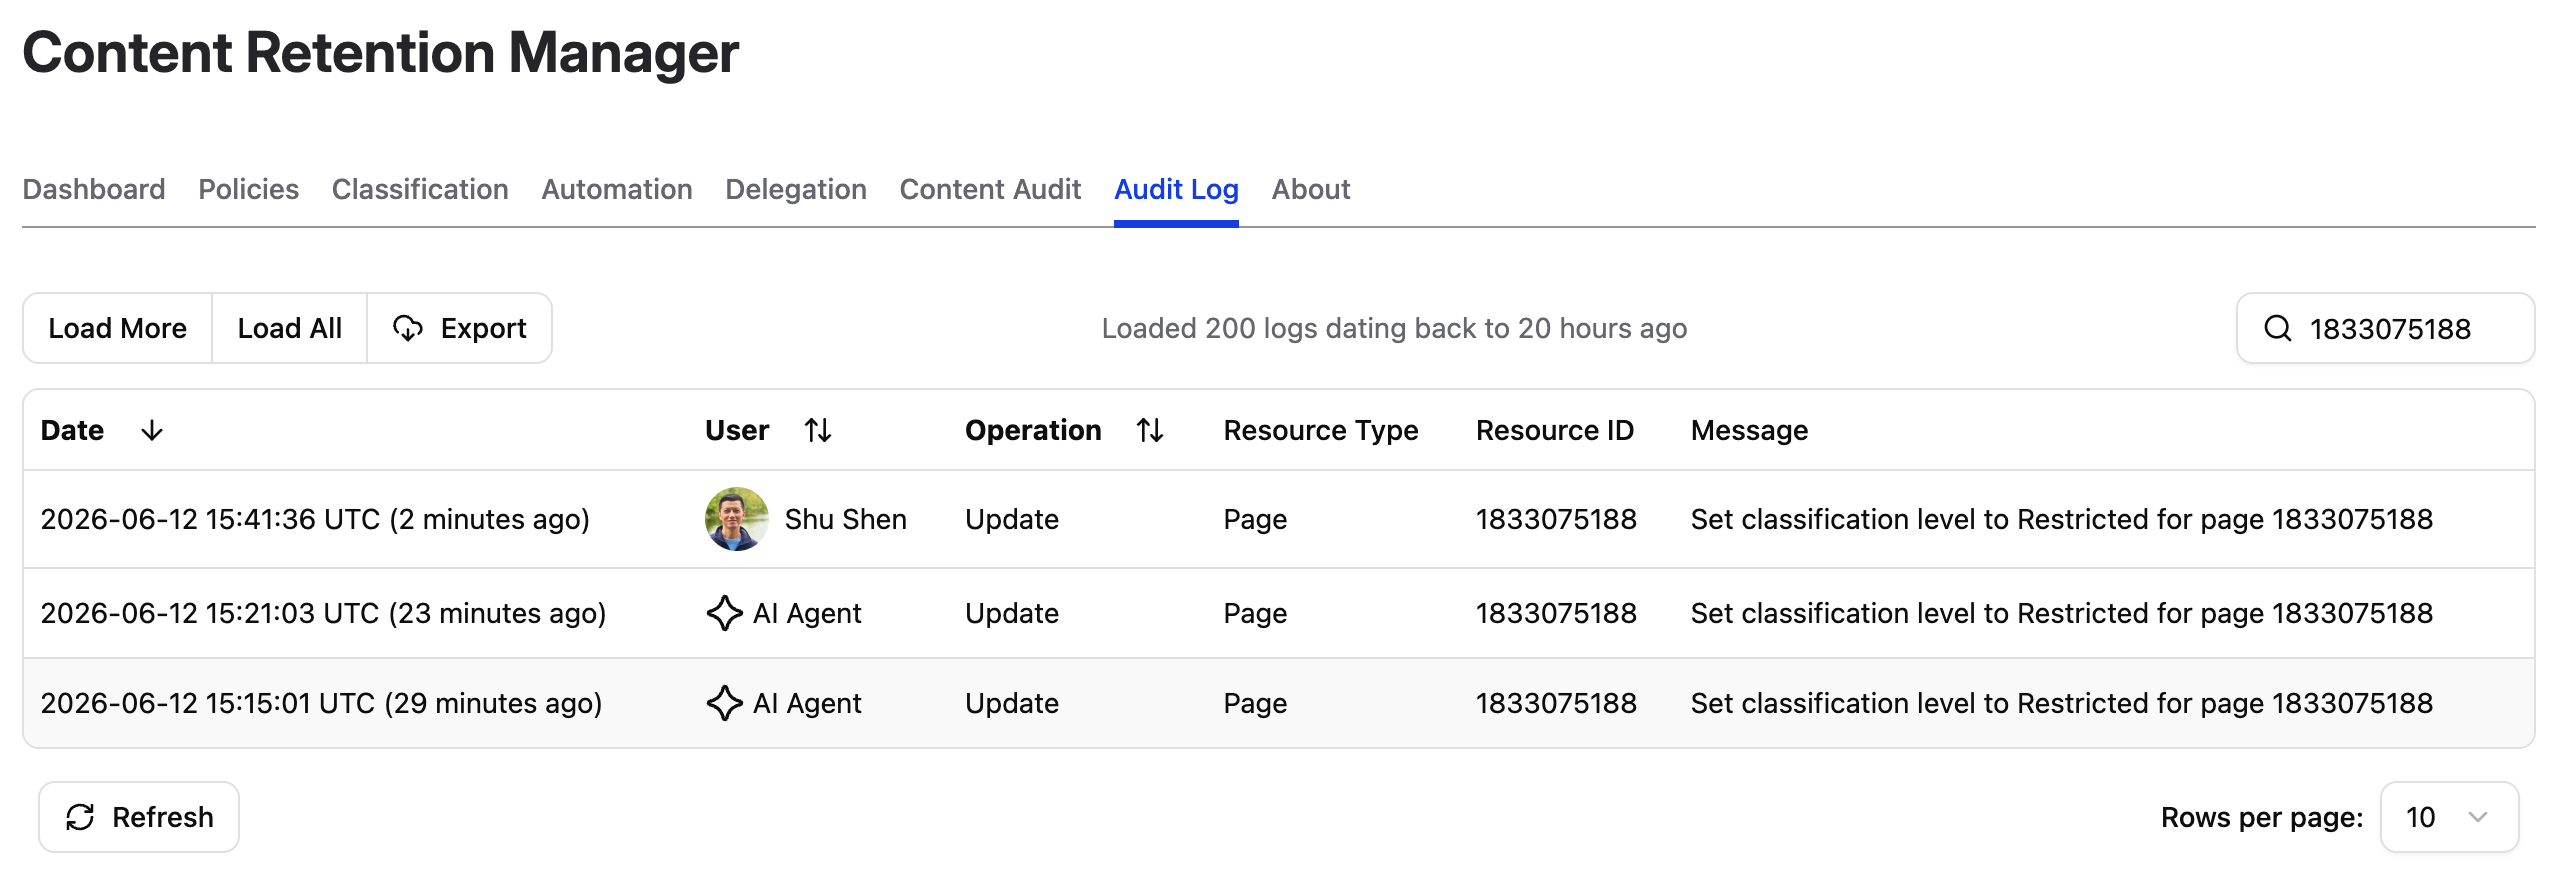
Content Retention Manager audit log showing AI Agent updates and user confirmation updates
Restricted Pages
Confluence content restrictions allow users to limit who can view or edit individual pages, independently of space permissions. For automation and dashboard statistics, Content Retention Manager acts as a dedicated user account (the app user) provisioned when the app is installed. Content restrictions apply to this account like any other user, so restricted pages are excluded from automation and dashboard statistics unless the app user has been granted Can view access.
To include restricted pages in Automation and Dashboard statistics, manually grant the app user Can view access to each page. Once access is granted, the page will appear in Dashboard statistics and be subject to Automation on its next scheduled scan. Restricted pages appear in the Content Audit only for users who have been granted access in the page's restrictions.
Finding Restricted Pages
Restricted pages do not appear in Confluence's search UI, even when your admin key is active. To locate them, you have two options:
- Navigate directly by URL: if you know the page URL, navigate to it directly. As a Confluence admin on Premium or Enterprise, your admin key lets you view a restricted page without being listed in its restrictions. When you navigate to a page you don't have access to, Confluence shows a prompt. Click View now to activate your admin key. A yellow banner at the top of the page confirms it is active.
- Use the Confluence REST API: while your admin key is active, the Confluence REST API returns restricted pages in search results when you include the
Atl-Confluence-With-Admin-Key: truerequest header.
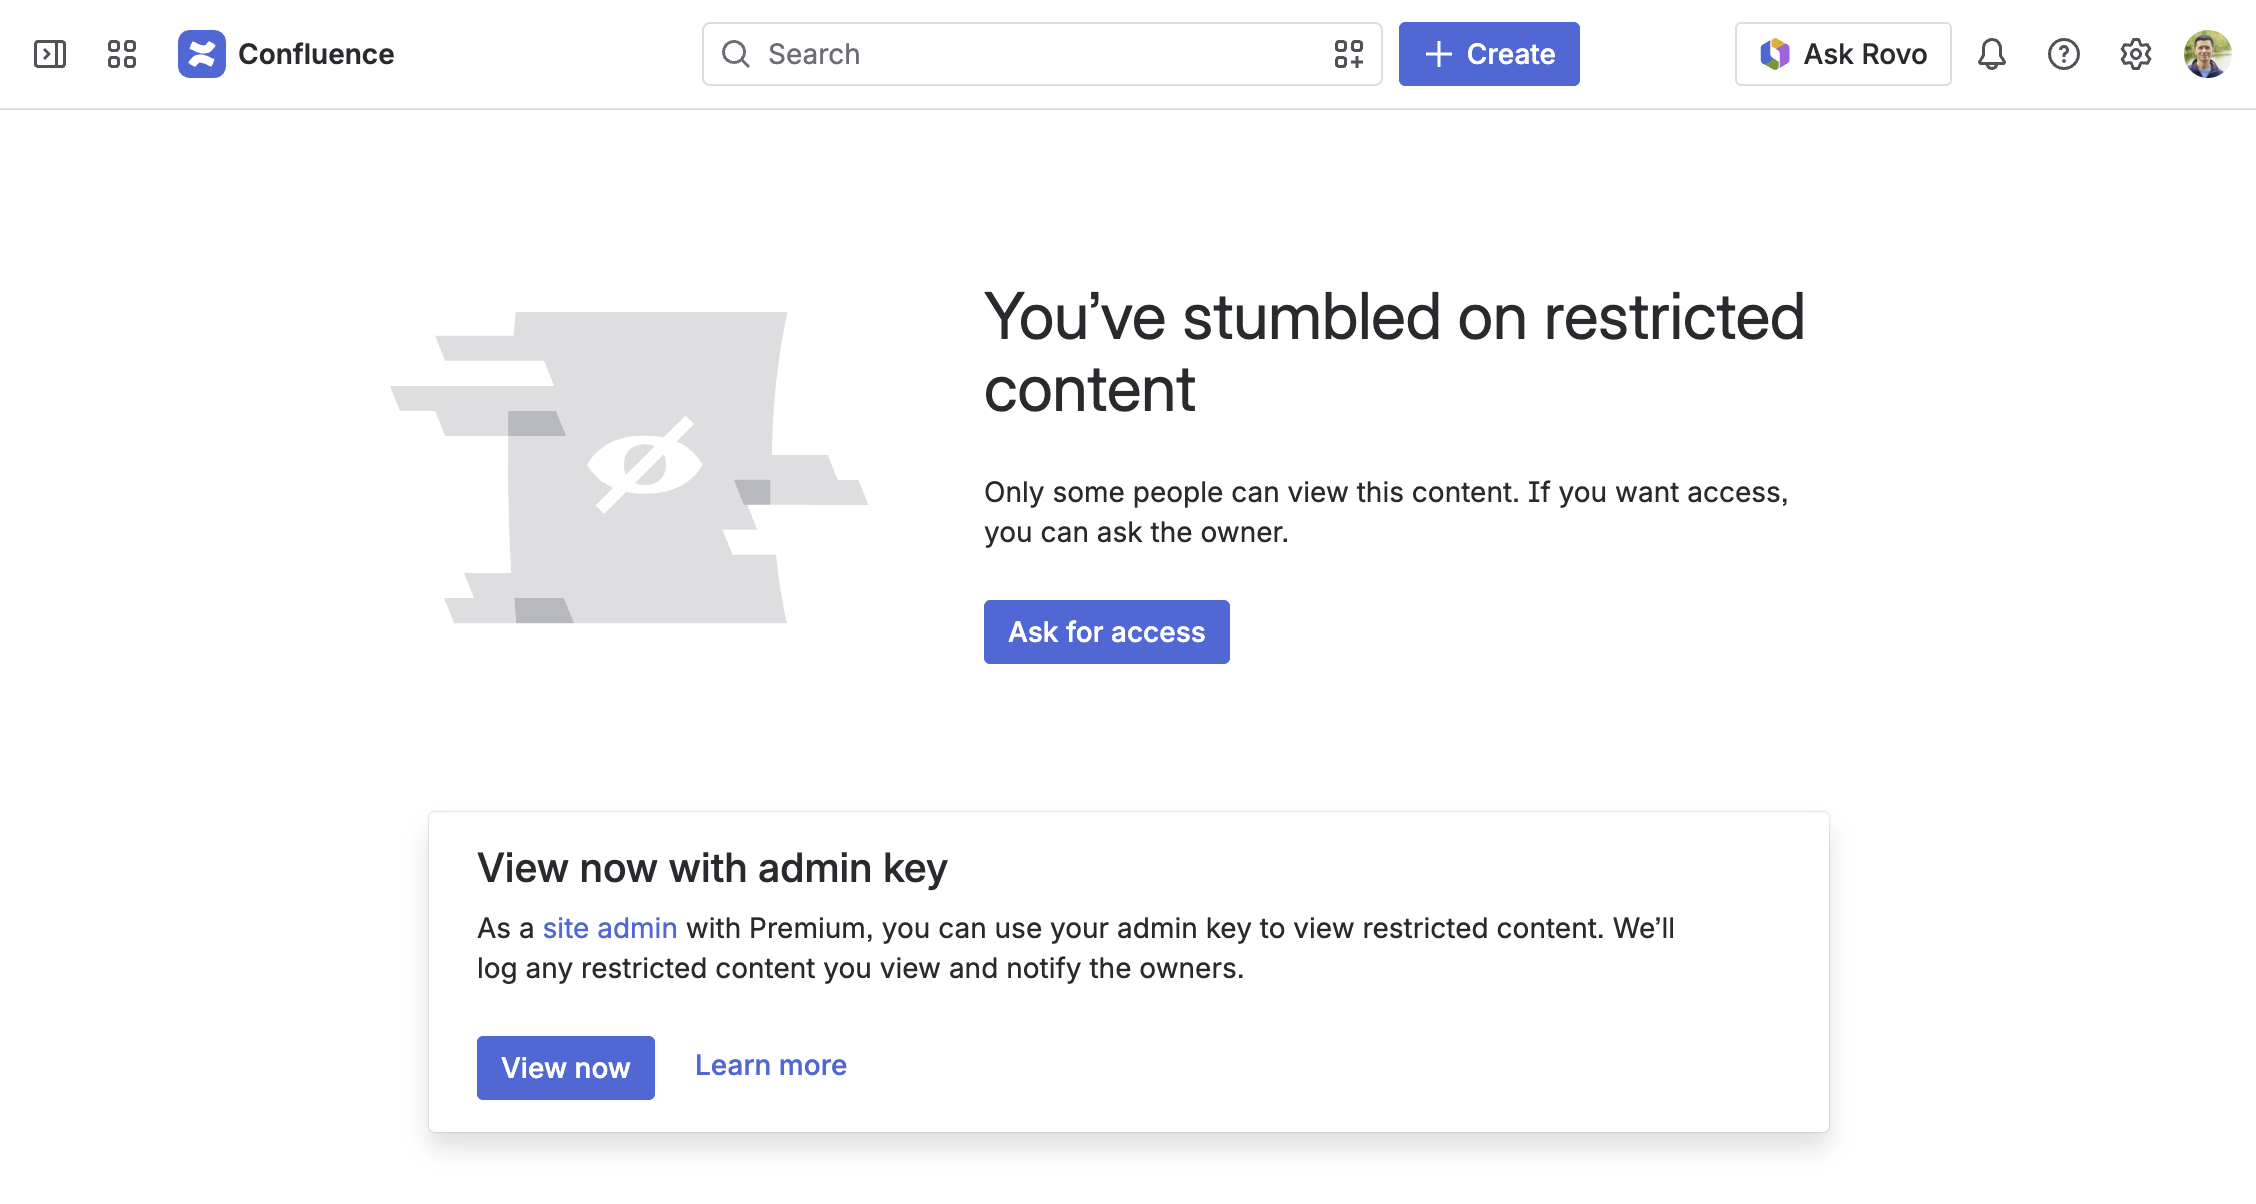
Confluence prompts a site admin to use their admin key to view a restricted page
Adding the App User
With the restricted page open, click the Share button on the page toolbar.
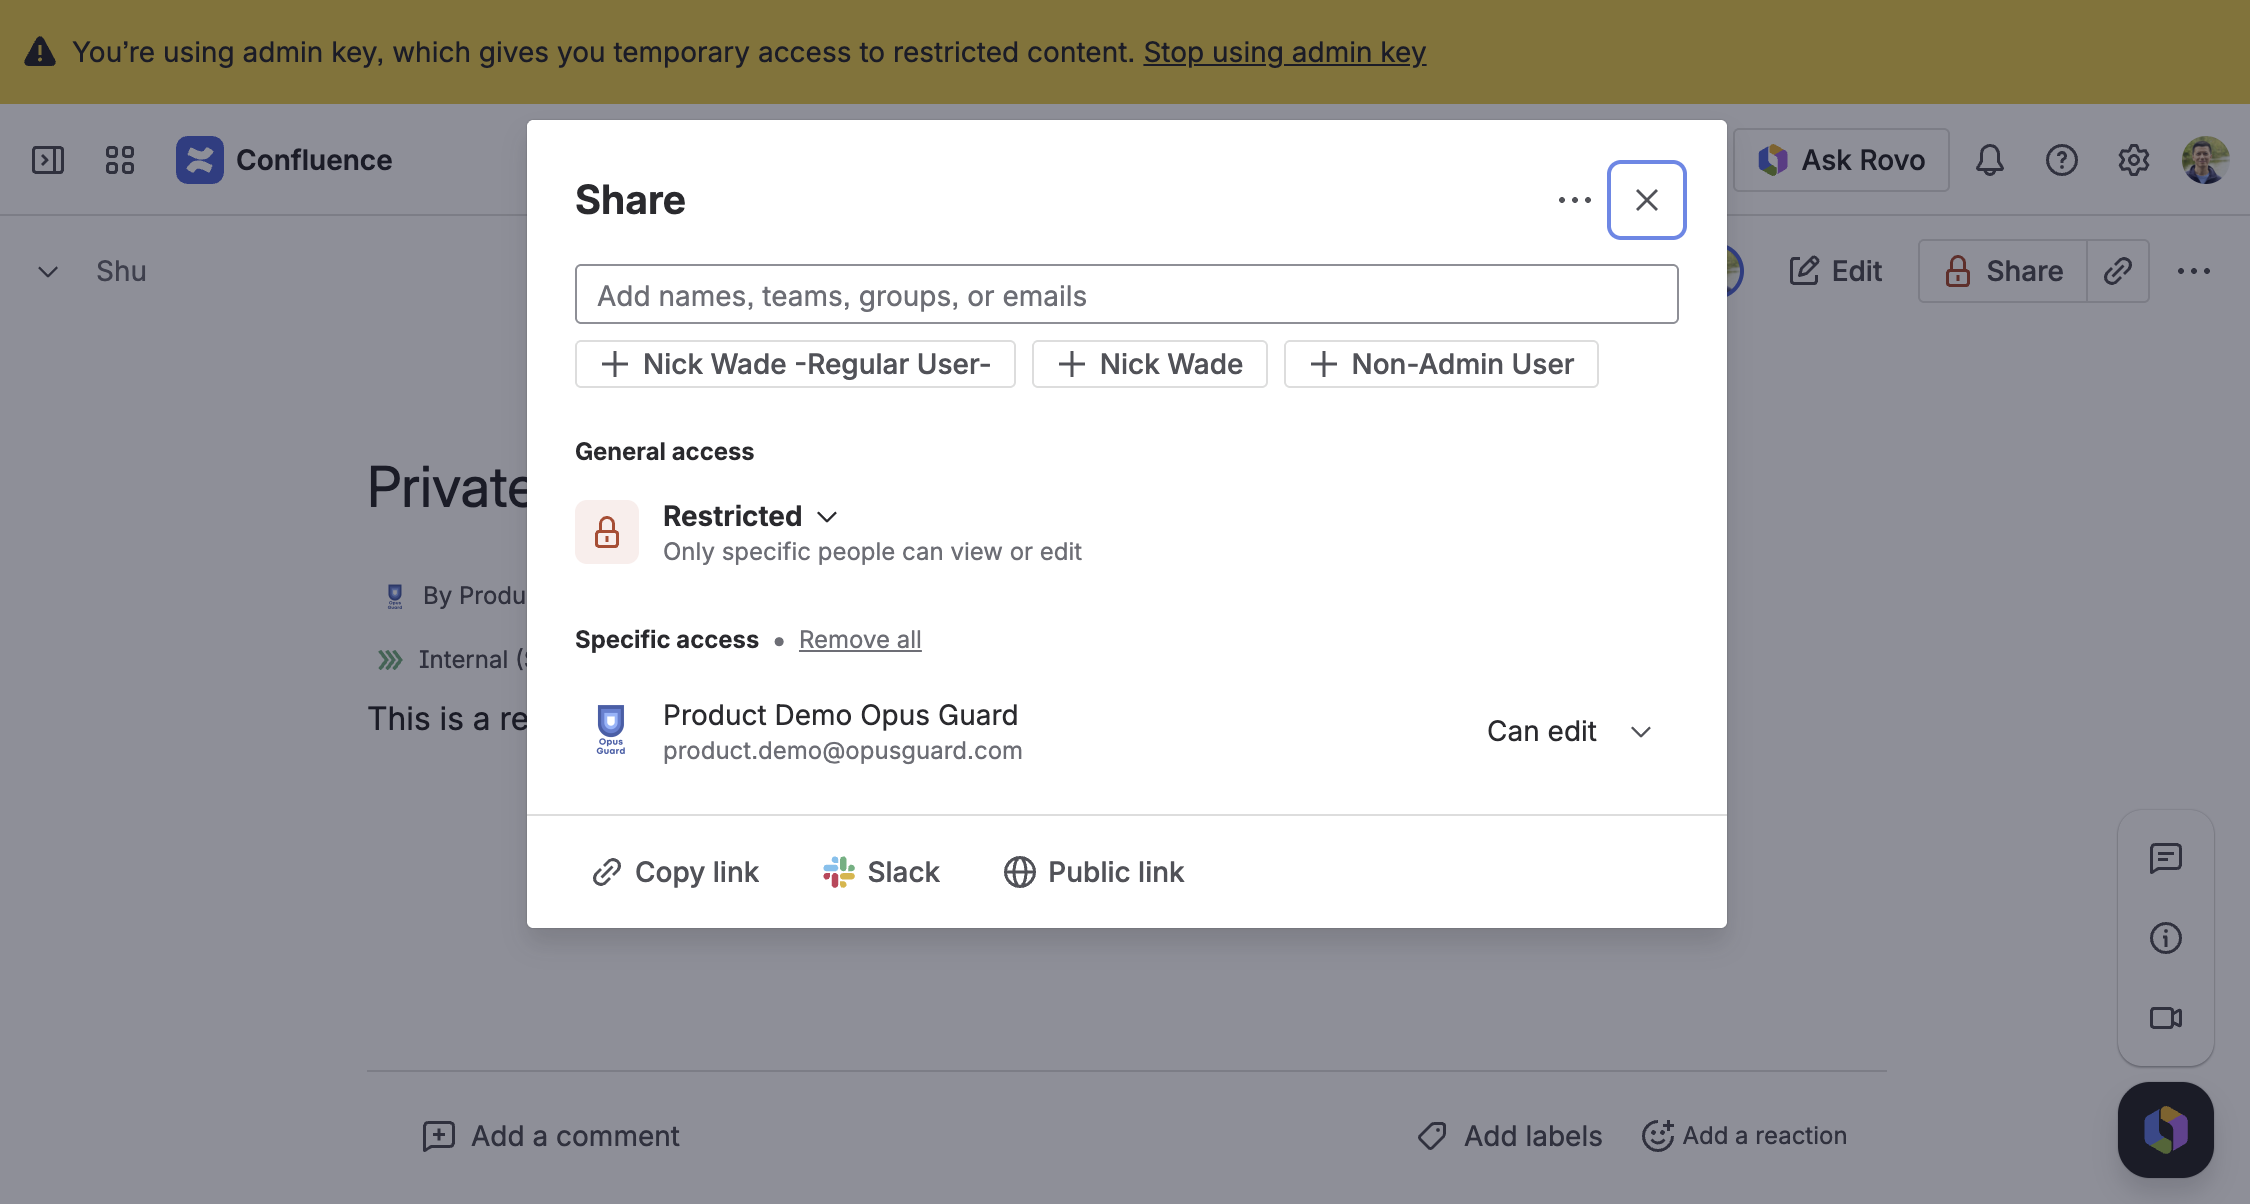
The Share dialog on a restricted page, showing Restricted general access
In the Share dialog, type Content Retention Manager in the search field, select Content Retention Manager for Confluence (Standard) or Content Retention Manager Lite for Confluence (Lite) from the results, set the permission to Can view, and click Save.
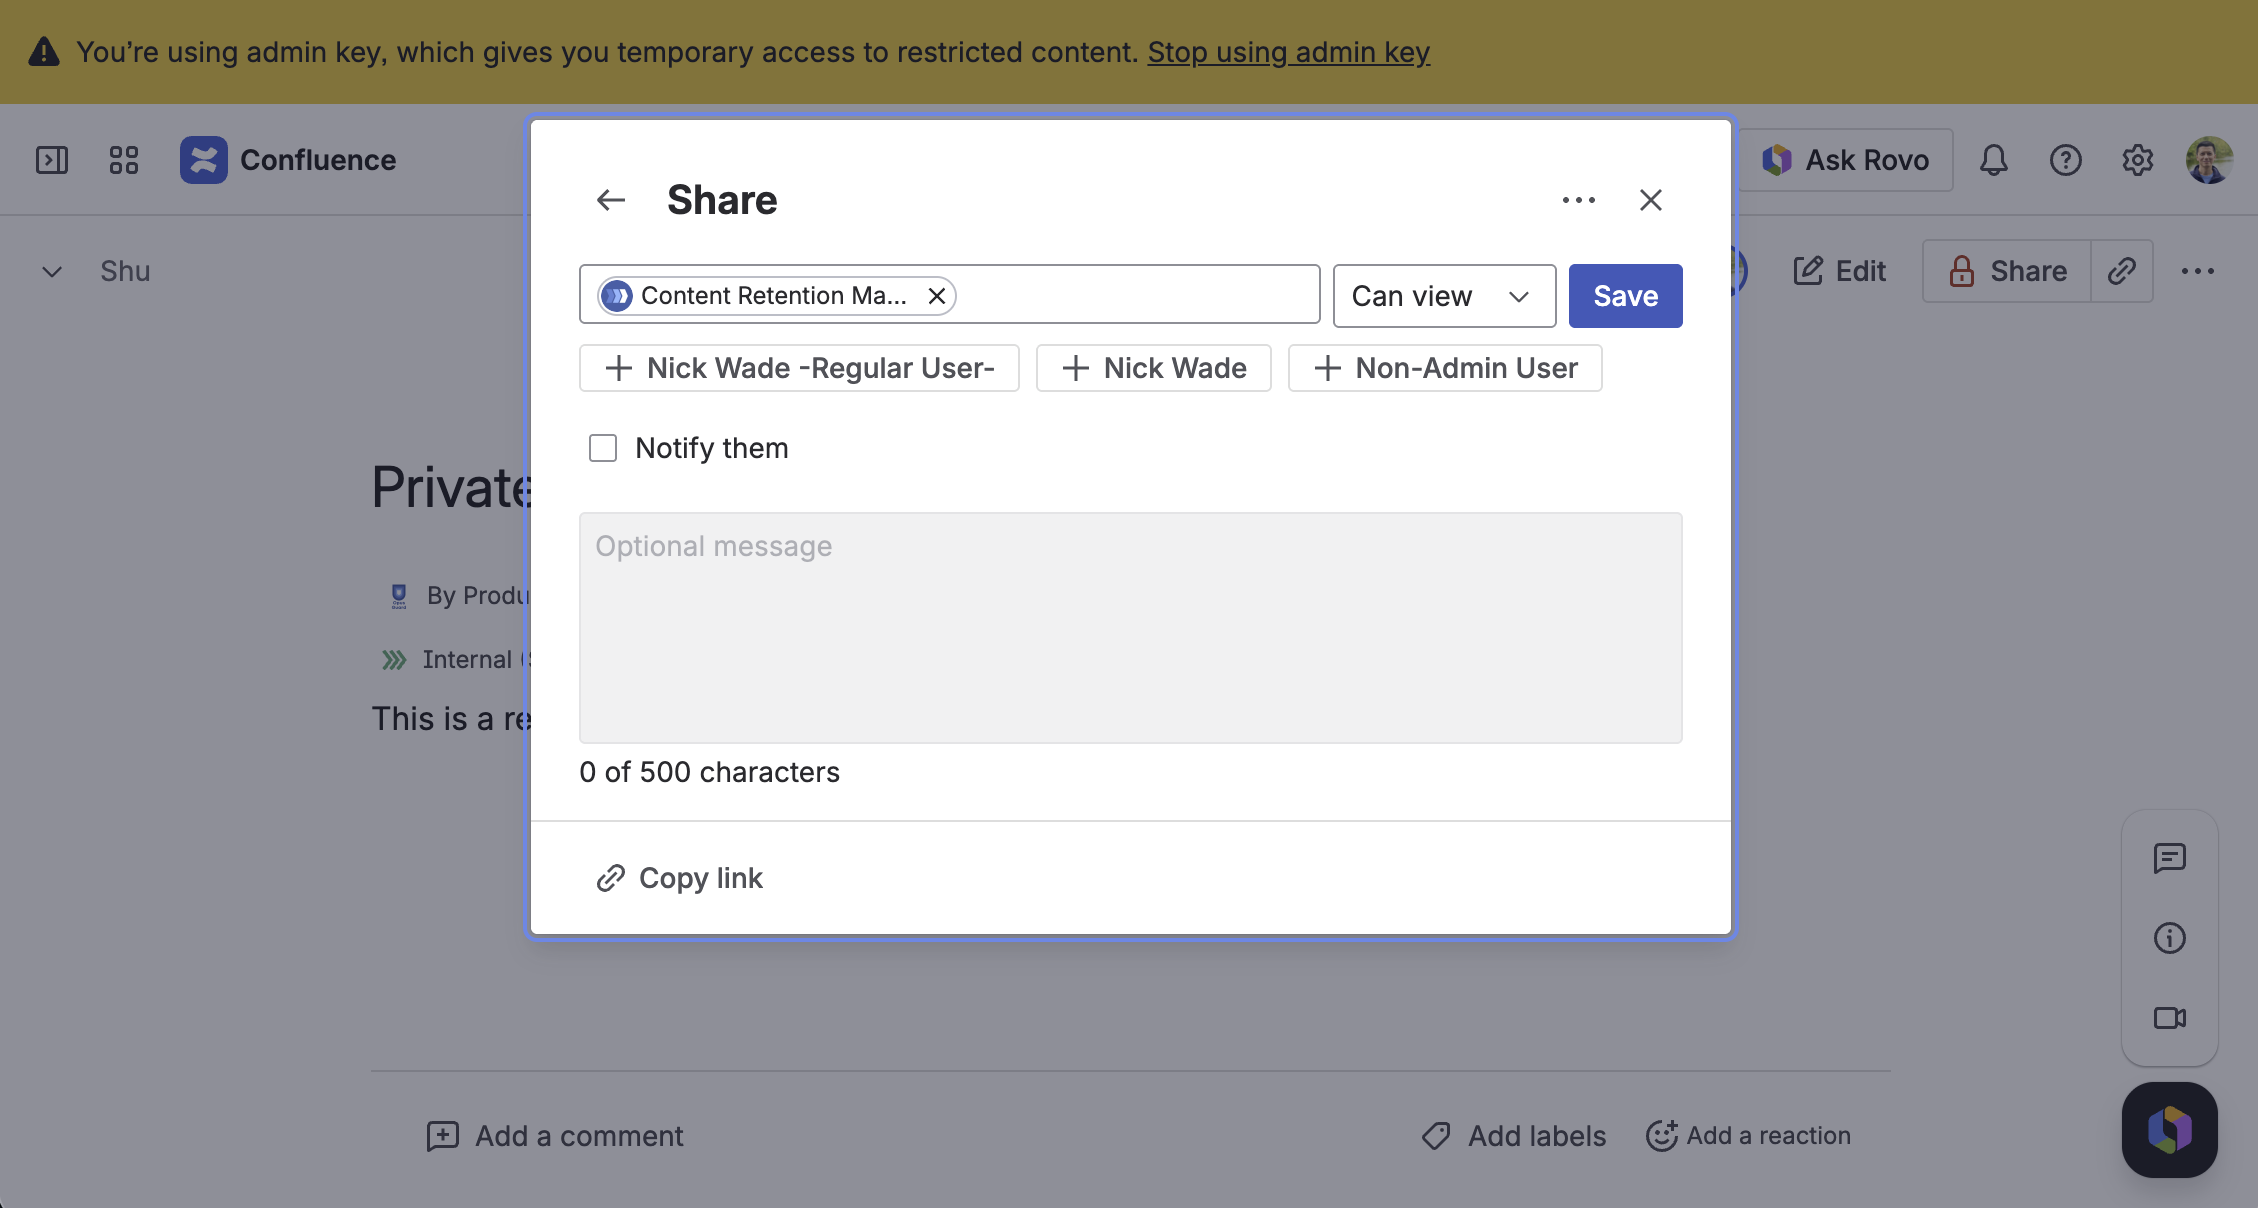
Adding Content Retention Manager for Confluence with Can view access
Known Confluence issue
After clicking Save, Confluence may show a spinner rather than confirming the change. This is a known issue when an admin adds a user other than themselves to a restricted page. The app user is added successfully despite the spinner.
Reload the page and reopen the Share dialog to confirm:
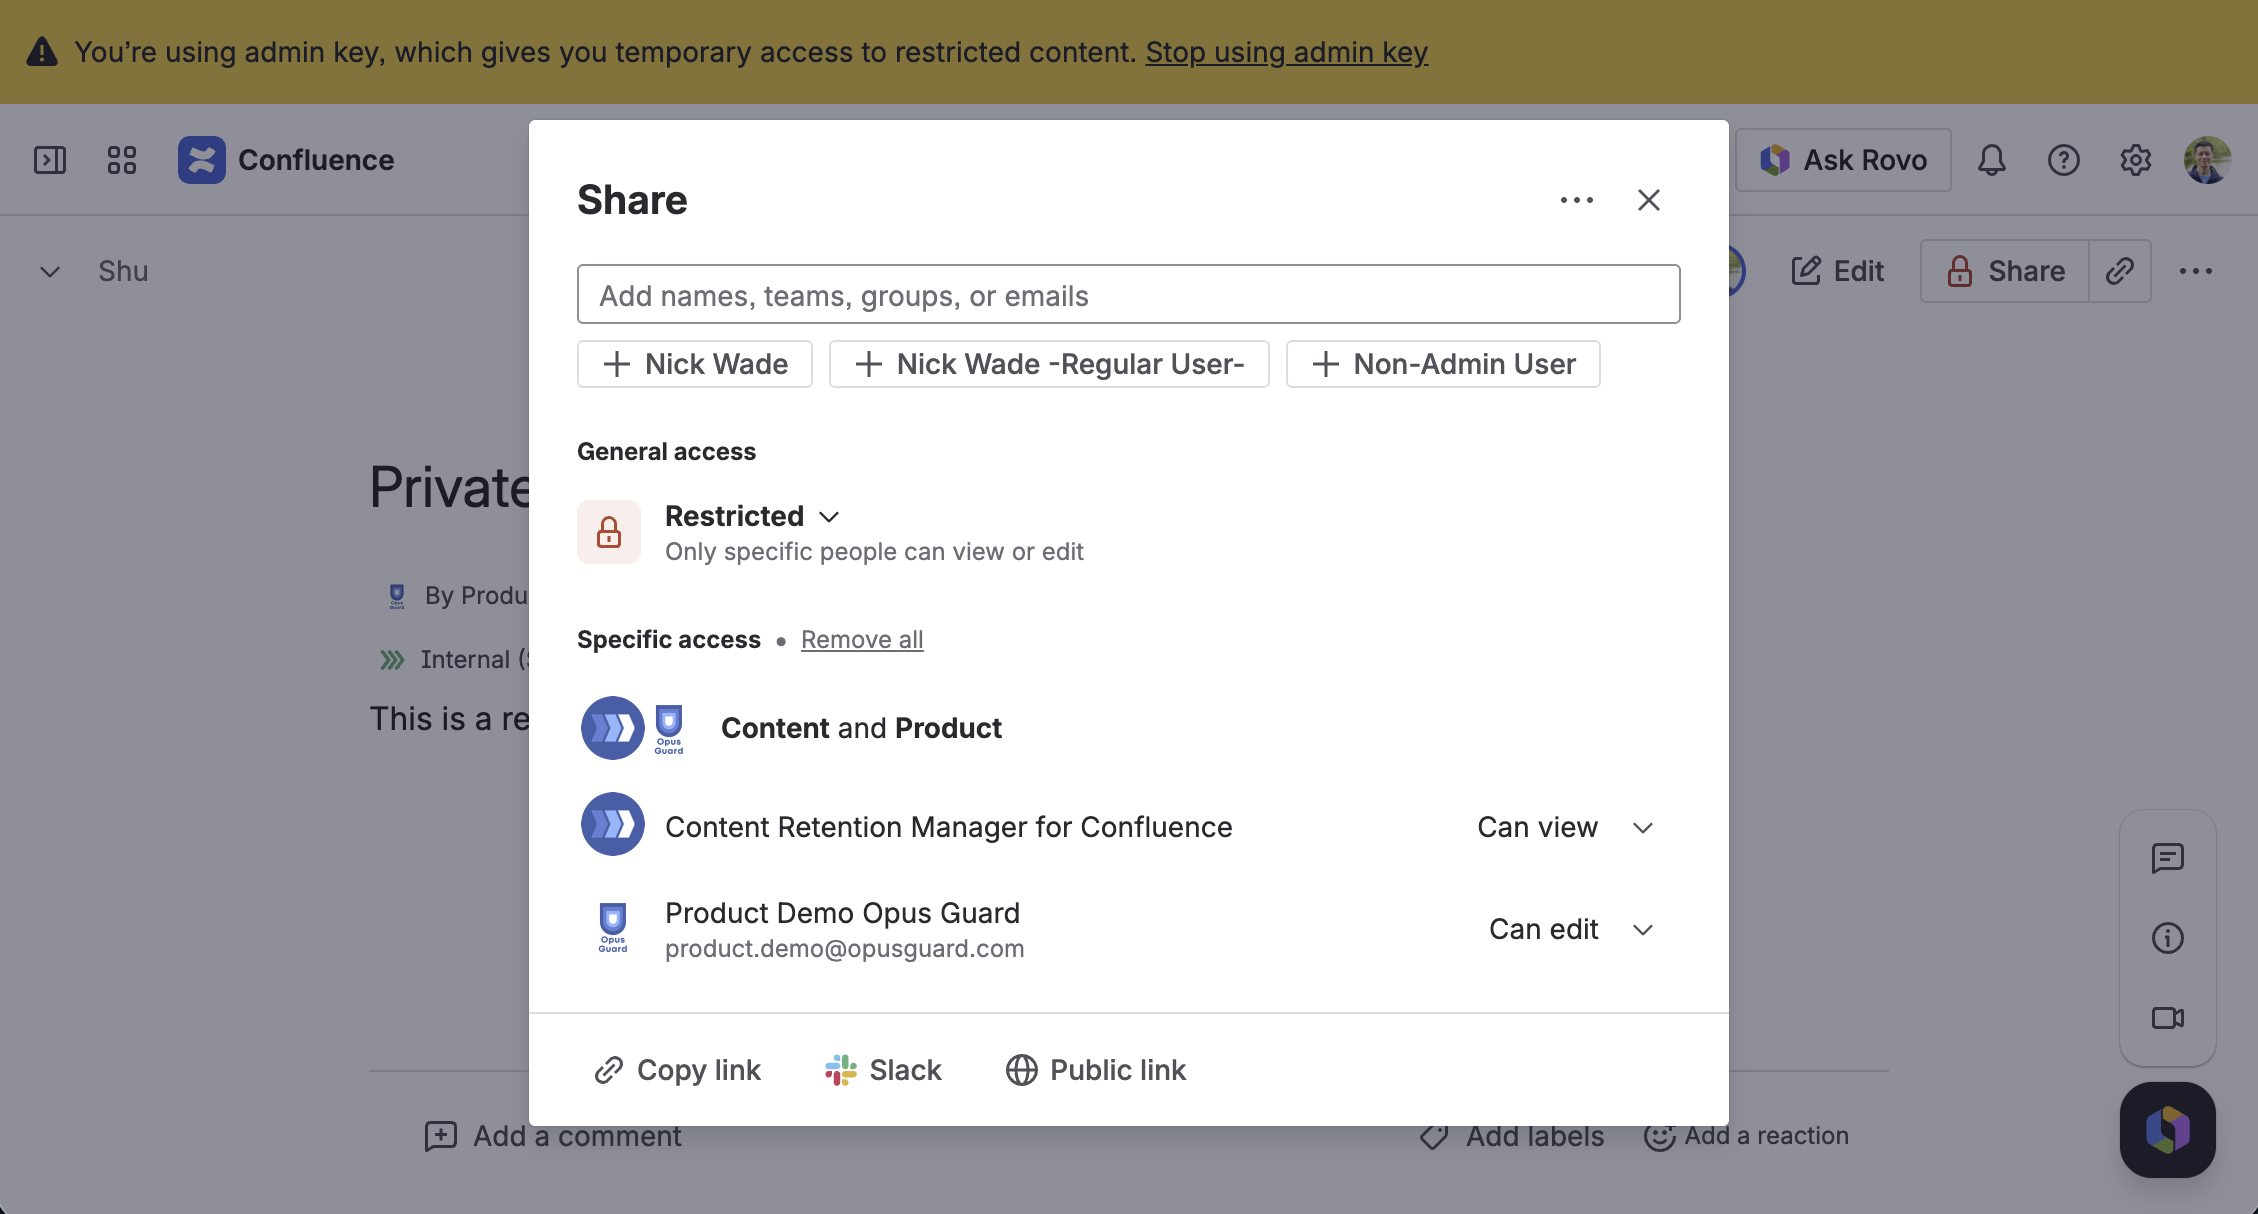
The Share dialog after the app user has been added, as seen by the admin
Visibility of the Change
Anyone with access to the page can see the change. When they open the Share dialog, Content Retention Manager for Confluence appears listed with Can view.
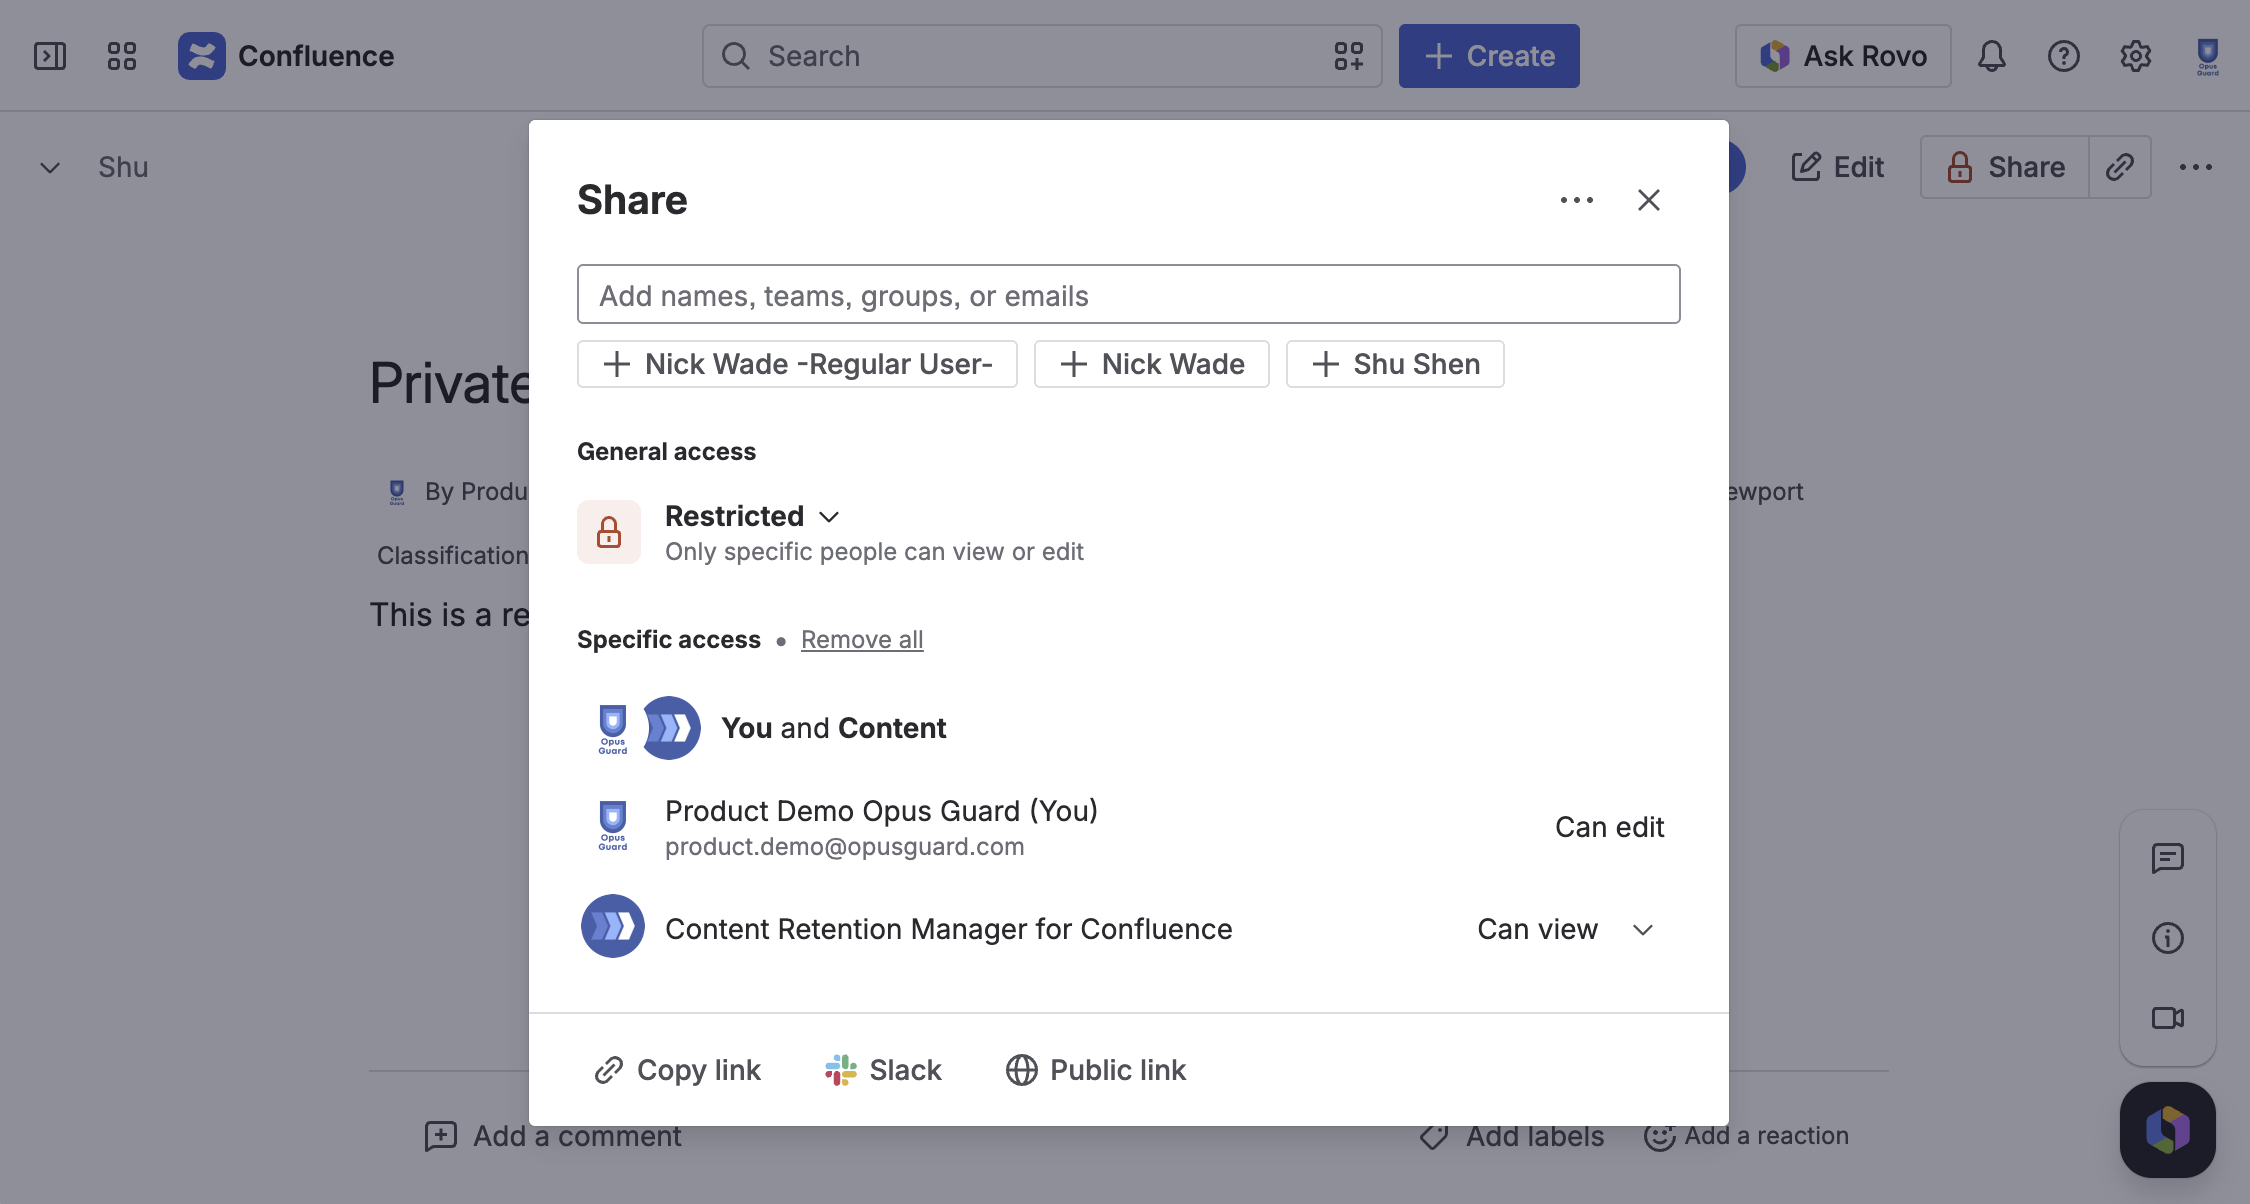
The Share dialog as seen by the page owner. The app user is visible to all who have access to the page.
Delegation
This feature is not available in Lite edition of the app.
Delegation allows you to share Content Retention Manager admin access with users who don't hold the Confluence Admin role. Members of delegated groups can create and manage retention policies and classification levels, including policies that govern content they cannot delete in Confluence. Delegate only to trusted users who understand your organization's retention policies.
There are a few key differences between a Confluence admin and a delegated admin:
- Only a Confluence admin can modify delegation settings. A delegated admin can view but cannot change these settings.
- Adding a user as a delegated admin does not alter their Confluence permissions. In the Content Audit tab, a delegated admin can only see content they have read access to in Confluence, and can only use the Purge button on content they could delete in Confluence. However, by modifying policies, classification rules, and definitions, or by enabling automation, a delegated admin can affect the retention and classification of all content on the site, including content they cannot directly access.
To review and modify the delegation, click the Delegation tab.
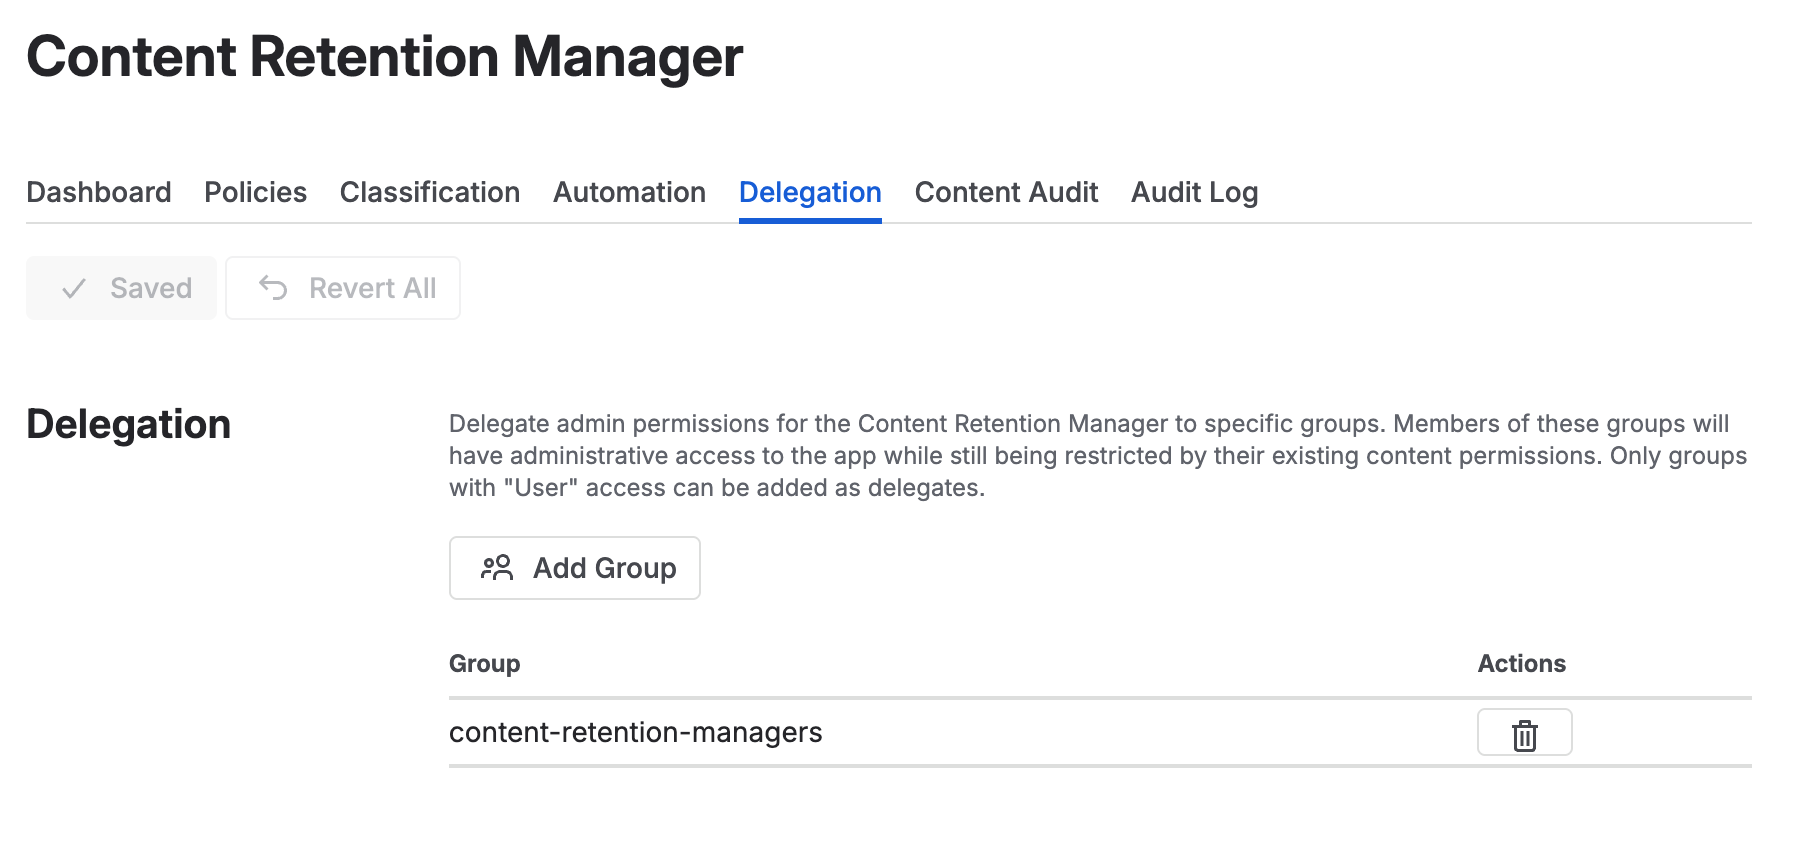
Delegation tab in Content Retention Manager for Confluence
To add groups:
- Click the Add Groups button above the table.
- In the dialog, select the groups to delegate to. Only groups with the User access type (non-admin groups) are shown.
- Acknowledge the warning and click Add Group to confirm.
- Click Save to apply your changes.
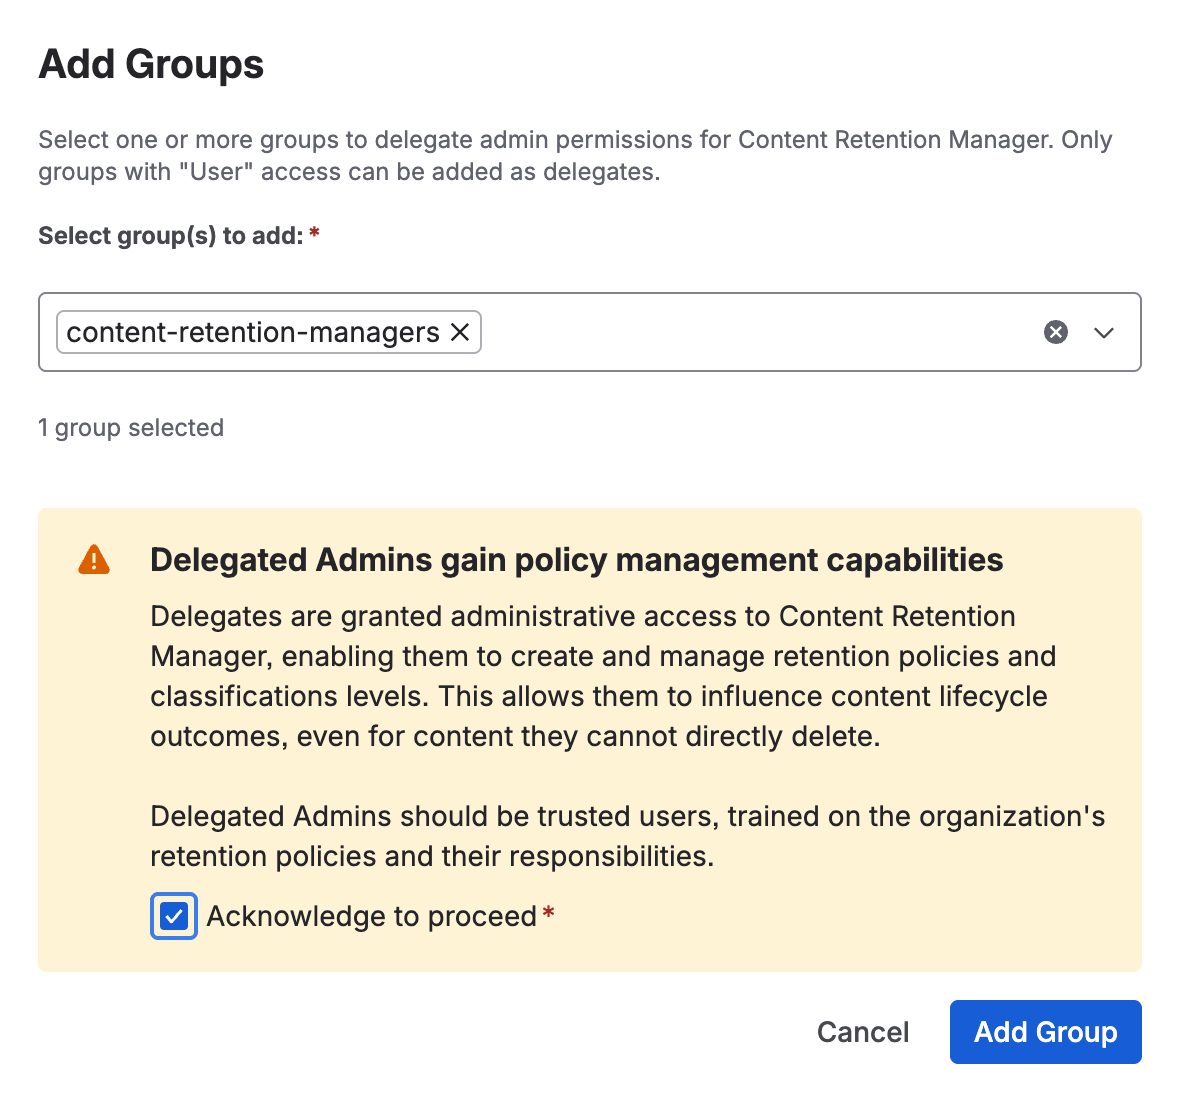
Add groups as admin delegates in Content Retention Manager
Audit Log
The audit log is a permanent record showing who set or updated a policy, defined an extension, or archived, deleted, or purged content, and when. If a page or blog post is archived, deleted, or purged by automation, it appears in the log. The log records content by ID only, not the content itself.
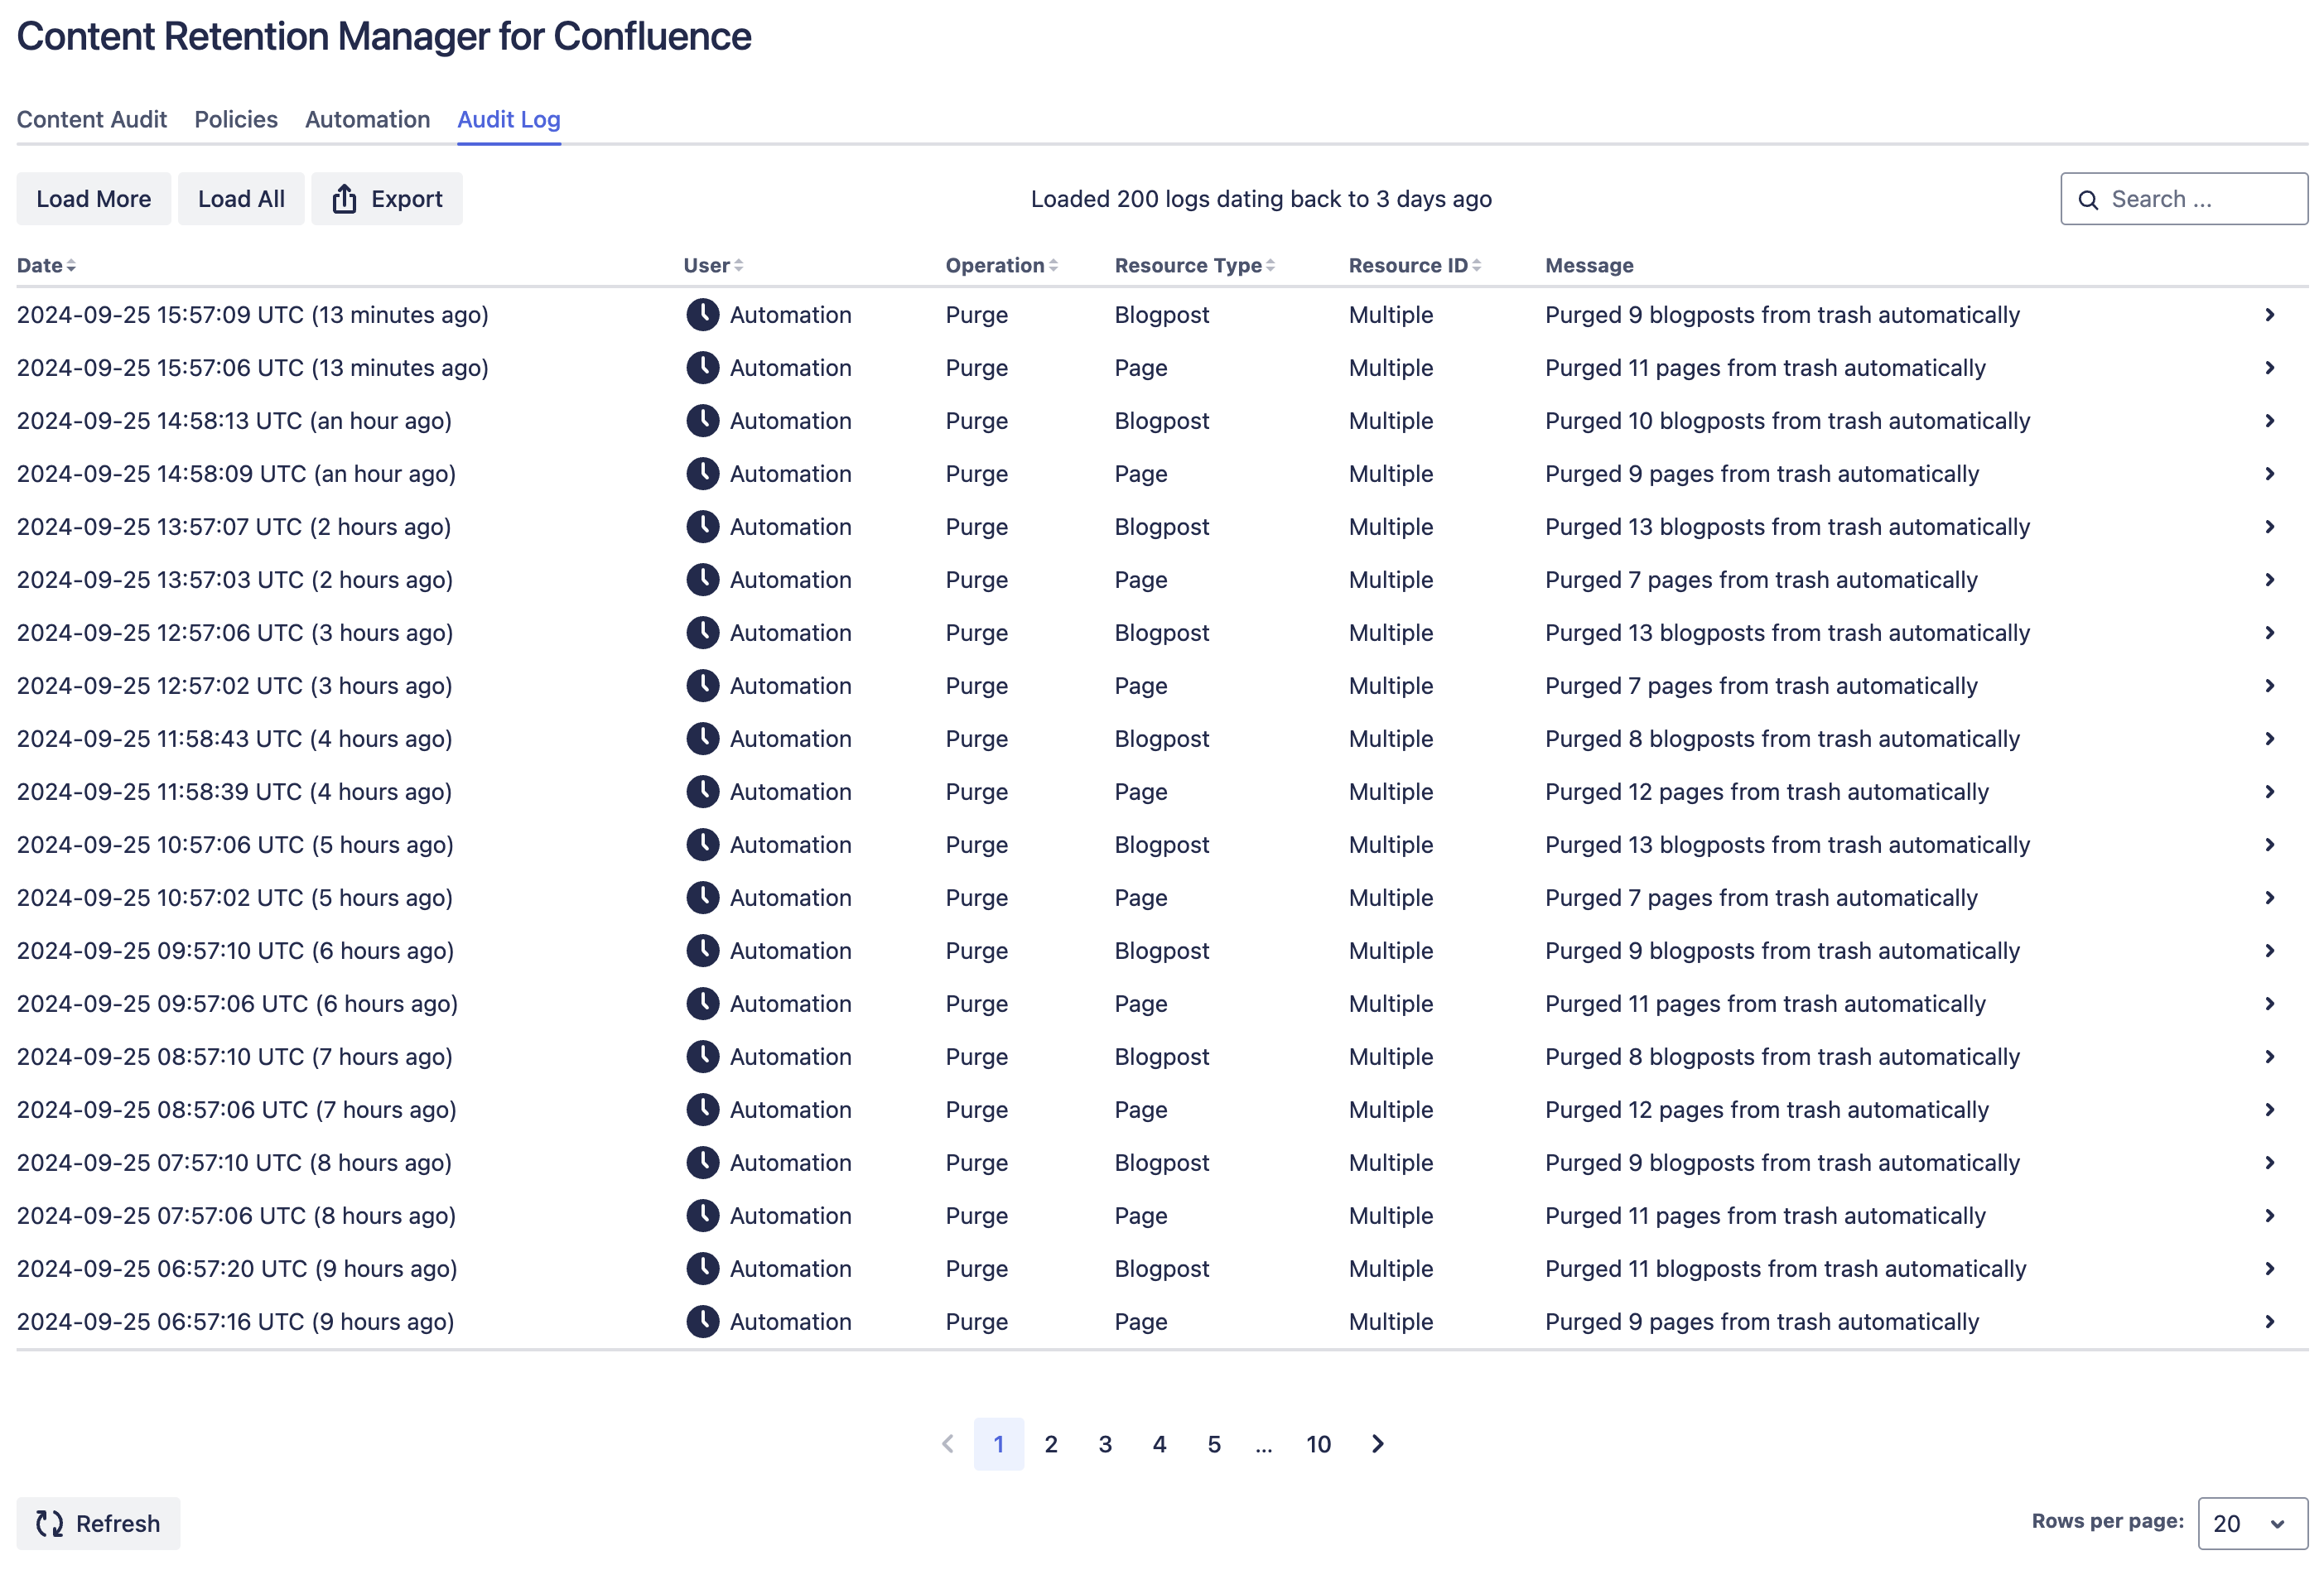
Example Audit Log in Content Retention Manager for Confluence
About
The About tab provides a quick reference for your installed version and links to helpful resources. It displays the app name and version number (e.g., v6.5.0). Use this version number when contacting support so the team can assist you more effectively.

About tab in Content Retention Manager for Confluence
Under Resources, you'll find links to documentation hosted on this site:
- How It Works: Overview of how Content Retention Manager works under the hood.
- Quick Start: Step-by-step guide to get up and running quickly.
- Release Notes: Changelog for all past and current releases.
- Glossary: Definitions of key terms used throughout the documentation.
Under Support, you'll find a link to the Opus Guard Support Portal where you can submit tickets or browse existing knowledge base articles.